Replacing the interior lining
- pjesus
- Rough Carpentry Apprentice
- Posts: 71
- Joined: Thu Nov 05, 2009 1:37 pm
- Boat Name: Jet Lag
- Boat Type: 1982 B-Jet
- Location: Portugal
Replacing the interior lining
Hi.
First of all, I hope I'm not repeating a topic, but I've searched and didn't find what I'm looking for.
The interior on my boat is a white leather-like (don't know the proper name in English, I'm sorry) lining material that has some kind of foam inside.
Well... the foam seems to have died and so the lining is whobbly/hanging in some places.
To be honest, Summer is already here and I'm not gonna waste good sailing days, so I guess I'll have to live with that for now.
Which gives me some months to search for the best way to fix that.
I heard that there is a new lining material that comes already with a harder foam attached. Anyone knows about it?
Would love to hear your ideas, folks.
I can take some pics to show what I'm talking about.
Cheers,
Tiago
- pjesus
- Rough Carpentry Apprentice
- Posts: 71
- Joined: Thu Nov 05, 2009 1:37 pm
- Boat Name: Jet Lag
- Boat Type: 1982 B-Jet
- Location: Portugal
Re: Replacing the interior lining
Went down to the boat and took some shots...
This is not a baggy spot, rather a part where the lining is coming apart at an end...
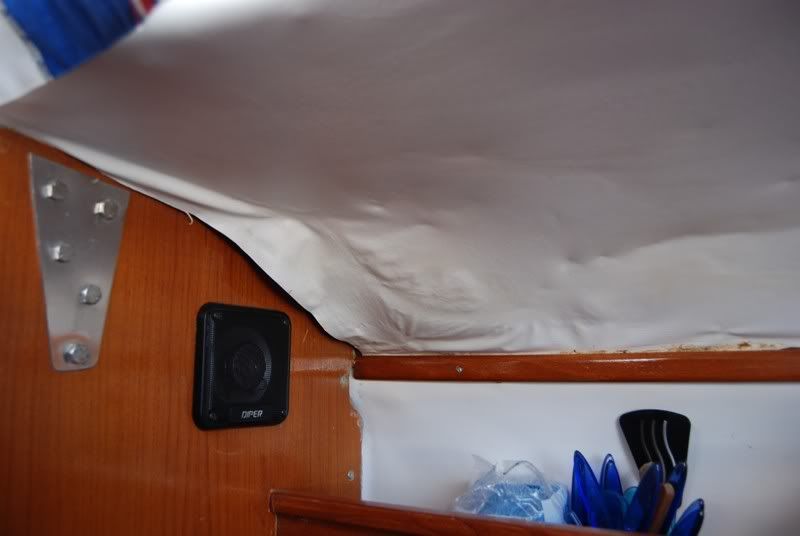
Here's the inside stuff:
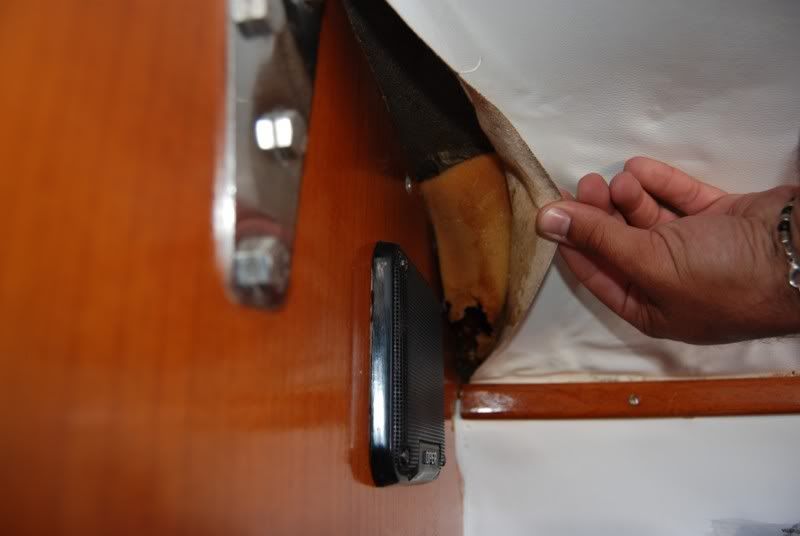
This is not a baggy spot, rather a part where the lining is coming apart at an end...

Here's the inside stuff:

Re: Replacing the interior lining
Almost any foam-lined vinyl liner will eventually fail. The foam disintegrates and the glue that held the foam to the top of the cabin fails. You can replace it with new foam-lined vinyl or with vinyl without foam. I have had some luck simply scraping the decayed foam off and then re-gluing the vinyl.
Al Lorman
Al Lorman
Al Lorman
Re: Replacing the interior lining
I'm not much for foam-backed vinyls, myself. So if I were confronted with a deteriorating one (and it does seem to be inevitable), I would remove it and either go with just painted fiberglass (scrubbable, ahhhh), or some sort of wooden ceiling with or without insulation behind it.
But that's just me, and I imagine replacing it with another foam-backed vinyl (perhaps Naugahyde™ was the term you were thinking of?) is an option too. I don't know of any "magic" ones that don't eventually deteriorate, but if one would last another 25 years, then that is something.
Albin Vegas came with such a liner, and many people have removed it. Not sure if anyone has replaced it, but some people must have. I think there are one or two Vega owners here so perhaps they will chime in.
- pjesus
- Rough Carpentry Apprentice
- Posts: 71
- Joined: Thu Nov 05, 2009 1:37 pm
- Boat Name: Jet Lag
- Boat Type: 1982 B-Jet
- Location: Portugal
Re: Replacing the interior lining
Yeah, I guess you're right. Thanks.Al wrote:Almost any foam-lined vinyl liner will eventually fail. The foam disintegrates and the glue that held the foam to the top of the cabin fails. You can replace it with new foam-lined vinyl or with vinyl without foam. I have had some luck simply scraping the decayed foam off and then re-gluing the vinyl.
I've seen some interesting results but not only does it look like a pile of work I'm affraid it would steal more room on an already small boatRachel wrote:or some sort of wooden ceiling with or without insulation behind it.
Oops... no, "vinyl" was the word I was missing.. but that Naugathing does look good!Rachel wrote:(perhaps Naugahyde™ was the term you were thinking of?)
I'm trying to find a product I was told about... a kind of foam-backed vinyl but with a foam that almost resembles the back of a computer mouse pad (the thick ones almost no one uses nowadays)
Thanks for the answers, guys.
Re: Replacing the interior lining
Okay, well there is closed cell "mouse pad like" foam (I think mouse pads are actually a type of neoprene) insulation known as Ensolite or Armacell. I don't know of any with the vinyl bonded to it (and if you find one, please let me know!).pjesus wrote: I'm trying to find a product I was told about... a kind of foam-backed vinyl but with a foam that almost resembles the back of a computer mouse pad (the thick ones almost no one uses nowadays)
There are some older fiberglass campers that came with an Ensolite insulation that had vinyl bonded to the "room" side, but no-one has been able to find it now when trying to replace damaged material. That said the foam itself is available and can/has been painted (even thought that seems weird; it seems to work).
bcooke here on the forum insulated his boat with Armacell (and then put wood over it); I have seen people use Ensolite in fiberglass campers (and painting it) from IR Foam Specialty in Washington (I see you are in Portugal though). In any case, I think it's a closed cell foam. IR Foam Specialty sent me some samples; they have various densities and thicknesses. It does feel similar to the neoprene/mouse pad type foam.
CharlieJ on this forum sails (and lives aboard) a small boat, and he and his partner did insulate and put in wood ceiling. They "lost" less about one inch (they used 1/2" plywood for the ribs/insulation, and then re-sawn ash strips for the ceiling (1/2" or so I believe).
That was a project, although to my mind not TOO huge (but a project nonetheless). One plus is that they only had to make a suitable surface in the small areas where the strips/"ribs" were adhered with epoxy. The rest of the surface was clean, but not "perfect."
I would wonder about gluing just vinyl without foam; most fiberglass boats I have seen do not have a fair enough surface for that, to my mind. I think there could be visible "lumps," air pockets, etc.
I suppose the simplest is just to clean/paint (?)
- pjesus
- Rough Carpentry Apprentice
- Posts: 71
- Joined: Thu Nov 05, 2009 1:37 pm
- Boat Name: Jet Lag
- Boat Type: 1982 B-Jet
- Location: Portugal
Re: Replacing the interior lining
Well... I like the "feel" of the vinyl and given the floor surface I'm pretty sure the finish on the ceiling's fiberglass won't be very pretty to just clean and paint.Rachel wrote:I suppose the simplest is just to clean/paint (?)
I'm just glad I have some time before I get to it... :)
-
One Way David
- Skilled Systems Installer
- Posts: 183
- Joined: Sat Aug 02, 2008 8:46 pm
- Boat Type: Pearson Ensign
- Location: Kansas
Re: Replacing the interior lining
I see 2 separate issues in attaching a laminate.
1) Decomposition of foam will occur.
2) Attaching anything other than wood will require a glue. Sailboats in the hot sun will melt/soften almost every glue. Except cured epoxy and everyone on this site can give you better information on that than I. I did talk to a automobile detailer that raved about a new adhiesive he used to put headliners in vintage trucks. Just glued it up and it stayed, and that is a good heat test. But that was circa 1993 and I do not recall, if I ever knew, what the product was/is.
Dave, trying to imagine what a cabin liner in freebe mouse pads would look like. Probably would get its own thread over by the bad-boat-name thread.
Never finish all your projects or you'll be bored.
- Peter
- Boat Obsession Medal Finalist
- Posts: 580
- Joined: Mon Nov 15, 2004 11:23 pm
- Boat Name: Pagan
- Boat Type: Albin Ballad 30
- Location: Pedder Bay (Victoria), BC, Canada
- Contact:
Re: Replacing the interior lining
I'll chime in here:
I removed all the cruddy old vinyl and foam and replaced it with indoor/outdoor carpet from Home Depot. It's glued to the fiberglass hull and provides a bit of insulation, does not promote condensation, is mildew resistant, looks good (my opinion), cleans easily, and is economical to install.
I've done a San Juan 24 and an Albin Vega this way, and am about to give an Albin Ballad the same treatment. I've had many favorable comments on the job and know of two other Vegas done this way. Mine was done in early 2006 and still looks great.


- pjesus
- Rough Carpentry Apprentice
- Posts: 71
- Joined: Thu Nov 05, 2009 1:37 pm
- Boat Name: Jet Lag
- Boat Type: 1982 B-Jet
- Location: Portugal
Re: Replacing the interior lining
Hi Peter.
Thanks for the tips and pics, it does look good indeed.
My concern with carpet is that it may tend to trap some dust, which is really nasty for my girlfriend allergies. What's yout oppinion on this?
Cheers,
Tiago
Thanks for the tips and pics, it does look good indeed.
My concern with carpet is that it may tend to trap some dust, which is really nasty for my girlfriend allergies. What's yout oppinion on this?
Cheers,
Tiago
- Peter
- Boat Obsession Medal Finalist
- Posts: 580
- Joined: Mon Nov 15, 2004 11:23 pm
- Boat Name: Pagan
- Boat Type: Albin Ballad 30
- Location: Pedder Bay (Victoria), BC, Canada
- Contact:
Re: Replacing the interior lining
Hi Tiago,
When we clean the boat it gets vacuumed. Easy Peasy :-)
When we clean the boat it gets vacuumed. Easy Peasy :-)
- Peter
- Boat Obsession Medal Finalist
- Posts: 580
- Joined: Mon Nov 15, 2004 11:23 pm
- Boat Name: Pagan
- Boat Type: Albin Ballad 30
- Location: Pedder Bay (Victoria), BC, Canada
- Contact:
Re: Replacing the interior lining
Just one more thing:
I made the mistake of using a solvent-based glue. It bonded the carpet well, but smelled pretty strong for several weeks. It's OK now, but with my new boat I'll use a water-baser carpet glue such as http://www.basspro.com/Boat-and-Outdoor ... 97/-957999.
I think any indoor/outdoor water based carpet glue should work.
Peter.
- Peter
- Boat Obsession Medal Finalist
- Posts: 580
- Joined: Mon Nov 15, 2004 11:23 pm
- Boat Name: Pagan
- Boat Type: Albin Ballad 30
- Location: Pedder Bay (Victoria), BC, Canada
- Contact:
Re: Replacing the interior lining
I've just finished "de-glueing" the Ballad interior.
Here were my tools of choice:

My method was to use the razor blade scrapers to get off as much glue as possible, leaving little pockets where the fiberglass weave was lower, below the blade reach. Then a coarse abrasive pad was used to get most of the rest. The most stubborn stuff had to be coaxed off with a stiff wire brush.
The one thing that helped the most was to wet the area with a sponge, and keep the abrasive and tools wet as well. This seemed to prevent the glue from re-sticking, and help roll off the crud.

Finally, done! Each side of the hull took a full day.

Here were my tools of choice:

My method was to use the razor blade scrapers to get off as much glue as possible, leaving little pockets where the fiberglass weave was lower, below the blade reach. Then a coarse abrasive pad was used to get most of the rest. The most stubborn stuff had to be coaxed off with a stiff wire brush.
The one thing that helped the most was to wet the area with a sponge, and keep the abrasive and tools wet as well. This seemed to prevent the glue from re-sticking, and help roll off the crud.

Finally, done! Each side of the hull took a full day.

- pjesus
- Rough Carpentry Apprentice
- Posts: 71
- Joined: Thu Nov 05, 2009 1:37 pm
- Boat Name: Jet Lag
- Boat Type: 1982 B-Jet
- Location: Portugal
Re: Replacing the interior lining
Hi there Peter.
Thanks again for your most valuable tips!
That confirms that it's not a weekend job... and I'm not sure I want to strip my whole boat apart just because of the headlining. If I had more things to take care of I would probably consider a major re-haul, but I don't.
So I really have to think this through.
I would love to see more pics of your work's progress though. I'm sure this may be helpful in the future to may people.
Cheers,
Tiago
- Peter
- Boat Obsession Medal Finalist
- Posts: 580
- Joined: Mon Nov 15, 2004 11:23 pm
- Boat Name: Pagan
- Boat Type: Albin Ballad 30
- Location: Pedder Bay (Victoria), BC, Canada
- Contact:
Re: Replacing the interior lining
Thanks, Tiago. I think the main priority is to keep the boat in sailing condition while you work on it. In my present case that isn't an option, but I have my Vega to sail in the meantime.
If you're interested, I keep a running progress report at http://www.sintacha.com.
If you're interested, I keep a running progress report at http://www.sintacha.com.
- pjesus
- Rough Carpentry Apprentice
- Posts: 71
- Joined: Thu Nov 05, 2009 1:37 pm
- Boat Name: Jet Lag
- Boat Type: 1982 B-Jet
- Location: Portugal
Re: Replacing the interior lining
That's exactly my way of doing stuff.Peter wrote:I think the main priority is to keep the boat in sailing condition while you work on it.
And I'm lucky enough to be able to sail all year round...
Sure am, will follow. Thanks.Peter wrote:If you're interested, I keep a running progress report at http://www.sintacha.com.
- pjesus
- Rough Carpentry Apprentice
- Posts: 71
- Joined: Thu Nov 05, 2009 1:37 pm
- Boat Name: Jet Lag
- Boat Type: 1982 B-Jet
- Location: Portugal
Re: Replacing the interior lining
Checked the website deeper and had to come back here and say you're a brave man, Peter!
The pics of the boat in the forest alone would scare most people
The pics of the boat in the forest alone would scare most people
- Peter
- Boat Obsession Medal Finalist
- Posts: 580
- Joined: Mon Nov 15, 2004 11:23 pm
- Boat Name: Pagan
- Boat Type: Albin Ballad 30
- Location: Pedder Bay (Victoria), BC, Canada
- Contact:
Re: Replacing the interior lining
Update on the Ballad carpet ceilings:


-
rescuesailor
- Rough Carpentry Apprentice
- Posts: 73
- Joined: Thu Mar 09, 2006 11:28 pm
- Boat Name: SV Christina Louise
- Boat Type: True North 34
- Location: Kingwood, TX
Re: Replacing the interior lining
I realize that you are not hip on a wood style liner but maybe you would like a plastic product that resembles wood. i found a plastic product that resembles beaded board. I is approximately 1/4 inch thick and provides a clean and easliy cleanable surface. I use 1/2 inch ply to provide a nailer and insulated in between. The result looks good and has lowerd the temp in the cabin significantly.
David
-
Tallystick
- Skilled Systems Installer
- Posts: 177
- Joined: Fri Sep 09, 2011 10:54 am
- Boat Name: Nostalgia
- Boat Type: Pearson Triton Yawl
Re: Replacing the interior lining
My boat didn't have a liner so I installed reflectix insulation in between furring strips screwed and epoxied to the fiberglass, and then covered it all with cedar strips. The cedar strips are then sanded smooth, filing any gaps with cedar dust thickened epoxy. I'm using epoxy to seal the wood, and to harden the surface, before finishing. Almost completed. A bit tricky to cover the curvatures. I found hot glue to be effective in holding the strips in place while the epoxy cures. It's been labor intensive, but the results are quite beautiful.
- pjesus
- Rough Carpentry Apprentice
- Posts: 71
- Joined: Thu Nov 05, 2009 1:37 pm
- Boat Name: Jet Lag
- Boat Type: 1982 B-Jet
- Location: Portugal
Re: Replacing the interior lining
Hi Peter.Peter wrote:Update on the Ballad carpet ceilings:
Thanks for the update. Your lining is coming out really nice!
I actually like that kind of that kind of liner but the problem is the thickness. I'm 6'1'' and my boat is already too short :-/rescuesailor wrote:I realize that you are not hip on a wood style liner
Just out of curiosity, could you show some pics?Tallystick wrote:My boat didn't have a liner so I installed reflectix insulation in between furring strips screwed and epoxied to the fiberglass, and then covered it all with cedar strips.
-
Tallystick
- Skilled Systems Installer
- Posts: 177
- Joined: Fri Sep 09, 2011 10:54 am
- Boat Name: Nostalgia
- Boat Type: Pearson Triton Yawl
Re: Replacing the interior lining
Here's a shot of the v-berth overhead lining. It's a bit splotchy looking at the moment after coating with epoxy. The cedar really sucks up epoxy. Needs another round of sanding, final coat of epoxy, light sanding, then varnish. The ugly piece of plywood is just temporarily covering the hatch to keep the rain out.
Reflectix insulation is under the cedar except around the portlight.
Reflectix insulation is under the cedar except around the portlight.
- pjesus
- Rough Carpentry Apprentice
- Posts: 71
- Joined: Thu Nov 05, 2009 1:37 pm
- Boat Name: Jet Lag
- Boat Type: 1982 B-Jet
- Location: Portugal
Re: Replacing the interior lining
Tally,
sorry for not seeing this before.
Thanks for the pic but that's a bit too much wood (and too dark) for me.
Peter,
now that I REALLY need to get this done (after reassembling the engine and building a new door), I went through your blog (again). And here I am procrastinating a simple lining replacement...
- earlylight
- Candidate for Boat-Obsession Medal
- Posts: 342
- Joined: Fri Dec 19, 2008 7:15 pm
- Boat Name: Early Light
- Boat Type: 1982 Sabre 34 MK I
- Location: MD
- Contact:
Re: Replacing the interior lining
Tiago,
I had vinyl on the sides if the V-berth on my boat and removed it and replaced with wood ceiling strips. You can use a light wood such as ash, cyprus, satinwood or any other wood of your liking. Here is a pic of one side of the V-berth before installing trim at either end. http://www.earlylight160.net76.net/PortSideCeilings.jpg
I have documented the project on my web site at: http://www.earlylight160.net76.net/HullCeilings.html
Good luck with whatever you decide to do.
- earlylight
- Candidate for Boat-Obsession Medal
- Posts: 342
- Joined: Fri Dec 19, 2008 7:15 pm
- Boat Name: Early Light
- Boat Type: 1982 Sabre 34 MK I
- Location: MD
- Contact:
Re: Replacing the interior lining
Another possibility is using fiberglass shower panels. They come in 4 ft x 8 ft sheets and are about 1/8 inch thick so they bend to the curvature of the overhead quite easily. They have a textured finish and clean very easily. I have a couple of friends who used these panels on the overhead of their boats. After removing the old vinyl they epoxied 1/2 inch x 2 inch wood strips to the overhead and the panels were then screwed to these strips. Where two panels joined, the seam was then covered with thin mahogany or teak trim strips to hide the joint.. These panels can be seen by clicking on the following link:
http://www.lowes.com/pd_8566-293-FTSTF. ... facetInfo=
Good luck
http://www.lowes.com/pd_8566-293-FTSTF. ... facetInfo=
Good luck
- pjesus
- Rough Carpentry Apprentice
- Posts: 71
- Joined: Thu Nov 05, 2009 1:37 pm
- Boat Name: Jet Lag
- Boat Type: 1982 B-Jet
- Location: Portugal
Re: Replacing the interior lining
Thanks for the tips, earlylight.
But for now I won't be adding any more wood to the boat. Besides, the side lining is ok so I won't be messing with anytime soon (fingers crossed).
Some real life (potentially stupid) questions:
1) I know contact glue should be applied to both surfaces, but in this case I see that as a hard task. Will I be ok with applying just to one surface?
2) When I start laying the vinyl I probably won't be able to apply it all at once. Any tips?
3) How do I keep the vinyl to fall due to its weight? (independently of it being a one shot thing or a bit at a time)
Not sure I'm formulating the questions right, hope you guys understand me...
-
mitiempo
- Candidate for Boat-Obsession Medal
- Posts: 319
- Joined: Mon Oct 27, 2008 11:37 am
- Boat Name: Mi Tiempo
- Boat Type: Canadian Sailcraft CS27
- Location: victoria bc canada
Re: Replacing the interior lining
Contact cement works only because it is on both surfaces. On only one it won't stick at all.
- pjesus
- Rough Carpentry Apprentice
- Posts: 71
- Joined: Thu Nov 05, 2009 1:37 pm
- Boat Name: Jet Lag
- Boat Type: 1982 B-Jet
- Location: Portugal
Re: Replacing the interior lining
I've made some experiments and it does stick. What I'm worried is about longterm.mitiempo wrote:Contact cement works only because it is on both surfaces. On only one it won't stick at all.
Anyway, that answers my first question, so thank you! ;-)
Two left:
2) When I start laying the vinyl I probably won't be able to apply it all at once. Any tips?
3) How do I keep the vinyl to fall due to its weight?
-
mitiempo
- Candidate for Boat-Obsession Medal
- Posts: 319
- Joined: Mon Oct 27, 2008 11:37 am
- Boat Name: Mi Tiempo
- Boat Type: Canadian Sailcraft CS27
- Location: victoria bc canada
Re: Replacing the interior lining
To answer #3 the glue will not keep heavy vinyl in place long term and fasteners will be required.
Why don't you epoxy strips to the overhead that have panels screwed to them, the area with the fasteners covered with trim. Easy access to any area by removing a few screws, insulation between panel and overhead if desired, and a permanent solution.
As far as contact cement I owned a boat in the past that had laminate on the bulkheads that was installed during construction. The contact cement was failing in places. Because of this I use epoxy to attach laminate and have had no issues.
- pjesus
- Rough Carpentry Apprentice
- Posts: 71
- Joined: Thu Nov 05, 2009 1:37 pm
- Boat Name: Jet Lag
- Boat Type: 1982 B-Jet
- Location: Portugal
Re: Replacing the interior lining
Thanks for the tips, mitiempo, but I have a small 25ft boat and at 6'1'' I'm already a bit short on headroom, so I'm not willing to lose any more of it. :)
- pjesus
- Rough Carpentry Apprentice
- Posts: 71
- Joined: Thu Nov 05, 2009 1:37 pm
- Boat Name: Jet Lag
- Boat Type: 1982 B-Jet
- Location: Portugal
Re: Replacing the interior lining
Well... almost 2 and a half years after I started this thread, I started the job.
Let's see how it goes.
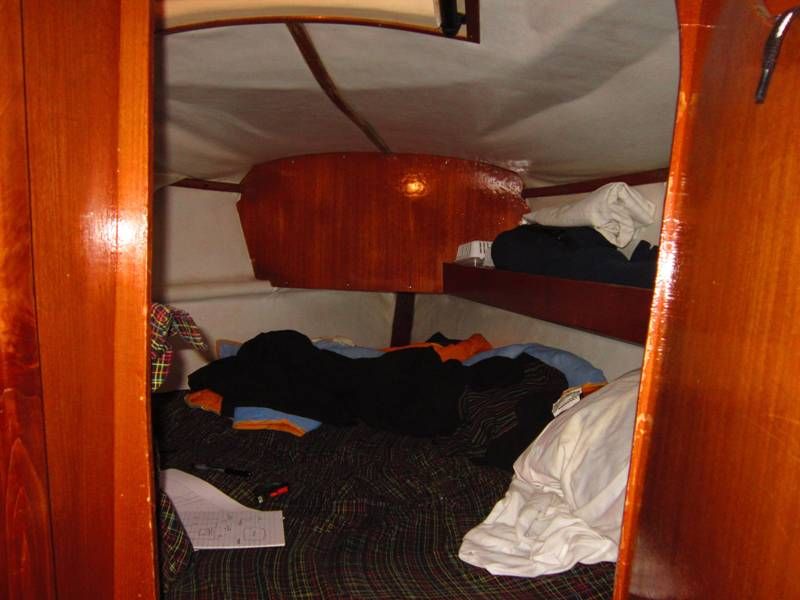
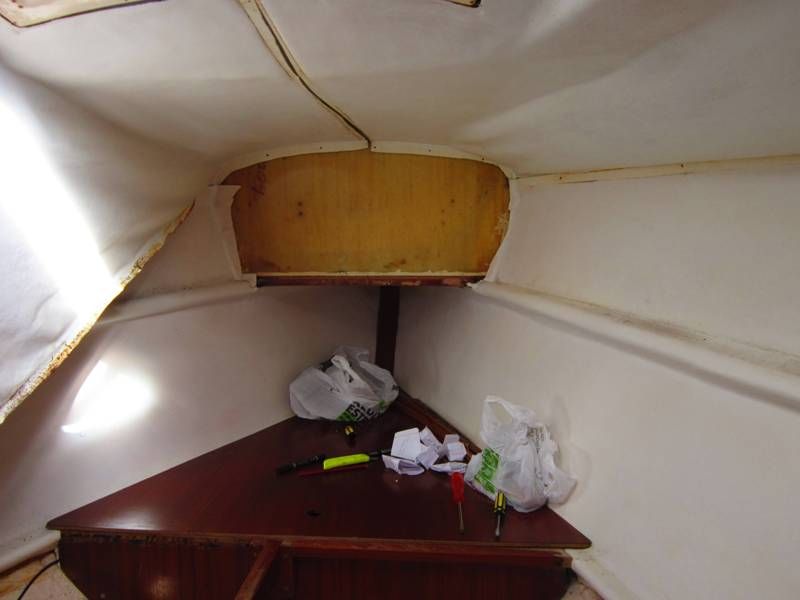
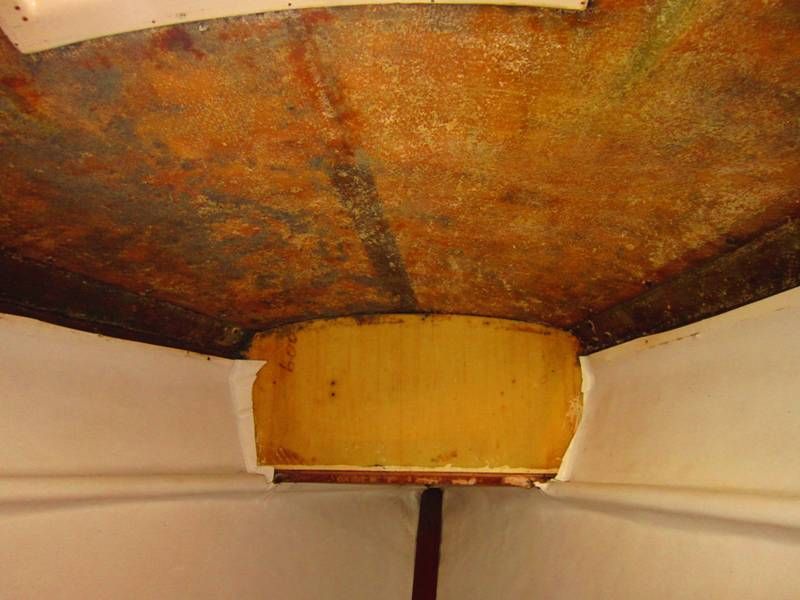
So far I'm battling to get rid of the old stuff.
Let's see how it goes.


So far I'm battling to get rid of the old stuff.
- pjesus
- Rough Carpentry Apprentice
- Posts: 71
- Joined: Thu Nov 05, 2009 1:37 pm
- Boat Name: Jet Lag
- Boat Type: 1982 B-Jet
- Location: Portugal
Re: Replacing the interior lining
I ended up not updating this thread... shame on me...
I bought the foam and the vinyl separated.
I drew templates into the vinyl...
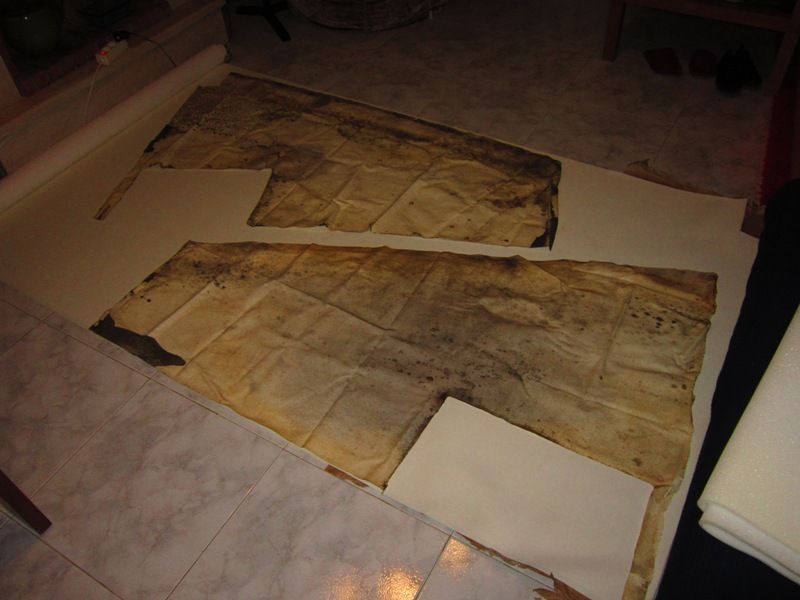
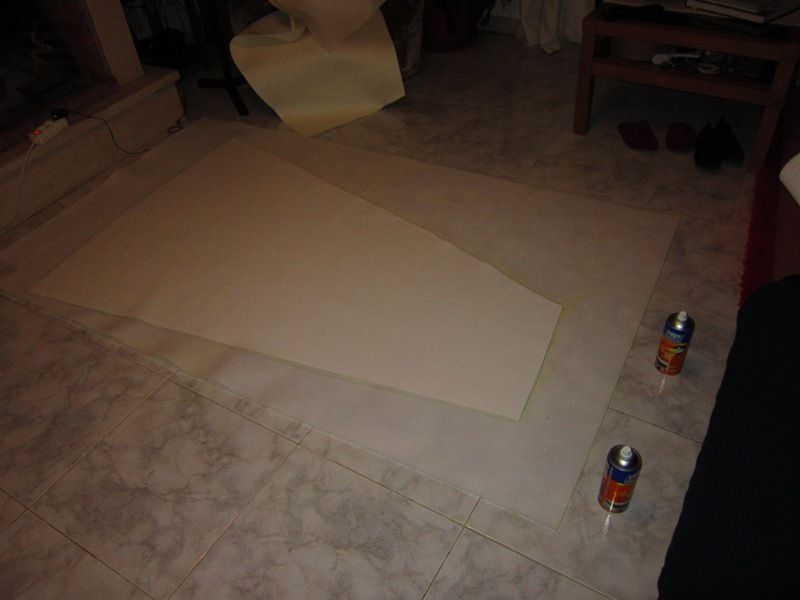
Then spray-glued them together:
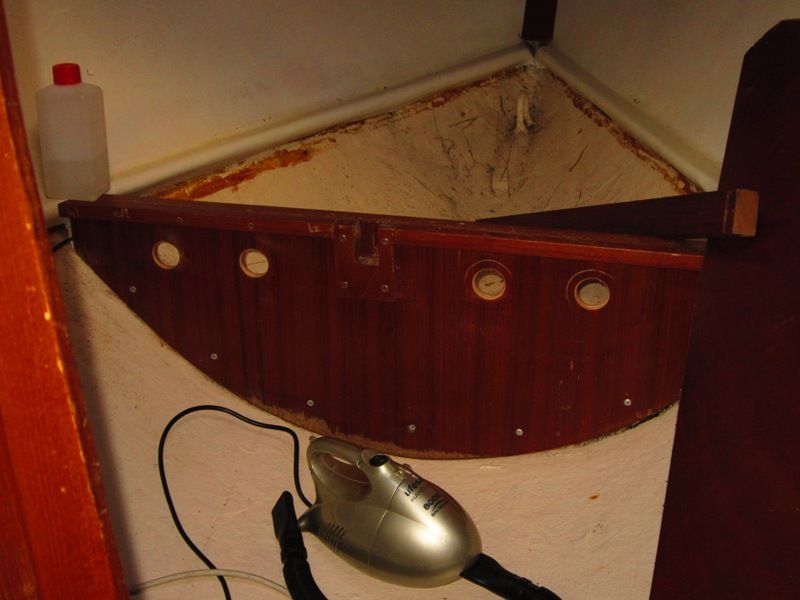
I took the chance to drill some ventillation holes into the bow compartment:
And added a deck D-ring to the spi pole downhaul (with a backing plate, of course).
All wood trim was sanded and varnished:
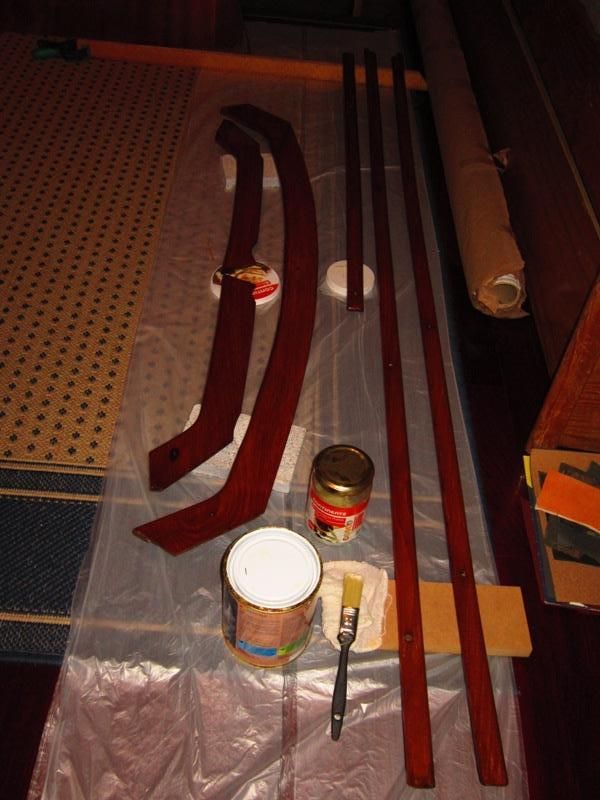
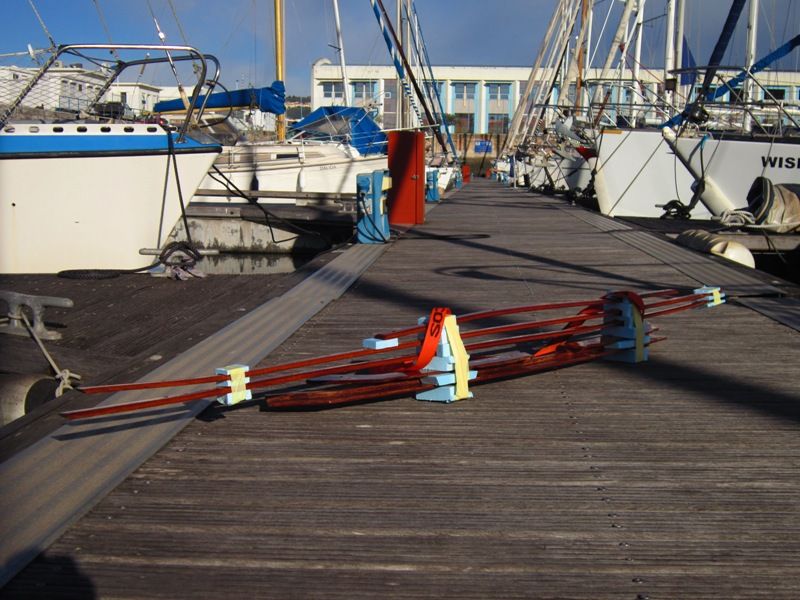
(and carried on the scooter, since the car was being rebuilt at the time :-) )
I then glued the foam to the ceiling with brush-on contact glue. The end result turned out ok:
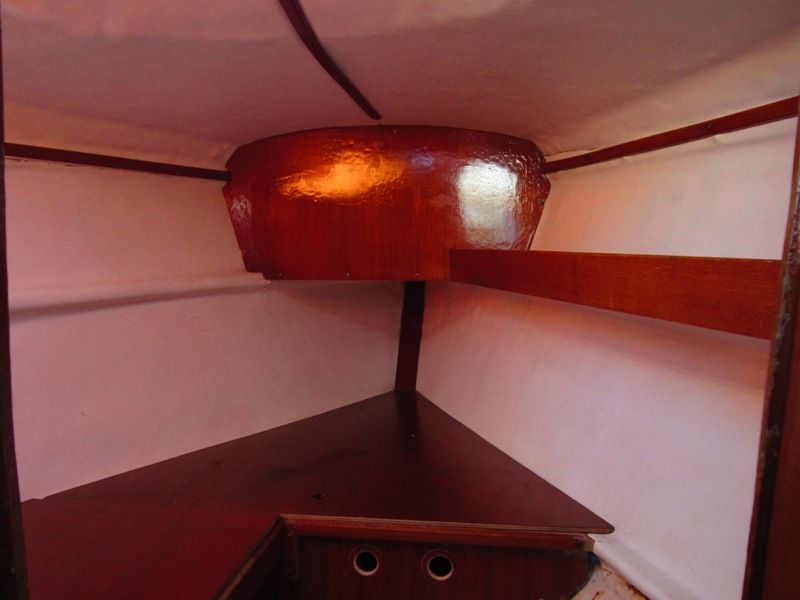
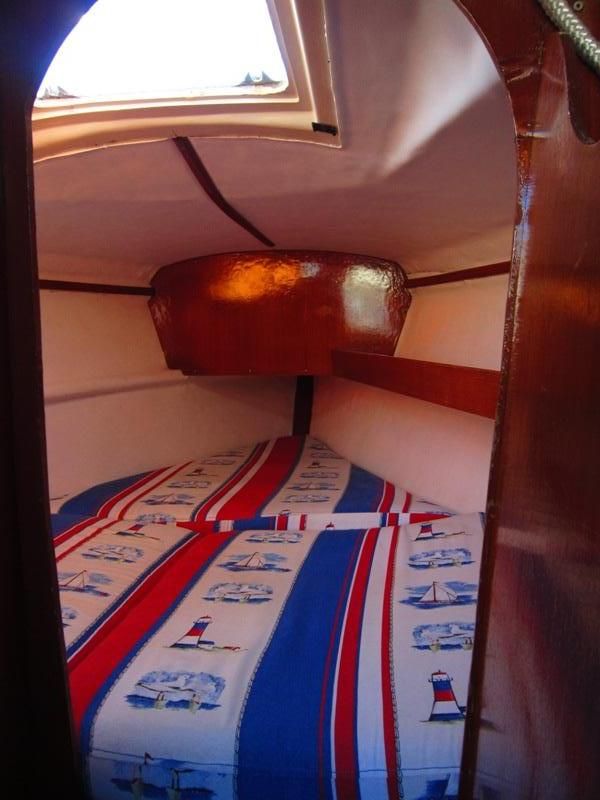
However... now that almost a year and a very hot summer have passed by, I found out that the vinyl dettached from the foam :-(
The foam is glued to the ceiling so I suspect it was the spray-on glue that didn't quite work.
Between other projects, I'm trying to find the courage to get back at it... more to come.
I bought the foam and the vinyl separated.
I drew templates into the vinyl...

Then spray-glued them together:

I took the chance to drill some ventillation holes into the bow compartment:

And added a deck D-ring to the spi pole downhaul (with a backing plate, of course).
All wood trim was sanded and varnished:

(and carried on the scooter, since the car was being rebuilt at the time :-) )

I then glued the foam to the ceiling with brush-on contact glue. The end result turned out ok:


However... now that almost a year and a very hot summer have passed by, I found out that the vinyl dettached from the foam :-(
The foam is glued to the ceiling so I suspect it was the spray-on glue that didn't quite work.
Between other projects, I'm trying to find the courage to get back at it... more to come.
Last edited by pjesus on Wed Oct 29, 2014 1:22 pm, edited 1 time in total.
-
Lloyd
- Skilled Systems Installer
- Posts: 187
- Joined: Sun May 13, 2007 1:04 pm
- Boat Name: Ella Marie
- Boat Type: Bristol 27
- Location: Pelahatchie. Ms
Re: Replacing the interior lining
Sorry to hear it did not hold up. You had it looking good. Are you going to give it a second try?
Lloyd
Bristol 27, #200
Bristol 27, #200
- pjesus
- Rough Carpentry Apprentice
- Posts: 71
- Joined: Thu Nov 05, 2009 1:37 pm
- Boat Name: Jet Lag
- Boat Type: 1982 B-Jet
- Location: Portugal
Re: Replacing the interior lining
Hi.Lloyd wrote:Sorry to hear it did not hold up. You had it looking good. Are you going to give it a second try?
Right now I'm busy with other stuff and I must confess the weather has been too good to work on the boat instead of sailing, but I sure will give it a new try! :)
I will not use the spray glue, I will brush it. I'll update the thread with the results.
If that works, I'm starting to think I might as well do the rest of the boat as I'm getting soggy lining in other places.
Tiago