Cost effective approach for a tall tent?

This is the place for information on various types of permanent and temporary boat shops and other project shelters.
Post Reply
User avatar
catamount
Candidate for Boat-Obsession Medal
Posts: 378
Joined: Sun Jun 19, 2005 7:30 am
Boat Name: GREYHAWK
Boat Type: Peterson 34
Location: Boothbay Harbor, ME
Contact:

Cost effective approach for a tall tent?

Post by catamount »

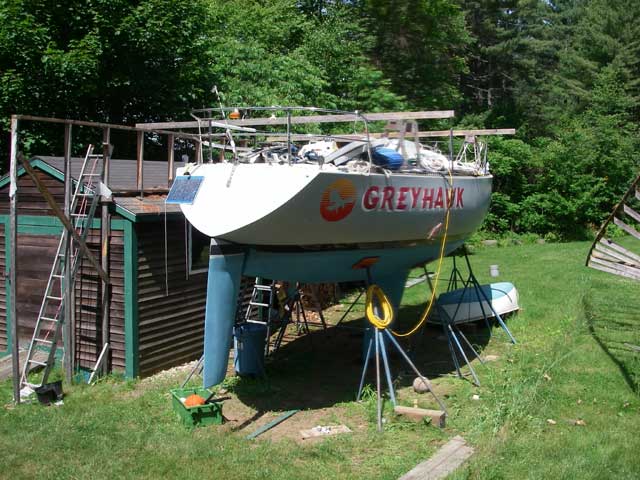
Now that GREYHAWK is resting comfortably in my yard, I need to erect a tent over her for the winter to protect her from the elements during phase 2 of the project (mainly refurbishing the deck). Here's a view of her from a second story window of our house:

Image

Note that the decks are over 10 feet off the ground, and I need to be able to work on top of them! FWIW, the boat's beam is 11'3"

I could frame something up with long sticks of 2x lumber (which could possibly be recylced into another project next summer), perhaps part of which could be supported by the sheds you see to the left of the boat; or I could try building a Stimson Bow Shed raised up on knee-walls, (I assume 1x3 strapping might be less expensive than 2x lumber?), or I could buy one of those pre-fab tents for parking RV's under (roof peak height of 15') which seem to be on sale for around $1,800, or maybe I could build my own tent support hoops from my old rod rigging (although they might be a bit wobbly) ...

Any thoughts as to what might be the most cost effective approach? Other advice?

Regards,
Last edited by catamount on Thu Apr 30, 2009 3:26 pm, edited 1 time in total.
Tim Allen -- 1980 Peterson 34 GREYHAWK
Harborfields Housekeeping Cottages, West Boothbay Harbor, Maine
Sailors for the Sea, a new voice for ocean conservation
User avatar
Tim
Shipwright Extraordinaire
Posts: 5708
Joined: Tue Apr 01, 2003 6:39 pm
Boat Name: Glissando
Boat Type: Pearson Triton
Location: Whitefield, ME
Contact:

Post by Tim »

Any shelter you build over her will need near vertical walls in order to provide you the clearance you need at deck level and outside of the deck for some comfortable staging. You want 3' of space between the gunwale and the side of the building, at least, and have to factor in working headroom at the deck edge too. You're probably looking at a shelter that's about 18' -20' wide. Depending on the width and the type of roof, the sidewalls will have to be at least 14'. To stand on deck, you'll want over 16' of peak clearance, and probably quite a bit more since most of the boat would not be located under the peak. I would figure out your building dimensions based on standing headroom (or very close) at the widest part of the beam.

The boat is pretty close to the existing building, so your space on that side will be more limited, which may mean that you won't get the ideal clearances on that side. If you don't see a need for staging off the side of the boat for your deck work, then you don't need the clearances I've suggested. I can't imagine doing any sort of significant deck project from the deck itself, though.

I don't know that much about the specifics of the Stimpson shed, but I presume its basic proportions are adjustable to make the entire structure larger or smaller. If so, then building a bow frame on top of some knee walls, which need to be high enough to keep the arch of the bow far enough away from the gunwale, would work. Strapping is less expensive than 2X lumber, and you end up with a stronger structure with less material. You just need to proportion it so that you can get the desired clearance at deck level and at the gunwale on the sides.

If you go with a more traditional shelter framed from dimensional lumber, you'll need 16' studs for the walls, plus the roof structure. This is pretty tall for a temporary building, so a good way to brace and anchor the building would be required. The roof would be the most challenging aspect because of the height.

Another option would be to build more of a pole barn, using larger vertical timbers spaced, say, 10' apart around the sides and ends, and then connect them with horizontal ties and bracing. Building any sort of temporary structure of this type and size, however, starts to really call into question how "temporary" you should make it; suddenly, it seems like less of a stretch to make it more permanent. Still, the pole barn approach might work for a temporary building.

What are your storm winds like at the boat's location? Is there fetch for winter (northerly) winds? If so, the building needs to be that much stronger in order to survive. The rickety temporary building I used around Glissando never would have made it if it hadn't been so sheltered by trees. Using the existing garden shed to help support the temporary building might be good, if you can do that without damaging the shed at all. Whatever you build, you'll need good cross bracing, ground anchors, and quite possibly some lines/cables run off to stakes on the exposed sides.

Something like rod rigging would never work unless you welded it into a spiderweb. Metal fence rail or similar might build an acceptable shelter, but this is not necessarily cost effective.

The reality is that any shed of this size, needing to survive snow loading and winter winds, cannot be that inexpensive. The amount of material required to build something suitable and properly support and brace it is significant enough that you're looking at a steep lumber bill to begin with.

Of course, one could build a workable shelter for a minimal amount, but there's a large question as to whether or not it would survive. It's my feeling that one doesn't really care to wake up some January morning and find the building destroyed, so that means that additional care in construction is required.

Put a really good tarp on the roof. You can use clear plastic or something else on the sides, if you want, but the roof will require something stronger and more UV resistant. Another option would be to have your structure shrink-wrapped, which would actually make it stronger as the material shrinks around the frame, but this would be expensive.

Somewhere in the midst of all this is a workable plan. I'm just hoping to point out some of the potential issues up front.
---------------------------------------------------
Forum Founder--No Longer Participating
User avatar
catamount
Candidate for Boat-Obsession Medal
Posts: 378
Joined: Sun Jun 19, 2005 7:30 am
Boat Name: GREYHAWK
Boat Type: Peterson 34
Location: Boothbay Harbor, ME
Contact:

Post by catamount »

OK, here's a quick section drawing for a lumber structure, 1/4" scale.

Image

All lumber is shown as 2x4's (except the scaffolding planks); the studs are 14', rafters 10', bracing and collarties 8'. I envision 13 of these trusses, one every 3', tied together at the ridge, eaves, and base, and with lots of diagonal bracing, for a 36' long shed. Cables and stakes, too. The roof would be covered with heavy duty woven tarps, sides partially covered with plastic.

Regards,
Last edited by catamount on Thu Apr 30, 2009 3:25 pm, edited 2 times in total.
Tim Allen -- 1980 Peterson 34 GREYHAWK
Harborfields Housekeeping Cottages, West Boothbay Harbor, Maine
Sailors for the Sea, a new voice for ocean conservation
Figment
Damned Because It's All Connected
Posts: 2847
Joined: Tue Apr 08, 2003 9:32 am
Boat Name: Triton
Boat Type: Grand Banks 42
Location: L.I. Sound

Post by Figment »

As much as I love my Stimson shed, I don't know that this is the right application for it. An 18' wide Stimson requires 18' strapping, which is hard to come by in my experience. Heck, I found that 16' lengths of the required quality were hard to come by. I think I had something like 25-35% breakage during the bending process. And you'd need REALLY high "kneewalls". The Stimson part would really just be a cool gothic roof on a 8' high building.
I think a vertical-wall design is absolutely the better path for your project.
As much as I dislike their business practices, this really does seem to be a good application for something like a prefab "Cover-It" shed.
Tim wrote: It's my feeling that one doesn't really care to wake up some January morning and find the building destroyed....
YUP.

and double-yup on the notion to buy the best cover material you can. I really kicked myself for not using the white shrinkwrap material the first time. It's holding up really well.

Your stick-framed design certainly seems workable. I'd suggest plywood gussets at the ridge and eaves, and LOTS of diagonal bracing. Make the end walls as stiff as you can, and this thing will have enough windage that I'd want to set some concrete deadmen in the yard for tie-down cables.

Also, the 3' spacing might be a bit ambitious for your latitude. The spacing most affects the longevity of the cover, and I think your cover will last a lot longer if you went to 30" spacing
User avatar
Tim
Shipwright Extraordinaire
Posts: 5708
Joined: Tue Apr 01, 2003 6:39 pm
Boat Name: Glissando
Boat Type: Pearson Triton
Location: Whitefield, ME
Contact:

Post by Tim »

catamount wrote:OK, here's a quick section drawing for a lumber structure, 1/4" scale.

Image
That looks pretty workable, but remember that those angled braces will be very much in the way of any staging you might set up, and especially your clear passage back and forth on the staging. You'll have to bend and duck around each brace, which will be located about one body's width apart.

The closer your studs end up being, the more of an inconvenience this will become. I worked around similar supports in the way, and it got really annoying. I actually removed many of them during the summer when I was working. If truly clear staging isn't a priority for whatever reason, then this building will work fine.

However, a temporary building is all about compromises, and what you've drawn will fit the bill about as economically as you can. Even so, it won't be inexpensive. With a good tarp on the roof and some attention after wind, rain, and snow storms, 3' spacing would probably be OK. That's what I used in my shelter. I agree that shortening the stud spacing would probably be a good idea in your case, though.

Either way, it's an ambitious temporary building. Good luck with the construction, and please post some updates when you get going!
---------------------------------------------------
Forum Founder--No Longer Participating
A30_John
Candidate for Boat-Obsession Medal
Posts: 318
Joined: Mon Nov 01, 2004 3:46 pm
Location: Maine

Post by A30_John »

Hi Tim,

I just had a long post written, and it was vaporized when I hit the "preview" button.

To make a long story short, I've been doing similar research, and, after buying the plans, decided against the Stimson Shed. I want something more robust and permanent that can take a serious load of crappy winter weather.

For $5-8K here's what you can set up:

(Least expensive): http://tinyurl.com/ln825

(Most expensive): http://www.winklercanvasbldg.com/struct ... rages.html

If you're interested in the Winkler building, let me know and I'll put you in contact with the rep for this area (who has been great to work with).

My house didn't sell this summer, so this is what I'm looking at as an alternative to my "dream" boat barn. I'm looking at it as a 1-2 year solution.

I've also been researching ways to insulate the building so I can heat it up on the weekends to be able to work on the boat throughout the Maine winter.
John
A30_John
Candidate for Boat-Obsession Medal
Posts: 318
Joined: Mon Nov 01, 2004 3:46 pm
Location: Maine

Post by A30_John »

Tim,

The structure you propose with the angled braces would probably not hold up in the weather we get in Maine. If you do that, I hope you've got relatively weak winter winds. The problem is there is nothing to prevent lateral shifting of the entire structure. (The poor guy between the structure and the boat is going to feel the pinch.)

Also, based on your photo, you may need to have your boat moved away from the building in order to build a decent sized structure over the boat.

For what it's worth... I've had a 2x4 structure over my boat over the past two winters, and, while it's worked well to protect the boat, it has been a poor structure for working under.

I think you'll be happier if you fork out the $ for a strong fabric covered building as I've referenced above. Choose white fabric for good light transmission.
Last edited by A30_John on Mon Aug 21, 2006 10:15 pm, edited 2 times in total.
John
Figment
Damned Because It's All Connected
Posts: 2847
Joined: Tue Apr 08, 2003 9:32 am
Boat Name: Triton
Boat Type: Grand Banks 42
Location: L.I. Sound

Post by Figment »

I don't see any reason why the wall of the "tent" couldn't spring from the ridge of the yard shed.

Those wall-rafter angle braces will only be in the way in the region of the boat's maximum beam. If you add sufficient diagonal bracing within the plane of the wall and roof (stiffen the diaphragm), you could omit the wall-rafter braces for the 8' or so that they would be troublesome, and allow them to take a deeper bite as the beam of the boat narrows.

but really, a pre-engineered metal frame structure is probably the simpler way to go. Save your creative energies for the actual boatwork.
Last edited by Figment on Mon Aug 21, 2006 10:14 pm, edited 1 time in total.
A30_John
Candidate for Boat-Obsession Medal
Posts: 318
Joined: Mon Nov 01, 2004 3:46 pm
Location: Maine

Post by A30_John »

I agree with Figment. If you build a 2x4 tent, the yard shed could make a useful anchoring structure. I also agree that a pre-fab metal frame building is the way to go... you can spend a lot of time building a structure-that's time which is better spent working on the boat.
John
User avatar
catamount
Candidate for Boat-Obsession Medal
Posts: 378
Joined: Sun Jun 19, 2005 7:30 am
Boat Name: GREYHAWK
Boat Type: Peterson 34
Location: Boothbay Harbor, ME
Contact:

Post by catamount »

I considered a metal-framed fabric-covered RV garage such as from Cover-It, ShelterKing, or ClearSpan, etc... (see red line in drawing below). In the end, I decided to erect a 2x4 lumber framed structure similar to the sketch I posted above.

But I decided the posts on the left in my initial drawing would be in the way of our access to firewood stored in the sheds to the left of the boat in the picture above, so I decided to extend the rafters over to the sheds, while still keeping the roof peak over the centerline of the boat. I also decided that I don't need full headroom over the cabin top, which will allow longer collar ties:

Image

This design has a 14' high wall on the right, 12' high (on top of the sheds) to the left, 14' rafter to the left, 10' rafter to the right, and 10' collar tie. (The red line shows the approximate outline of a typical ShelterKing-type RV garage). The rafters are pitched at 9-in-12, or about 37 degrees. Hopefully snow will slip off pretty easily.

Note that I am calling this a tent rather than a shed. This is definitely intended to be just a temporary structure, to be taken down in about 9 months. I haven't told my city building inspector about it.... ;-)

Day 1

We began construction by lofting the structure at full scale (using actual pieces of lumber) on the driveway with sidewalk chalk:

Image

Then we assembled a full truss, including the legs, screwed it together, and attempted to hoist it upright with a rope from the bow of the boat. Unfortunatley, the connection between rafters and legs broke as we were tilting the truss up. So we needed a new plan. We decided to erect walls on the sides and then set the rafter trusses on top of them, as in more traditional stick framing.

Image

You can see the proto-type roof truss on the pavement in the foreground.

We raised the 14'-tall right wall in three sections, bracing each as we went, and then tied them together (at least at the bottoms). The studs (and the roof trusses) are spaced at 30 inches, except for the first and last which are at 36 inches.

Image

With the right wall up, we began work on the left wall, which rests upon and skirts around the two sheds (an enclosed garden shed in front, and an open fire-wood storage shed in the back). Lots of careful measuring to get the wall in the right place and at the right height. By the end of the first day, we had a start on the left wall:

Image

The proto-type roof truss is leaning up against the front of the two walls. Once the walls are done, we'll make up the remainder of these (15 in all) and then the plan is to lift them in place using gin poles from the deck of the boat. To finish the roof, we'll set up scaffolding brackets on the outside of the 14' tall right wall from which to work; we can work from the shed roofs on the left wall.

Day 2

We continued construction of the left wall, spanning the gap between the two sheds, again entailing much measurement and cogitation to get the wall in the right place and at the right height. By lunchtime, it had started to rain....

Image

Image

More to come, once it stops raining...

Regards,
Last edited by catamount on Thu Apr 30, 2009 3:25 pm, edited 1 time in total.
Tim Allen -- 1980 Peterson 34 GREYHAWK
Harborfields Housekeeping Cottages, West Boothbay Harbor, Maine
Sailors for the Sea, a new voice for ocean conservation
A30_John
Candidate for Boat-Obsession Medal
Posts: 318
Joined: Mon Nov 01, 2004 3:46 pm
Location: Maine

Post by A30_John »

That's an interesting looking structure. It looks like you'll have a lot of room around the boat in this configuration. I'd be concerned about the snow weight on the shed roof, but it looks like you've considered that and are confident the structure will shed the snow adequately. What are you planning to cover the tent with? Tarp? Shrink wrap?
John
User avatar
Tim
Shipwright Extraordinaire
Posts: 5708
Joined: Tue Apr 01, 2003 6:39 pm
Boat Name: Glissando
Boat Type: Pearson Triton
Location: Whitefield, ME
Contact:

Post by Tim »

That looks like quite a project. Looks good so far! I think your modifications look good.

I agree that you may need to watch the snow buildup between the kneewall on the big shed and the roof of the small shed, but that won't be that big a deal to stay ahead of...as long as you stay ahead of it.

The problem is, you're going to like your new building so much that you'll want a permanent one!

Good luck with the remaining work. I look forward to seeing it come together.

My only question is: how did you get the Michelin Man to pose for your drawings?
---------------------------------------------------
Forum Founder--No Longer Participating
MQMurphy
Topside Painter
Posts: 132
Joined: Sat Dec 03, 2005 5:42 pm
Boat Name: Ikey Boy
Boat Type: Paceship Westwind 24
Location: Cape May, NJ, USA
Contact:

Post by MQMurphy »

Good work, Tim - two suggestions (you've probably already thought of these) tack a couple of 14' 2x4 together so that they are about 20' long - make half a dozen or so - to use as temp braces for your high wall. You don't want that one moving around on you when you are setting your rafters. Secondly, you could just dummy on some longer tails to the rafters that run to the kneewall, running them to the ridge of the shed - somewhat eliminating that space where snow could collect. It'll probrbly be difficult to make that space totally weatherproof, but you might keep most of the snow out.
Good luck - I'm also needing a cover for a boat this winter. The biggest structural problem down here will be wind - we get a wicked NW in the winter.
- Mike Murphy
S/V Ikey Boy
1968 Westwind 24
User avatar
catamount
Candidate for Boat-Obsession Medal
Posts: 378
Joined: Sun Jun 19, 2005 7:30 am
Boat Name: GREYHAWK
Boat Type: Peterson 34
Location: Boothbay Harbor, ME
Contact:

Latest Update

Post by catamount »

Day 3

After work on Monday afternoon, I finished off the wall on top of the sheds:

Image

Rather than run a stud down to the ground in the space between the two sheds, I used diagonal braces to help transfer the load to the the adjacent sheds.

Day 4

I came home from work around lunch time today (Friday) to work on the "tent" (got to make hay when the sun shines). I installed some additional bracing, and erected supports for a scaffolding along outside of the tall right wall, 3' down from the top. With that in place, I used the proto-type roof truss as a template to construct another truss, and then I raised the prototype up onto the boat to set it in place (after setting up ladders, etc...). While I was holding the truss in place, standing on the boat, my wife tied off the guy ropes to the boat's bow and stern cleats. Then I went and screwed the truss down to the left and right walls.

Image

Image

Image

I spent the rest of the afternoon cutting gussetts and rafters, and assembling more trusses (now using the second truss as a template). Tomorrow, I'll try to raise all the trusses I've assembled so far, and make up the rest, before the remnants of Ernesto get here... Stay tuned!

Regards,
Last edited by catamount on Thu Apr 30, 2009 3:23 pm, edited 1 time in total.
Tim Allen -- 1980 Peterson 34 GREYHAWK
Harborfields Housekeeping Cottages, West Boothbay Harbor, Maine
Sailors for the Sea, a new voice for ocean conservation
MQMurphy
Topside Painter
Posts: 132
Joined: Sat Dec 03, 2005 5:42 pm
Boat Name: Ikey Boy
Boat Type: Paceship Westwind 24
Location: Cape May, NJ, USA
Contact:

Post by MQMurphy »

Looking good! Ernesto passed through here (South Jersey) yesterday and last night - serious wind! Good luck up there.
- Mike Murphy
S/V Ikey Boy
1968 Westwind 24
User avatar
catamount
Candidate for Boat-Obsession Medal
Posts: 378
Joined: Sun Jun 19, 2005 7:30 am
Boat Name: GREYHAWK
Boat Type: Peterson 34
Location: Boothbay Harbor, ME
Contact:

Post by catamount »

This morning I raised all the trusses I had made yesterday, and screwed them all in place. After tieing them together with some strapping, I made up the remaining trusses. After lunch, I raised all the remaining trusses, except the last one. Given the reverse transom of my 34' boat, there was no deck to stand on! Then I added some more strapping.

Image

Image
Baxter, the dog, weighs in at almost 150 lbs.; he's over 6' long from the tip of his nose to the tip of his tail. He can rest his chin on the dining room table (His dad was a Golden Retriever, his mom a Newfoundland).

Image

Once I get it all braced, we'll place some staging planks on top of the collar ties so that we can set the ridge pole in place.

Image

More to come....

Regards,
Last edited by catamount on Fri May 01, 2009 11:30 am, edited 1 time in total.
Tim Allen -- 1980 Peterson 34 GREYHAWK
Harborfields Housekeeping Cottages, West Boothbay Harbor, Maine
Sailors for the Sea, a new voice for ocean conservation
User avatar
Tim
Shipwright Extraordinaire
Posts: 5708
Joined: Tue Apr 01, 2003 6:39 pm
Boat Name: Glissando
Boat Type: Pearson Triton
Location: Whitefield, ME
Contact:

Post by Tim »

That is looking great. Too bad you didn't just pour a slab beneath it...

Thanks for the updates.
---------------------------------------------------
Forum Founder--No Longer Participating
MQMurphy
Topside Painter
Posts: 132
Joined: Sat Dec 03, 2005 5:42 pm
Boat Name: Ikey Boy
Boat Type: Paceship Westwind 24
Location: Cape May, NJ, USA
Contact:

Post by MQMurphy »

Tim wrote:That is looking great. Too bad you didn't just pour a slab beneath it...
It isn't too late, is it?
- Mike Murphy
S/V Ikey Boy
1968 Westwind 24
User avatar
catamount
Candidate for Boat-Obsession Medal
Posts: 378
Joined: Sun Jun 19, 2005 7:30 am
Boat Name: GREYHAWK
Boat Type: Peterson 34
Location: Boothbay Harbor, ME
Contact:

Post by catamount »

Day 6

Added more braces and strapping, placed ridgepoles with help from Wendy, then pulled tarps over the top and secured them in place with battens screwed to the rafters:

Image

(As to the concrete slab, you should know I am already contemplating how to take this thing down when the time comes! ;-)
Last edited by catamount on Thu Apr 30, 2009 3:22 pm, edited 1 time in total.
Tim Allen -- 1980 Peterson 34 GREYHAWK
Harborfields Housekeeping Cottages, West Boothbay Harbor, Maine
Sailors for the Sea, a new voice for ocean conservation
User avatar
catamount
Candidate for Boat-Obsession Medal
Posts: 378
Joined: Sun Jun 19, 2005 7:30 am
Boat Name: GREYHAWK
Boat Type: Peterson 34
Location: Boothbay Harbor, ME
Contact:

Post by catamount »

Yesterday afternoon, Wendy and I got the last roof truss in place by lifting one end up and lashing it in place, then lifting the other end up while Wendy kept the truss from tipping over using sticks and ropes while standing on the aft deck of the boat. Once I got the end up on top of the wall, I screwed it in place and secured some strapping to brace it. Then I went over to the other wall and screwed that end down and braced it. Finally, we pulled the blue tarp over this last truss and I finished battening that down.

Left to do is to enclose the ends and side with clear poly, build scaffolding or staging around the boat, and hang some shop lights.

Regards,
Tim Allen -- 1980 Peterson 34 GREYHAWK
Harborfields Housekeeping Cottages, West Boothbay Harbor, Maine
Sailors for the Sea, a new voice for ocean conservation
User avatar
catamount
Candidate for Boat-Obsession Medal
Posts: 378
Joined: Sun Jun 19, 2005 7:30 am
Boat Name: GREYHAWK
Boat Type: Peterson 34
Location: Boothbay Harbor, ME
Contact:

Now Partially Enclosed

Post by catamount »

This weekend, I installed some framing on the gable ends, particularly at the rear, and stapled up 6 mil plastic to enclose the rear and right side. I'll get to front sometime later (most of the weather comes at us from the rear of the "tent" so that was the most important to get covered).

Image

Image

I also constructed some staging -- a wrap-around "dock" -- about seven feet off the ground all along the port side of the boat. This puts the toerail at belt-buckle height. I now need to construct a stairway for ease of access up to this "dock" from the ground. For work on the starboard side of the boat, I will have to use ladders and some very tall horses to support the staging...

Image

Finally, I've placed a couple of 4' flourescent shop lights (with electronic ballasts for cold weather starting) over the collar ties to illuminate the decks for working on the boat in late afternoons and evenings....

At the same time, some progress is being made on tackling some of this year's winter work list.

Regards,
Last edited by catamount on Thu Apr 30, 2009 3:22 pm, edited 1 time in total.
Tim Allen -- 1980 Peterson 34 GREYHAWK
Harborfields Housekeeping Cottages, West Boothbay Harbor, Maine
Sailors for the Sea, a new voice for ocean conservation
User avatar
catamount
Candidate for Boat-Obsession Medal
Posts: 378
Joined: Sun Jun 19, 2005 7:30 am
Boat Name: GREYHAWK
Boat Type: Peterson 34
Location: Boothbay Harbor, ME
Contact:

Final Tally

Post by catamount »

Since I started this thread asking about cost-effective solutions, I figured I ought to post the final tally for what I ended up building:

I spent a total of $830.61 on lumber, fasteners, tarps, plastic sheeting, and two good quality shop lights. The lumber was sufficient not only for the frame of the "tent," but also for staging and stuff (along with some planks and scraps I already had). I also spent $198.00 on a new tool needed to do the job (a taller step ladder -- actually one of those of 4-1 types).

I'm well along in stripping all the hardware off the deck in preparation for re-coring, re-finishing, and re-bedding...

Regards,
Tim Allen -- 1980 Peterson 34 GREYHAWK
Harborfields Housekeeping Cottages, West Boothbay Harbor, Maine
Sailors for the Sea, a new voice for ocean conservation
User avatar
catamount
Candidate for Boat-Obsession Medal
Posts: 378
Joined: Sun Jun 19, 2005 7:30 am
Boat Name: GREYHAWK
Boat Type: Peterson 34
Location: Boothbay Harbor, ME
Contact:

Ready for Standard Time

Post by catamount »

Ready for falling back to Standard Time:

Image

(It was my wife and son who hung the American flag from the tent frame.)
Last edited by catamount on Thu Apr 30, 2009 3:21 pm, edited 1 time in total.
Tim Allen -- 1980 Peterson 34 GREYHAWK
Harborfields Housekeeping Cottages, West Boothbay Harbor, Maine
Sailors for the Sea, a new voice for ocean conservation
User avatar
catamount
Candidate for Boat-Obsession Medal
Posts: 378
Joined: Sun Jun 19, 2005 7:30 am
Boat Name: GREYHAWK
Boat Type: Peterson 34
Location: Boothbay Harbor, ME
Contact:

Post by catamount »

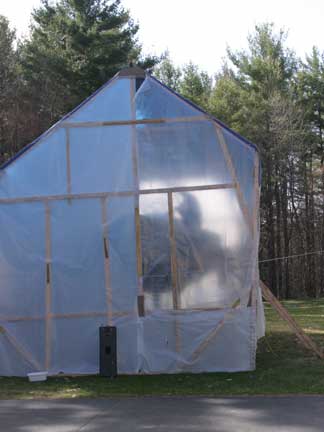
Just an update following the Tax Day Storm of 2007 -- the "tent" is still standing tall. You can see that I've had to add battens over the winter to keep the plastic sheeting attached (the plastic ripped out around the staples alone). The frame hasn't budged, though!

Image

The snow pile is the remains of accumulated snow that has avalanched off the "tent" roof, and is in the shade on the NE side.

It leaks a little along the ridgeline, probably from chafing of the tarp. As soon as things dry out, I'll try patching it up with duct tape :-) from the inside. With luck, it's only got to last another two months or so...

Regards,
Last edited by catamount on Thu Apr 30, 2009 3:21 pm, edited 1 time in total.
Tim Allen -- 1980 Peterson 34 GREYHAWK
Harborfields Housekeeping Cottages, West Boothbay Harbor, Maine
Sailors for the Sea, a new voice for ocean conservation
A30_John
Candidate for Boat-Obsession Medal
Posts: 318
Joined: Mon Nov 01, 2004 3:46 pm
Location: Maine

Post by A30_John »

It leaks a little along the ridgeline, probably from chafing of the tarp. As soon as things dry out, I'll try patching it up with duct tape
You can always throw another tarp over the existing one. The existing tarp will help provide chafe protection.

Congratulations on your shelter's success against this storm. It was a doozy..
John
Figment
Damned Because It's All Connected
Posts: 2847
Joined: Tue Apr 08, 2003 9:32 am
Boat Name: Triton
Boat Type: Grand Banks 42
Location: L.I. Sound

Post by Figment »

I'd say you did VERY well.
I added ballast to the 4th corner, and needed THREE spring clamps to keep the door closed yesterday.

I'll second the suggestion for simply adding another tarp. Sunshading season is coming up too. Less time spent on the shed (tent) leaves more time for the boat.
User avatar
Tim
Shipwright Extraordinaire
Posts: 5708
Joined: Tue Apr 01, 2003 6:39 pm
Boat Name: Glissando
Boat Type: Pearson Triton
Location: Whitefield, ME
Contact:

Post by Tim »

I ended up adding extra tarps over my original plastic boat shed too, though I started with clear plastic on the roof. I think I had 2 or 3 layers of tarp over the top by the end.

Tax day in Maine (and MA) is today. I love Patriot's day, which gives these two states an extra day before filing. Any delay in paying the government is a good thing to me!
---------------------------------------------------
Forum Founder--No Longer Participating
User avatar
catamount
Candidate for Boat-Obsession Medal
Posts: 378
Joined: Sun Jun 19, 2005 7:30 am
Boat Name: GREYHAWK
Boat Type: Peterson 34
Location: Boothbay Harbor, ME
Contact:

Post by catamount »

I still haven't gotten around to "repairing" the leaks along the ridgeline. They're really not all that bad, and besides -- it only leaks when it's raining!

Here are a couple more pics, from another thread, posted here for completeness:

Image
Me, grinding on the deck. With the warmer spring weather, I have since cut off the bottom 10 feet or so of the front wall. Unfortunately, that means you can now see all the junk that has collected on the "ground floor" (so no pics! :-)

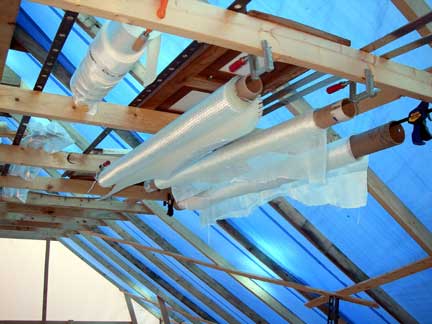
Image
Rolls of fiberglass materials suspended from my overhead storage racks. The collar ties make for convenient storage of a lot of other things, too, like the genoa tracks, traveller, hand rails, hatches, pipe berth frames, etc...

Regards,
Tim Allen -- 1980 Peterson 34 GREYHAWK
Harborfields Housekeeping Cottages, West Boothbay Harbor, Maine
Sailors for the Sea, a new voice for ocean conservation
User avatar
catamount
Candidate for Boat-Obsession Medal
Posts: 378
Joined: Sun Jun 19, 2005 7:30 am
Boat Name: GREYHAWK
Boat Type: Peterson 34
Location: Boothbay Harbor, ME
Contact:

Re: Cost effective approach for a tall tent?

Post by catamount »

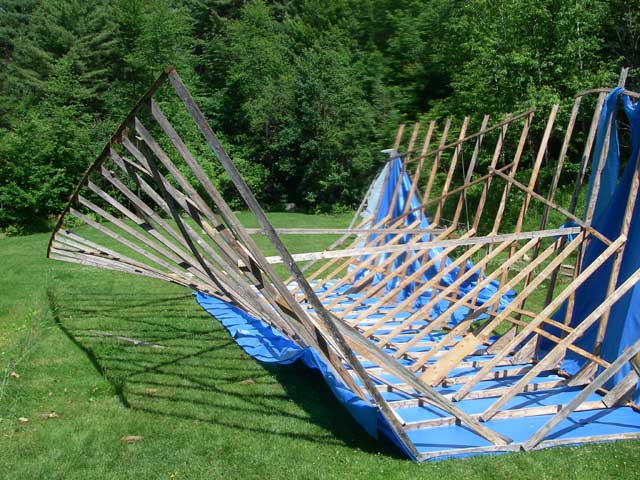
One of my projects in June was to take down the tent I had built almost three years ago. GREYHAWK would be going back in the water at the end of the month, and getting the tent out of the way might make moving the boat easier for my trucker. With help from my Dad (of engine pull fame), we rigged a bridle from the rafters on the south side, over the ridge pole, to a block and tackle hitched to a tree up the hill to the north. The idea was to pull the whole tent over to the north side, where it might be easier to disassemble on the ground rather than 15 to 20 feet up in the air over the boat (the way I had first assembled it). We added some bracing between the north wall and the roof structure, and disconnected the rafters from the plate at the top of the south wall. Before pulling the thing over, we added some "rails" from the south wall across the boat to support the roof structure so it wouldn't drag across the boat in case it decided to dip instead of swing up and away when we pulled it over.

With everything set, and all bystanders well out of harms way, we started hauling in on the block and tackle. The roof lifted and the wall tilted and everything came down with a crash. The tent actually rolled onto it's roof with the wall up in the air!

Image

Here is the boat, with the rails, unscathed:

Image

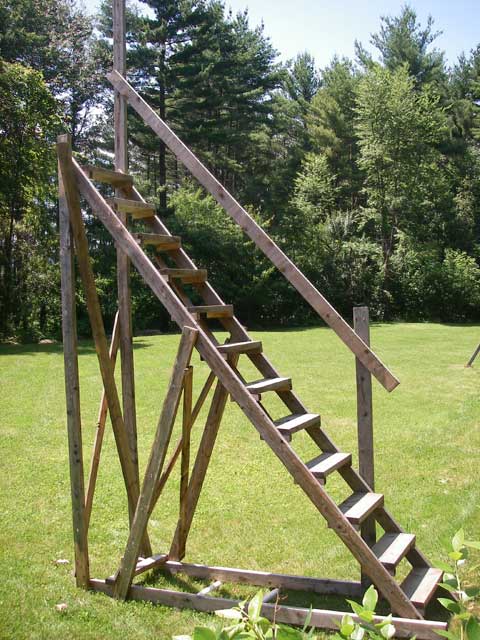
We spent the rest of the day disassembling the tent and by the end of the day the boat was sitting there surrounded by nothing but lawn, and we had a big pile of 2x4 lumber tucked off to the side. We also re-built the stairway I had for getting up on the boat, this time as a free-standing unit rather than tied into the boat tent. Stairs are much more convenient than ladders, especially when your deck is 10 feet off the ground.

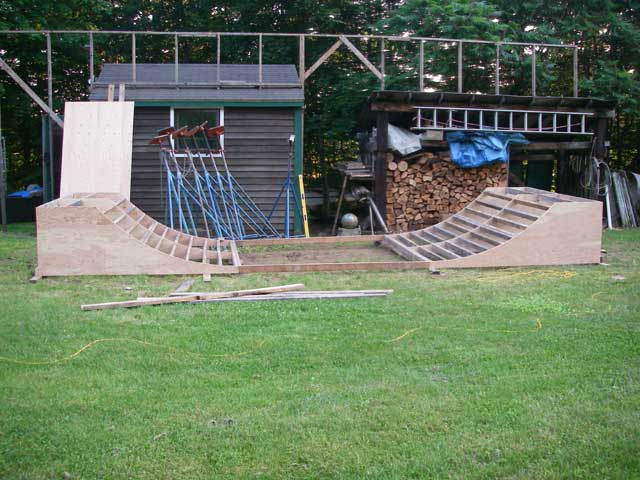
Now that GREYHAWK is back in the water, some of that lumber, and the space that the tent used to occupy, is being re-purposed:

Image

You can see that the old south wall has yet to be taken down....

Tim A.
Tim Allen -- 1980 Peterson 34 GREYHAWK
Harborfields Housekeeping Cottages, West Boothbay Harbor, Maine
Sailors for the Sea, a new voice for ocean conservation
User avatar
catamount
Candidate for Boat-Obsession Medal
Posts: 378
Joined: Sun Jun 19, 2005 7:30 am
Boat Name: GREYHAWK
Boat Type: Peterson 34
Location: Boothbay Harbor, ME
Contact:

Re: Cost effective approach for a tall tent?

Post by catamount »

catamount wrote:...we had a big pile of 2x4 lumber tucked off to the side. We also re-built the stairway I had for getting up on the boat, this time as a free-standing unit rather than tied into the boat tent. Stairs are much more convenient than ladders, especially when your deck is 10 feet off the ground.
Cleaning up files on my laptop, I came across this picture of the Stairway to Heaven:

Image

Definitely better than a ladder!

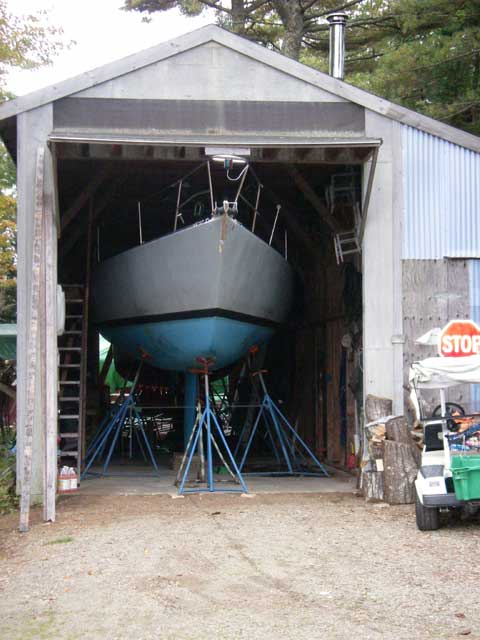
BTW, I've kept the stair treads and put them up in the shed where the boat is stored now -- you can see them off on the left side:

Image

Tim A.
Tim Allen -- 1980 Peterson 34 GREYHAWK
Harborfields Housekeeping Cottages, West Boothbay Harbor, Maine
Sailors for the Sea, a new voice for ocean conservation
Hulukupu
Skilled Systems Installer
Posts: 165
Joined: Tue Oct 23, 2007 9:54 pm
Boat Name: Mahana
Location: Bristol, Maine

Re: Cost effective approach for a tall tent?

Post by Hulukupu »

This has been a great thread for me. Thanks for sharing the full evolution of Greyhawk's shed.
Robert The Gray
Candidate for Boat-Obsession Medal
Posts: 351
Joined: Thu Feb 19, 2004 1:54 pm
Location: Oakland California
Contact:

Re: Cost effective approach for a tall tent?

Post by Robert The Gray »

Now that GREYHAWK is back in the water, some of that lumber, and the space that the tent used to occupy, is being re-purposed:

Image

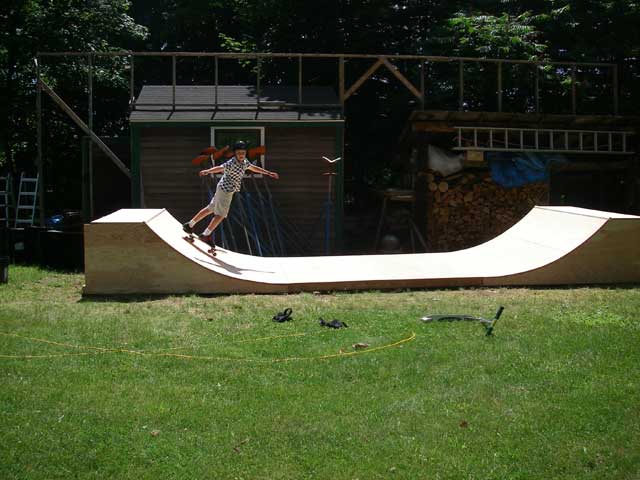
OK. What is it? A very shallow skateboard ramp?
Former Owner: Whisper, now Alma 1960 WC Triton
Whisper Projects
Daysailfilms
Hulukupu
Skilled Systems Installer
Posts: 165
Joined: Tue Oct 23, 2007 9:54 pm
Boat Name: Mahana
Location: Bristol, Maine

Re: Cost effective approach for a tall tent?

Post by Hulukupu »

I took it for stadium seating for kabitzers. You don't want them to get too comfortable.
User avatar
Rachel
Master of the Arcane
Posts: 3044
Joined: Tue Dec 07, 2004 7:59 pm

Re: Cost effective approach for a tall tent?

Post by Rachel »

Hulukupu wrote:I took it for stadium seating for kabitzers. You don't want them to get too comfortable.
"You know, you're not doing that right. You really should....."

:Whoop! Bossy know-it-all slides down into heap of prior critics:
User avatar
catamount
Candidate for Boat-Obsession Medal
Posts: 378
Joined: Sun Jun 19, 2005 7:30 am
Boat Name: GREYHAWK
Boat Type: Peterson 34
Location: Boothbay Harbor, ME
Contact:

Re: Cost effective approach for a tall tent?

Post by catamount »

Does this answer the question?

Image
Tim Allen -- 1980 Peterson 34 GREYHAWK
Harborfields Housekeeping Cottages, West Boothbay Harbor, Maine
Sailors for the Sea, a new voice for ocean conservation
Robert The Gray
Candidate for Boat-Obsession Medal
Posts: 351
Joined: Thu Feb 19, 2004 1:54 pm
Location: Oakland California
Contact:

Re: Cost effective approach for a tall tent?

Post by Robert The Gray »

NICE!!!!!!
I like the little coping detail.
r
Former Owner: Whisper, now Alma 1960 WC Triton
Whisper Projects
Daysailfilms
Post Reply