Bear with me, I have very little real world experience with fiberglass repairs. I am thinking to repair some holes in my boat and I do not feel comfortable guessing.
According to the West System book, 9oz cloth is 0.017" and 12oz is 0.020". So I would call 10oz 0.018" more or less.
So, If I am patching 1/4" thick glass, I need almost 14 layers of 10oz?!?! This doesnt sound right.
I have some 1708 mat backed cloth too but I have no clue what its theoretical wet thickness is.
Is there a standard that you use to determine the number of layers of cloth needed to make a repair?
10oz cloth wet thickness for planning purposes
-
Surveyor
- Rough Carpentry Apprentice
- Posts: 61
- Joined: Sat Nov 06, 2010 3:20 pm
- Boat Type: Alberg 30 #329
- Contact:
Re: 10oz cloth wet thickness for planning purposes
I did some reading :P
Casey says +- 1/32 per layer of 10oz. This seems much more reasonable.
Casey says +- 1/32 per layer of 10oz. This seems much more reasonable.
Jim - Bahala Na!
http://svcookie.blogspot.com/
http://svcookie.blogspot.com/

Re: 10oz cloth wet thickness for planning purposes
Although I don't know the exact type of holes or patches you are making, in general I would vote for using the biax. Off the top of my head, I think one layer of 1708 comes out to about [Edited] 3/32" [I had written 3/16" but that can't be right as it's almost 1/4"].... I will have to look that up.
Edited to add: I'm not sure about a "standard," but then I am not a repair professional. I generally figure that on "our type" of boats, if I'm repairing with something like 1708 and epoxy, I'm going to be making the boat stronger than it was almost no matter how many layers I use (within logical reason, of course). I don't worry so much about duplicating original thickness exactly (except for the fact of convenience), but as a rough guide, I'd probably use three layers for a top deck skin, one or two layers for an inside deck skin, three to four layers for an outside patch on a machined hole, and one or two layers on the inside of a machined hole (below the waterline - say a disused through-hull). I do go for the 12:1 scarph ratio though - I don't mean to imply that I just casually slop on some cloth without any thought or planning.
I have sometimes used a layer of 6-10 oz. "plain" cloth, or release cloth/Peel Ply as a finishing/cosmetic layer, but oftentimes I just been use fairing compound for that (depends on situation).
I rarely use "plain cloth" for any type of repair though - except for cosmetic or sheathing type uses.
How does the above compare to what others here do?
Rachel
PS: One note is that on "machined" holes (such as a perfectly round, small diameter disused through-hull hole), you are not so much adding or restoring strength as you are simply closing it up to keep the water out of your boat.
PPS: Have you got a copy of WEST System's free epoxy guide? That has a lot of good information in it. Also, if you look on their website, they have some good guides to things such as how to patch holes of various sizes and shapes, etc.
System Three also has a good epoxy book. Here are some links:
WEST article on patching machined holes:
http://www.westsystem.com/ss/repairing- ... iberglass/
Use guide (each illlustration brings up one chapter of "the book":
http://www.westsystem.com/ss/use-guides/
System Three's epoxy book:
http://www.systemthree.com/reslibrary/m ... rature.asp
-
Surveyor
- Rough Carpentry Apprentice
- Posts: 61
- Joined: Sat Nov 06, 2010 3:20 pm
- Boat Type: Alberg 30 #329
- Contact:
Re: 10oz cloth wet thickness for planning purposes
Thanks Rachel for the heap of info, it really helps. I do have the West Systems books and have seen the all of the websites except the System 3.
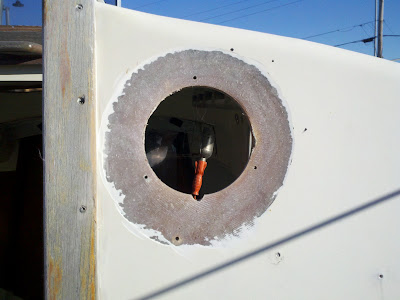
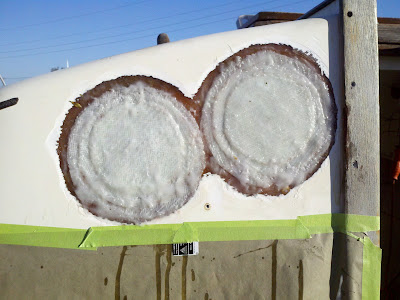
The repair I am thinking of doing is patching these holes:
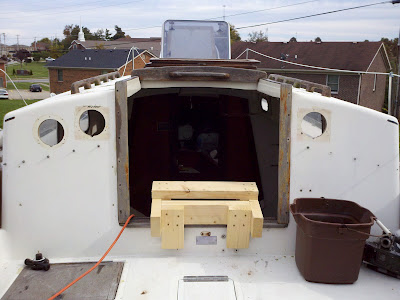

I have the balsa cut out (4"dia) and plan to back it on the inside with plastic covered sponge and a piece of luan. Cutting the sponge just right was a pain. My outside skin is 6/32" thick so 2 layers of 1708 should be just right!
The repair I am thinking of doing is patching these holes:
I have the balsa cut out (4"dia) and plan to back it on the inside with plastic covered sponge and a piece of luan. Cutting the sponge just right was a pain. My outside skin is 6/32" thick so 2 layers of 1708 should be just right!
Jim - Bahala Na!
http://svcookie.blogspot.com/
http://svcookie.blogspot.com/
-
mitiempo
- Candidate for Boat-Obsession Medal
- Posts: 319
- Joined: Mon Oct 27, 2008 11:37 am
- Boat Name: Mi Tiempo
- Boat Type: Canadian Sailcraft CS27
- Location: victoria bc canada
Re: 10oz cloth wet thickness for planning purposes
Why don't you glass both inside and outside? It would be a stronger repair.
-
Surveyor
- Rough Carpentry Apprentice
- Posts: 61
- Joined: Sat Nov 06, 2010 3:20 pm
- Boat Type: Alberg 30 #329
- Contact:
Re: 10oz cloth wet thickness for planning purposes
Thats what I am doing. The inside and outside skins are different thicknesses and I originally did not know how much cloth was needed. I am going to use 2 layers of biax on the outside and have some 10oz precut and ready if needed. Same for the inside but one layer of biax with possibly some 10oz.mitiempo wrote:Why don't you glass both inside and outside? It would be a stronger repair.
I am going to do the inside first then back it and insert the core plug from the outside. Once it kicks I will fill voids from outside and make that patch.
I have both sides ground down to about 10/1, everything is cut and now waiting for the temp to rise.
Jim - Bahala Na!
http://svcookie.blogspot.com/
http://svcookie.blogspot.com/
-
mitiempo
- Candidate for Boat-Obsession Medal
- Posts: 319
- Joined: Mon Oct 27, 2008 11:37 am
- Boat Name: Mi Tiempo
- Boat Type: Canadian Sailcraft CS27
- Location: victoria bc canada
Re: 10oz cloth wet thickness for planning purposes
That sounds like a good plan. I misunderstood when you described the sponge and luan.
Re: 10oz cloth wet thickness for planning purposes
I actually never realized/thought that the cabin "sides" were cored. Interesting! I guess it makes sense, now that I think about it, for the after side since it's a rather large, flat "slab" of fiberglass.
-
Surveyor
- Rough Carpentry Apprentice
- Posts: 61
- Joined: Sat Nov 06, 2010 3:20 pm
- Boat Type: Alberg 30 #329
- Contact:
Re: 10oz cloth wet thickness for planning purposes
I got it done. Thanks for everyone's help.
It ain't pretty but it will do. You can see the results in the blog.
It ain't pretty but it will do. You can see the results in the blog.
Jim - Bahala Na!
http://svcookie.blogspot.com/
http://svcookie.blogspot.com/
Re: 10oz cloth wet thickness for planning purposes
Just for the record :)
I hope you won't mind if I post a few of your photos here; I do read your blog whenever you post, but too, it's nice to not have a thread just sort of die off, for those who have been reading along. (If it is a problem, let me know and I will edit this post to remove them. Oh, and I a note, down after the last photo (it relates to that one).

On the above photo, I got the idea from your blog that you were done (for now). I don't know if you know this, but you know how after the epoxy cures, you have to go back wash off the blush, then sand, then tack off, and then go back and fair? Well, if you can hit it in the "green stage," then you can just go on and fair without any of those middle steps.
Of course if your patches are too full of "poinks" and proud ridges, that won't work and you will want to sand; but, if things are all (or mostly) below the surface, you can just let it go "green," and then trowel on your fairing compound in one fell swoop, then let it fully cure and move on along.
Again, there's no sense compromising a job just to skip that one step, but sometimes (especially if you go in with that in mind) you can just as easily make work out all in one go (or mostly and then you just go back with a wee little skim coat in few places).
Go Mr. Fiberglass! :D
Rachel
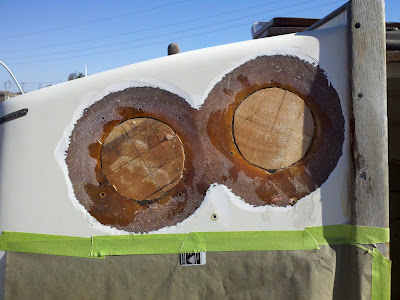
PS: Oh, now one more thing came to mind looking at that last photo. This may just be the photo, but to me.... well see how the layers there look a bit... puffy? Like they could just be laying down better and smoother? Well I'm thinking that maybe.... oh wait, I just went back and read your blog again.... I see you thickened that epoxy. That's kind of a no-no for a basic initial wetout. I think that explains the overly white, puffy look.
You mentioned the resin was running quite a bit. Now some resins are thinner than others (not sure what you are using), but they are all runny (and thin does wet out biaxmat nicely). What I do is first tape and mask off everything that even might get resin on it (certainly everything below; maybe some sides and above).
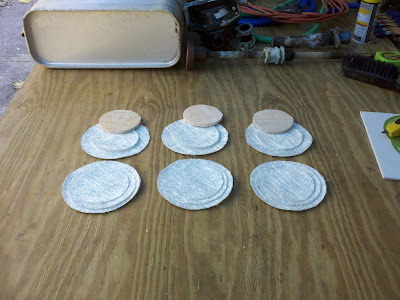
Then I brush neat resin on the receiving fiberglass surfaces, and if I think there is going to be a sticking problem, I let that tack up a bit (still green, so no worries). Then I wet out the three patches on a piece of plastic over plywood, or in the bottom of a plastic dishpan, or on plastic over cardboard. I just pour a little resin right on them (you can let it soak a bit on biaxmat and also go from both sides if it's recalcitrant), and then squeegee it around until the fiberglass is completely translucent and wet (no longer stiff or white, more like rice noodles once they are cooked). I squeegee out any excess resin.
Then I take them - either singly or more often as a "pancake stack" - and put them in place on my now-slightly-tacked surface. This next step is not totally necessary for small bits, but now that I (finally) got a fiberglass roller I use it to roll over everything - it's really really good at releasing air and making everything lay down just right. But for years I just used a squeegee so that works too. Biaxmat likes to trap air (you will hear the bubbles kind of crackling out). If the resulting vertical pancake stack wants to fall down, you can just make a large X over it with blue tape, sticking the ends of the X to dry gelcoat. That will hold them in position while they cure. Or for a super nice smooth surface you can use "peel ply" (release fabric; like windbreaker fabric) to go over the top of them, allow you to squeegee without messing anything up, and leave a nearly ready to finish surface when you peel it off (and blush goes off with it).
I'm not sure if those patches put on with thickened epoxy will be okay or not. I guess just look them over closely for air, "white/dry" fiberglass, etc. And then grind them to heck so they are not proud of the surface and then fair (unless they look bad enough to just come out and start over). They may be fine, just not the ideal way to work in future.
I hope you won't mind if I post a few of your photos here; I do read your blog whenever you post, but too, it's nice to not have a thread just sort of die off, for those who have been reading along. (If it is a problem, let me know and I will edit this post to remove them. Oh, and I a note, down after the last photo (it relates to that one).
On the above photo, I got the idea from your blog that you were done (for now). I don't know if you know this, but you know how after the epoxy cures, you have to go back wash off the blush, then sand, then tack off, and then go back and fair? Well, if you can hit it in the "green stage," then you can just go on and fair without any of those middle steps.
Of course if your patches are too full of "poinks" and proud ridges, that won't work and you will want to sand; but, if things are all (or mostly) below the surface, you can just let it go "green," and then trowel on your fairing compound in one fell swoop, then let it fully cure and move on along.
Again, there's no sense compromising a job just to skip that one step, but sometimes (especially if you go in with that in mind) you can just as easily make work out all in one go (or mostly and then you just go back with a wee little skim coat in few places).
Go Mr. Fiberglass! :D
Rachel
PS: Oh, now one more thing came to mind looking at that last photo. This may just be the photo, but to me.... well see how the layers there look a bit... puffy? Like they could just be laying down better and smoother? Well I'm thinking that maybe.... oh wait, I just went back and read your blog again.... I see you thickened that epoxy. That's kind of a no-no for a basic initial wetout. I think that explains the overly white, puffy look.
You mentioned the resin was running quite a bit. Now some resins are thinner than others (not sure what you are using), but they are all runny (and thin does wet out biaxmat nicely). What I do is first tape and mask off everything that even might get resin on it (certainly everything below; maybe some sides and above).
Then I brush neat resin on the receiving fiberglass surfaces, and if I think there is going to be a sticking problem, I let that tack up a bit (still green, so no worries). Then I wet out the three patches on a piece of plastic over plywood, or in the bottom of a plastic dishpan, or on plastic over cardboard. I just pour a little resin right on them (you can let it soak a bit on biaxmat and also go from both sides if it's recalcitrant), and then squeegee it around until the fiberglass is completely translucent and wet (no longer stiff or white, more like rice noodles once they are cooked). I squeegee out any excess resin.
Then I take them - either singly or more often as a "pancake stack" - and put them in place on my now-slightly-tacked surface. This next step is not totally necessary for small bits, but now that I (finally) got a fiberglass roller I use it to roll over everything - it's really really good at releasing air and making everything lay down just right. But for years I just used a squeegee so that works too. Biaxmat likes to trap air (you will hear the bubbles kind of crackling out). If the resulting vertical pancake stack wants to fall down, you can just make a large X over it with blue tape, sticking the ends of the X to dry gelcoat. That will hold them in position while they cure. Or for a super nice smooth surface you can use "peel ply" (release fabric; like windbreaker fabric) to go over the top of them, allow you to squeegee without messing anything up, and leave a nearly ready to finish surface when you peel it off (and blush goes off with it).
I'm not sure if those patches put on with thickened epoxy will be okay or not. I guess just look them over closely for air, "white/dry" fiberglass, etc. And then grind them to heck so they are not proud of the surface and then fair (unless they look bad enough to just come out and start over). They may be fine, just not the ideal way to work in future.
-
Surveyor
- Rough Carpentry Apprentice
- Posts: 61
- Joined: Sat Nov 06, 2010 3:20 pm
- Boat Type: Alberg 30 #329
- Contact:
Re: 10oz cloth wet thickness for planning purposes
I was running out of daylight and the temp was dropping so not really any time to fair. When I went back out to look at it and measure a bit, I noticed that they are almost perfectly level with the surrounding gelcoat except at the bottoms where they slid down. They will need some heavy sanding in those areas. There are small depressions at the tops too of course.
I like all of your suggestions and they make good sense. Born from common sense I suppose. One thing I have learned from this experience is do not try to beat the clock. I had a small weather window where I had to wait for temps to rise then get it down before they drop again. It would have been better maybe to just tape over the holes and wait until the spring :)
The inside turned out nice where I used neat epoxy. It was not as heavy as the thickened so it did not slide or sag. It did run though which was the reason I decided to thicken on the outside. Then I used a greater part of the heaviest filler which compounded my error.
I did use a roller. The disheveled look they have in the picture is mainly from having to push them up as they slide down. I didnt wait long enough for the initial surface wet out to get tacky and hold it.
I did learn alot though. I am not opposed to grinding it out and doing it again either. No problem about the pictures and I am glad that you posted them here. It was getting late and I was feeling tired.
Jim - Bahala Na!
http://svcookie.blogspot.com/
http://svcookie.blogspot.com/
-
Triton106
- Candidate for Boat-Obsession Medal
- Posts: 392
- Joined: Fri Apr 18, 2003 4:51 pm
- Location: San Francisco Bay Area
Re: 10oz cloth wet thickness for planning purposes
Just to echo your sentiment here, the greatest challenge I found in doing various boat projects is not how to do each process correctly (although it takes a lot time to learn each new skill) but how to balance between doing a job that is "good enough" vs. doing a "perfect" job. I know it is almost taboo on this forum to talk about "good enough" but in real life we are faced with limitations of resources (eg. time, money, tools, skills etc...) While I admire other people's show perfect projects I don't really feel too bad if my projects don't turn out as well because I know I can't choose perfection each time.Surveyor wrote:I was running out of daylight and the temp was dropping so not really any time to fair. When I went back out to look at it and measure a bit, I noticed that they are almost perfectly level with the surrounding gelcoat except at the bottoms where they slid down. They will need some heavy sanding in those areas. There are small depressions at the tops too of course.
I like all of your suggestions and they make good sense. Born from common sense I suppose. One thing I have learned from this experience is do not try to beat the clock. I had a small weather window where I had to wait for temps to rise then get it down before they drop again. It would have been better maybe to just tape over the holes and wait until the spring :)
My friend Rob is such a perfectionist. Every one of his projects is always done perfectly or he will redo them. The trade off is that he has not sail his boat for the last five years. On the other hand I can work a weekend and sail a weekend (not literally). These are trade offs we all have to make each according to our own priorities.
Ray D. Chang
Triton 106 in Berkeley, CA
Triton 106 in Berkeley, CA