Fiberglassing a Hull to Deck Joint (?)

Ask a question...get an answer (or two).
Post Reply
avd155

Fiberglassing a Hull to Deck Joint (?)

Post by avd155 »

I've been really making every consideration possible to make my boat a "dry" boat, but one thing that always seems to be a leaky problem is the hull to deck joint. My current hull to deck joint looks like this:

Image
[Caption: Sorry, that's right after I took off the toe rail, the joint is all cleaned out now]

Image

(A photo album of images are here, I'll be posting more of the cleaned up joint here: http://bristol27.com/photos/projects/de ... eck_joint/ )

I've heard online of people doing the following:

1) Removing all machine screws for hull to deck joint
2) Grind hull to deck joint to a bevel
3) Laying up fiberglass strips in the bevel created in step 2
4) Sand & fair the new fiberglass strip
5) Re-drill and install new machine screws bedded in 5200

I know this is a large under taking, but I do believe that it would be a good improvement for reaching my goal of a dry boat. It needs new caulking in places already...so it's going to take some work whatever path I choose....

Any thoughts on this process? Is it worth the time and effort? Anyone have links to people who have done this?
Quetzalsailor
Master of the Arcane
Posts: 1100
Joined: Fri Aug 26, 2005 9:53 am
Boat Name: Quetzal
Boat Type: LeComte North East 38
Location: Philadelphia, PA

Re: Fiberglassing a Hull to Deck Joint (?)

Post by Quetzalsailor »

LeComtes and Hinckleys are 'glassed across the joint. LeComtes are glassed on the interior; must have been a miserable job for a young 'B' string worker! Sloppy mess on our boat, but presumably strong enough.

If you've really got a correctly sized and executed scarpf joint between hull and deck, I don't think you need bolt it. Save all those new holes for the toerail. If you only have a little 'glass bandage across the joint and the old sealant with new bolts is the structural joint, then I'd wonder about how much that joint moves either under load or temperature over time; I'd fear breaking the bandage. As an example, our '72 Morgan 27 has the usual sealed and bolted joint, but the joint at both the bow and transom was covered with a slather of gelcoat rather than toerail or a Hunter-Catalina-esque trim strip. After only 25 years, the gelcoat cracked along the joint suggesting both the brittle-ness of the gel and movement in the joint.

Tim might show you how to mine the archive on this forum; I recall someone who separated his hull and deck and resealed the joint. Lots of work!
User avatar
Rachel
Master of the Arcane
Posts: 3044
Joined: Tue Dec 07, 2004 7:59 pm

Re: Fiberglassing a Hull to Deck Joint (?)

Post by Rachel »

I think it's a great idea, and a fiberglassed hull/deck joint is my preference. If it's properly done, I don't think the bolts are necessary or even desirable. In fact, if it were me, I would be thinking of alternative ways to attach the toerail, just because... why have more holes, and also there's always that challenge of keeping the varnish up where the toerail sits on the deck (assuming you have a varnished wooden toerail).

It all depends on the style and function you're going for, but I've been intrigued by the installations where the toerail is held an inch or so above the deck, and fastened via flanges -- either on the back of the stanchion bases, or small independent flanges. That way you have fewer holes to keep bedded, and no worries about deck drainage or scuppers; also, the varnish is not sitting on the deck and wanting to peel in the waterways. It would change the look of the boat though.

If you are interested in the latter, I could dig up some links to other boats that have gone that way - including the fiberglassed hull/deck joint where one did not previously exist (but on my way out the door to an appointment now).

Rachel
avd155

Re: Fiberglassing a Hull to Deck Joint (?)

Post by avd155 »

Rachel wrote:If you are interested in the latter, I could dig up some links to other boats that have gone that way - including the fiberglassed hull/deck joint where one did not previously exist (but on my way out the door to an appointment now).
Yes please :) Not sure if I'll go as far as using flanges to raise the toe-rail, but never say never.
User avatar
Rachel
Master of the Arcane
Posts: 3044
Joined: Tue Dec 07, 2004 7:59 pm

Re: Fiberglassing a Hull to Deck Joint (?)

Post by Rachel »

Here are a few that come to mind:

1) This is only a reference that you could seek out more info on, but Hal and Margaret Roth had continual trouble with a leaking hull-deck joint on their Spencer 35, "Whisper." After trying many fixes (re-bedding, etc.), they eventually fiberglassed the hull/deck joint, and at the same time they did the elevated toerail/stanchion bracket treatment. As far as I read, that solved their problems. As I understand it, newer Spencer 35's had their hull-deck joint 'glassed, and somehow the toerail was included in this (maybe it was a fiberglass shape?).

DECK:
...The Spencer hull and deck are joined while the hull is still in the mold to maximize fairness. The toerail is incorporated into the deck/hull joint which is achieved by means of successive layers of internal fiberglass bonds...


http://www.spenceryachts.net/information.htm


2) Fred Bickum recently completed a circumnavigation in his Cape Dory 28, "Fenix." He had a background in fiberglass boatbuilding (I think he worked for Sam Morse, or someone who made the fiberglass BCC at any rate). He bought his CD 28 with a plan for a thorough refit before he set out. One of his projects was to fiberglass the hull-deck joint, and then to put on the elevated toerail. I loosely followed his cruising log reports on the Cape Dory board (they may be on his website too), and I don't remember him reporting any problems with this arrangement.

Here is a photo of the boat post refit but pre-launch:

Image

Here is a link to his exterior projects page. In the left margin are links to where he fiberglasses the joint and then adds the new toerail:

http://www.sbastro.com/FeNIX/Projects/P ... riorFS.htm

3) Here is an article from Good Old Boat magazine wherein a couple refit a Cal 48 for cruising. They reworked and fiberglassed the hull-deck joint. Then they were reluctant to drill hundreds of new holes just to re-install the toerail. Instead, they made some brackets out of various aluminum shapes (angle and such), and used those to mount an elevated toerail.

http://www.goodoldboat.com/reader_servi ... oerail.php

4) Liz Clark, who is cruising on the Cal 40, "Swell," fiberglassed the hull-deck joint on her boat. Looking at photos, I couldn't quite tell what she did with the toerail; it almost looked like she had fiberglassed a low, fiberglass profile on at the same time she fiberglassed the hull-deck joint. I mention this one because it's always interesting to see how people handle the transition between the new fiberglass and the hull when they glass the outside of the boat. Some people do a meticulous fairing job, others I've seen add a rub rail, and from photos, it looks like Liz simply cut or ended all the fiberglass parallel with the gunwale and a few inches below it, and just let there be a line there.

Her previous website had a link to a "boat" section, but I don't see that on her new one, and the photo gallery seems a bit hard to find, but this photo slightly shows the line of fiberglass a couple of inches below the gunwale:

There is a close-up shot at the link below (copyrighted, so I can't paste it here):

http://www.shannonswitzer.com/SAIL/SAIL ... 9015_XCriW

http://www.swellvoyage.com


5) There is a fellow named Les who is rebuilding a Pearson Vanguard named "Coqueta." On his boat he found that, although Pearson apparently claimed to have completely fiberglassed the hull-deck joint (on the inside), the tabbing there on his boat was pretty weak, and also was put on after the bulkheads were in, so there was essentially nothing to seal the joint near the bulkheads but caulk (no overlapping flanges on the Vanguard). He has since fiberglassed the joint, faired the hull, and painted it. He has a web page documenting it, with numerous photos of the process. I don't believe he has got to the toerail stage yet (or, maybe he has but without updating the page; there is contact info for him at the bottom of the pate).

http://www.steds.net/myweb/lrogers/HullDeckJoint.htm

I hope this is helpful,

Rachel
stone
Rough Carpentry Apprentice
Posts: 55
Joined: Tue Dec 13, 2005 6:18 pm
Location: Wilmington,NC

Re: Fiberglassing a Hull to Deck Joint (?)

Post by stone »

Image
Image
Image
I did mine,but mainly because I put on a whole new deck(core,new lamination) so it wasnt much more effort to glass the hull /deck joint. Mine is an outward flange that i just grinded the sides round then glassed completely around.the sides .
Hirilondë
Master of the Arcane
Posts: 1317
Joined: Thu Dec 28, 2006 8:50 am
Boat Name: Hirilondë
Boat Type: 1967 Pearson Renegade
Location: Charlestown, RI

Re: Fiberglassing a Hull to Deck Joint (?)

Post by Hirilondë »

If the hull to deck joint is still sound it is very likely that the leaks were from the toe rail fastening and the fact that the toe rail bedding had failed. I removed the toe rail from my Renegade, along with all wood work actually, for a complete exterior redo. I filled all the toe rail fastener holes as part of the fairing process. That and a thorough bedding of the new toe rail is all I did to address leaks and have had 4 perfectly dry seasons so far since. There is certainly nothing wrong with the process you describe. But if the joint is still sound it is really way more than you need to do.

If you do go that route you describe, I would not bed the screws in 5200. There is nothing to gain by using that product over any other good bedding material and you will make removing the screws totally frustrating when/if it becomes necessary.
Dave Finnegan
builder of Spindrift 9N #521 'Wingë'
--------------------------------------------------------------------------------------------------------------------------------------------------------------------
Gresham’s Law of information: Bad information drives out good. No matter how long ago a correction for a particular error may have appeared in print or online, it never seems to catch up with the ever-widening distribution of the error.
User avatar
Rachel
Master of the Arcane
Posts: 3044
Joined: Tue Dec 07, 2004 7:59 pm

Re: Fiberglassing a Hull to Deck Joint (?)

Post by Rachel »

Hirilondë wrote:If the hull to deck joint is still sound it is very likely that the leaks were from the toe rail fastening and the fact that the toe rail bedding had failed.
Just as a model-specific note, when I was shopping for my first "big boat," the Bristol 27 was at the top of my list (reason being, it was "Tritonish" yet had a motor well, which I wanted). At that time I found quite a number of notes on a particular weakness of the B-27 being the hull-deck joint. Not weak in terms of breaking apart, but weak in that they were prone to leakage.

Rachel
avd155

Re: Fiberglassing a Hull to Deck Joint (?)

Post by avd155 »

If I were to take the path of just removing all the screws which now hold the hull and deck together, then re-bed them with 4200, then install the toe rail with 4200, I would bet that as Hirilondë pointed out, I'd have a leak proof hull to deck joint. (Again as Hirilondë mentioned, I'd use 4200 so that I can remove/repair them if needed individually if/when they leak).

My question would that is this type of repair really going far enough? Wouldn't it be better to somehow squeeze 5200 between the two layers of hull and deck? I don't think I'm comfortable with just glassing the seam then calling it good. I feel that the added strength of the machine screws holding together the hull and deck is a worthwhile strength addition.

It's a hard and often debated decision to make, so I really appreciate all the input so far!
User avatar
Tim
Shipwright Extraordinaire
Posts: 5708
Joined: Tue Apr 01, 2003 6:39 pm
Boat Name: Glissando
Boat Type: Pearson Triton
Location: Whitefield, ME
Contact:

Re: Fiberglassing a Hull to Deck Joint (?)

Post by Tim »

The machine screws are only there because your boat's builder used them to hold the joint together during construction while whatever adhesive is in there cured. The original hull-deck joint adhesive might be a mastic, a 5200-type material, or polyester-wetted mat. It's the adhesive (whatever it is) that secures the joint together, and which is intended to be the structural element.

If you glass over the joint in a proper structural manner, whether from inside or outside (i.e. not just a narrow strip over the existing seam, but really tabbing it together as suggested by one or two of the other posts in this thread), the machine screws are entirely unnecessary, and putting them in would be a total waste of time and resources in that scenario. They wouldn't add strength or insurance. You'd be better off removing them and filling their holes.
---------------------------------------------------
Forum Founder--No Longer Participating
avd155

Re: Fiberglassing a Hull to Deck Joint (?)

Post by avd155 »

After doing some more reading and everyone's great input on this post, I am now nearly 100% certain I'd like to do this type of repair. The basic idea is to give a heavy layup on both the interior and exterior of the joint and do away with the machine screws (as Tim suggested). The biggest question I have is how to, if at all, re-attach the toe-rail. But, before that (and other) questions, here's the idea I have for this repair (see if you think it will stand up to offshore sailing):

1) Remove all machine screws for hull to deck joint. These will not be installed again.
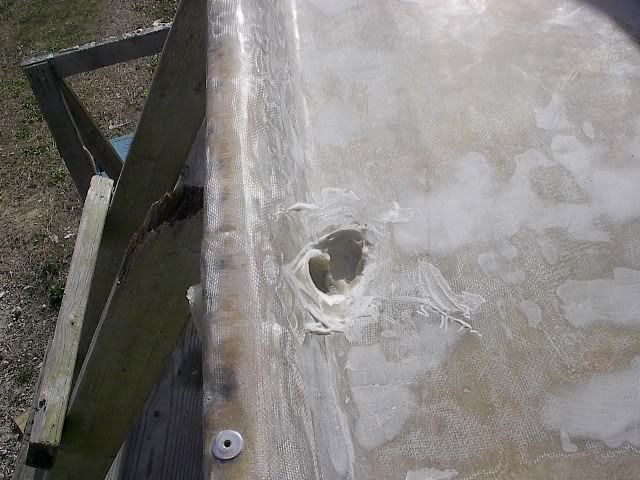
2) Clean all caulking possible from joint.
3) Remove gelcoat starting at the joint, 7" down freeboard and 7" on deck (to prepare for fiberglass layup).
3) Fair interior / exterior of joint to prepare for fiberglass.
4) Lay-up exterior joint with 3 layers of biaxial fiberglass. Lay-up schedule as follows:
a) 2" x 24" strip (spanning joint, deck and hull only)
b) 4" x 26" strip (spanning joint, deck, hull as well as 1" of fiberglass "down" onto freeboard)
c) 8" x 28" strip (spanning joint, deck, hull and 4" down onto freeboard)
5) Lay-up interior joint with 3 layers of biaxial fiberglass. Lay-up schedule as follows:
a) 4" x 24" strip
b) 8" x 26" strip
c) 10" x 28" strip
6) Sand & carefully fair the exterior fiberglass. Here I will try to blend the freeboard "overlap" into the shape of the hull by using the extra 3" of ground down freeboard to continue this line hopefully hiding the repair entirely. I'll also use the extra 3" on the deck to make the new fiberglass
7) Sand & fair the interior fiberglass. This just needs to be done nice enough to be smooth and look semi ok, as it will be hidden inside lockers.
8) Prime and paint
9) Install toe rail....(I'm not sure how to do this).

Here are the questions I have about the plan mentioned above:

1) What is the best method to attach the toe rail?
I have to admit I'm at a loss how this might be done. I read all the links Rachel mentioned, and found that nothing stuck out as an "ah-hah!". I liked the upgraded toe rail the S/V Fenix website Rachel linked showed, but he didn't go into detail how he attached it. (http://www.sbastro.com/FeNIX/Projects/P ... riorFS.htm). The "Good Old Boat" article was interesting, but I didn't think it would work for me exactly (http://www.goodoldboat.com/reader_servi ... oerail.php).

2) Do you believe the layup in steps 4 and 5 is strong enough?
Avoiding leaks is great, but making sure it's strong is the most important thing. I also wanted to note that I plan to vary lengths of my fiberglass strips to make as much overlap as possible, but will doing so make the fairing process that much harder, since there will be "speed bumps" in the layers of biaxial (1 layer stacked on another on another in some places)? What's the best way to not have speed bumps and have an even "level", while still getting good overlap of fiberglass?

3) Does blending the repair into the existing shape of the freeboard and deck (step 6) even possible?
Will the 3" of extra gelcoat allow for enough fairing to blend the repair into the same lines that exist on the current freeboard and deck? Will water drain properly with the increased height of the biaxial and fairing? I'm thinking that using the extra 3" of removed gelcoat, to fair in the thickness of 3 layers of biax might not be enough width to get a complete blend between the existing layers of the hull/deck and the new repair, but perhaps...


Again, thanks for all the input. I hate to beat a dead horse here, but I just want to make sure I'm doing the right thing for this important repair.
User avatar
Tim
Shipwright Extraordinaire
Posts: 5708
Joined: Tue Apr 01, 2003 6:39 pm
Boat Name: Glissando
Boat Type: Pearson Triton
Location: Whitefield, ME
Contact:

Re: Fiberglassing a Hull to Deck Joint (?)

Post by Tim »

You're asking for repair detail that is really going beyond the bounds of forum advice.

Frankly, either the inside or outside layup you suggest is more than adequate for the task alone. I see no reason to do both, though if you want to I guess you can, but it's wasteful to do so.

If I had to choose one, given your proposed sailing plans, I'd suggest the external layup is the best option. It will be plenty of work to complete the job and fair the new work into the hull and deck and make it look good, but it's been done and will certainly result in a strong, waterproof joint.

2" strips aren't really doing you any good. I'd start with a 4" wide strip, then. 6", and finally 8" (17 oz. biax or equivalent). Done correctly, that will be stronger than you can even imagine. Fiberglass and epoxy is strong! Don't underestimate its strength potential.

Fiberglass repair work is often done starting with the largest piece, then progressively smaller ones. I believe this to be the correct approach for hole-filling and many other repairs. For the proposed hull-deck reinforcement, though, I think I'd start with the smallest and end with the largest, as indicated above. You will require quite a wide area over which to fair this into the adjacent surfaces. If your boat has a molded cove stripe recess, it makes a pretty natural boundary for your hull-side fairing.

Page 83 of Hal Roth's book How to Sail Around the World shows a photo of the custom stanchion bases he installed on his highly modified Spencer 35 Whisper that also secure the wooden bulwark board, as alluded to in previous posts. Unless you want to build and fiberglass-in your own raised toerail/bulwark, this stanchion-mounted bracket method is the only way to install a reasonable toerail/bulwark without adding additional holes through the deck.
---------------------------------------------------
Forum Founder--No Longer Participating
Zach
Boat Obsession Medal Finalist
Posts: 684
Joined: Wed Jan 25, 2006 6:28 pm
Location: Beaufort, North Carolina
Contact:

Re: Fiberglassing a Hull to Deck Joint (?)

Post by Zach »

I second Tim on widths and exterior layup. I think 2 layers of 1708 is a gracious plenty.

I glassed 160 feet of rub rail on Noel over the fall, this is my system:

I would buy a really nice pair of Wiss fiberglass scissors and cut 48 inch strips... Just don't cut them sideways across the cloth as it comes off the roll. It feels like it is easier, but it is a lot harder to wet out and keep looking nice. 8 to 10 inches is not long enough for biax to want to stay together. It stretches out in length and fuzzes up.

Fold the stuff over a few times, and cut 3 or 4 at a time.

Walk down the sides of her with a straight edge. if she has some tumble home, or is dead plumb you'll add 3/16ths of flair to her with 3 layers of 1708.

Pre cut all your fabric, build a wet out bench with some saw horses and a piece of plywood with polyethelene sheet on top of it. Wet out with some candy stripe paint rollers. If you are in direct sun, do not use a chrome roller tray. Keep the epoxy containers under the table in the shade. Wet out the cloth, set it aside and stack it up as you go. Roll it for air to squeeze out the excess resin.

I tend to stack the strips, fold them over, and set them on a piece of garbage bag wherever it was handy to do so...

I use a 6 inch air roller with a 1 inch diameter most of the time. Buy 2, in case the goop starts to kick on it you don't have to stop right then and clean it.

You should be able to wet out and put down 6 or 8 of them before they start kicking off, even stacked up. Roll them for air before you carry them to the boat. Roll the hull with epoxy, Peel off one, stick it.

Lay a 48 inch strip starting at the stem, put down a 24 inch strip on top of it so the seam staggers. Start walking down the hull. Put a sharpie line on the hull evenly 4 inches down from the rail, and 4 inches in on the deck to keep your seam fair.

Tape a piece of brown paper right under the sharpie line so you don't have to grind off all the snot that dribbles down the rail. Tape polyethylene to the deck so whatever runs want to happen don't have anywhere to go. Do an acetone wipe every now and again...

I'm a firm believe in microballoons as soon as you are done with a stretch, I stopped and ballooned it every 15 feet, but then again it was 95 degrees in the sun. I came back in the morning with a 7 inch pad sander and 60-80 grit and walking down it to take off the high spots and get everything level. Pull fairing putty that afternoon, and have her ready to paint.

If you have staging, and the glass pre-cut you should be able to grind and glass the whole boat in a day. Particularly if you have a helper doing the wetting out...

My favorite grinder is a multi-task wonder. Makita makes it, model 9227. It is light weight, and has just as much butt as any of the 20 pounders... and has variable speed. I'd grab a half a box of Norton 36 grit hard sandpaper discs and take a very light touch to burn off the gelcoat. If you have room to practice, 1 7 inch 40 grit zirconium flap disc would do the whole boat. I'd tape the corner of the hull and do that last, after you are familiar with how fast your grinder of choice chews and where best to hold it for doing detail work.

When you go to blend it in, drag the putty down into the existing gel coat (Which means it needs to be de-waxed and scratched off too...) that feathers to nothing. 2 layers works out to be about 3 inches of fairing putty. I use a rectangular sheet rock knife about a foot wide with a handle. Run a long board down it, or an air file if you have access to compressed air... and you are pretty much done.

You may want to add a smear of cabosil right to the corner of the hull before you glass, so the fiberglass has something to stick to instead of trying to bubble up. It depends how sharp the corner really is... If you do build up 2 or 3 layers, I'd be oh so tempted to pass a router with a few small roundover carbide bits across it just to make keeping everything in place a little less "fun." If the gel coat is stupidly thick like it is on my triton, she'll probably be a little less sharp just after removing the gel!

Are you planning to repaint the whole boat? I'd ponder putting a gaudy accent stripe around the top of her... Grin.

Anyway, good luck.

Zach
1961 Pearson Triton
http://pylasteki.blogspot.com/
1942 Coast Guard Cutter - Rebuild
http://83footernoel.blogspot.com/
User avatar
Rachel
Master of the Arcane
Posts: 3044
Joined: Tue Dec 07, 2004 7:59 pm

Re: Fiberglassing a Hull to Deck Joint (?)

Post by Rachel »

On the "Fenix" toe rail, I'm not sure if you saw this section on his website or not, because sometimes similar topics are in different sections, but he shows how he attaches the toe rail with modified stanchion bases.

http://www.sbastro.com/FeNIX/Projects/P ... riorFS.htm

From the page:

An original stanchion base:

Image

With a toerail mounting plate welded on:

Image

On the deck:

Image

Another view, without the stanchions in the bases:

Image

Attached to the stanchion bases (five per side) but still running wild at the ends:

Image

There's more info on his site at the link, and other views scattered around the various pages. I was reading along as he was making the modifications, so I got a bit more familiar with the site.

Rachel

PS: I don't think you'll be sorry about glassing the hull and deck together (after you've recovered from the pain of the project). It's nice to know it's a solid joint. Especially since the B-27's were plagued by leaks there.
John Stone
Deck Grunge Scrubber
Posts: 25
Joined: Mon Apr 27, 2009 11:07 pm
Boat Name: Far Reach
Boat Type: Cape Dory 36
Contact:

Re: Fiberglassing a Hull to Deck Joint (?)

Post by John Stone »

AVD,
I am in the midst of glassing the hull deck joint of my Cape Dory 36. I have not laid the glass on yet but I have rounded the edge of the hull deck joint and this week I'll be sanding the gelcoat back 4 1/4" on the deck and hull each. I plan on using west system and multiple layers of 17oz biaxial with some 8" wide finishing cloth as the top layer. I am leaving in the bolts since I already countersunk them below deck level. I plan on installing a raised bulwark like Hal Roth as mentioned by Tim Lackey. Fred Bickum did the same thing. It makes sense to me if you like the look of the bulwark. Allan Vaitses in his book The Fiberglass Boat Repair Manual talks about the advantages of glassing the hull deck joint but not in enough detail to be a "how to guide." There are several posts here that are very similar to what I am doing, e.g. Tim Lackey and Zack.

I am posting pictures of my work at http://www.farreachvoyages.comif that is of interest to you.

Good luck.
John
John Stone
Far Reach
Cape Dory 36
Hull 61
http://www.farreachvoyages.com
User avatar
Bluenose
Candidate for Boat-Obsession Medal
Posts: 438
Joined: Thu Apr 05, 2007 4:19 pm
Boat Name: Bolero
Boat Type: Modified Shields One Design
Location: Lopez Island, WA
Contact:

Re: Fiberglassing a Hull to Deck Joint (?)

Post by Bluenose »

When you guys,and gals, say that fiberglassing over the inside or outside of the hull to deck joint would would be structurally adequate and allow you to replace any and all the fasteners, how do you know? What loading conditions are you taking into account. Where does your confidence come from?

Just curious as it doesn't seem that obvious to me (in fact it seems damned complicated).

Bill
User avatar
Rachel
Master of the Arcane
Posts: 3044
Joined: Tue Dec 07, 2004 7:59 pm

Re: Fiberglassing a Hull to Deck Joint (?)

Post by Rachel »

Well I don't know in any calculated sense; I base my thoughts on seeing boats that do have the hull-deck joint glassed (and no other fasteners), and also on the numerous boats that are built in two (or more) hull pieces that are glassed together.

Examples of the former would be the Triton and Ariel, the Rhodes Meridan and Ranger, and the Tripp-Lentsch 29, which are all in the size range of the Bristol 27. None of these have metallic fasteners holding the hull and deck together.

Then boats such as the Alberg 30, Westsail 32, Rhodes Meridian and Ranger, Tripp-Lentsch 29 (and others) are built in halves (or even more pieces) and glassed together. This isn't as similar as the hull-deck joints mentioned above, for a couple of reasons, but it is still an example of major structural parts glassed (and only glassed) together.

Now you might say that these boats that were joined originally have the advantage of a chemical bond, but I have my doubts as to whether the build quality on many of them means that they really do have that. My guess would be that a bond made now, with proper preparation, epoxy resin, and superior reinforcement (such as biaxial cloth) would actually be better than those original ones.

Rachel
avd155

Re: Fiberglassing a Hull to Deck Joint (?)

Post by avd155 »

John Stone wrote:I am in the midst of glassing the hull deck joint of my Cape Dory 36.
Ah, someone else doing this, good to hear :) I checked out your site, you've got a similar approach as me, but I don't think I'll need to "round" the corner as you have done. I'll be removing paint down to the cove stripe (about 4 inches down) and then 4 - 5 inches on deck. The plan is to avoid having to grind anymore (as I just finished that stage tonight) and hope to be using a carbide blade to take off the gelcoat. From another thread, I read wetting the boat and a sharp blade can really work wonders.

My layup process will basically be what Tim suggested (plus some fairing / mat layup inside to finish the joint for my own peace of mind):
Tim wrote:I'd start with a 4" wide strip, then. 6", and finally 8" (17 oz. biax or equivalent). Done correctly, that will be stronger than you can even imagine.
I also decided that the raised toe rail / bulwark is a perfect idea and just ordered Hal Roth's book to review how he did it. I'll be scouring the net on some other people who did this as well, but I think I have the basic idea figured out. Overall, this will be a massive upgrade to the boat and this large project will pay dividends in the long run. In fact, if I'm adamant about my repair process and deck hardware installation, I might even have a shot at a "dry" boat.
User avatar
Bluenose
Candidate for Boat-Obsession Medal
Posts: 438
Joined: Thu Apr 05, 2007 4:19 pm
Boat Name: Bolero
Boat Type: Modified Shields One Design
Location: Lopez Island, WA
Contact:

Re: Fiberglassing a Hull to Deck Joint (?)

Post by Bluenose »

Rachel wrote:Well I don't know in any calculated sense; I base my thoughts on seeing boats that do have the hull-deck joint glassed (and no other fasteners), and also on the numerous boats that are built in two (or more) hull pieces that are glassed together.

Examples of the former would be the Triton and Ariel, the Rhodes Meridan and Ranger, and the Tripp-Lentsch 29, which are all in the size range of the Bristol 27. None of these have metallic fasteners holding the hull and deck together.

Then boats such as the Alberg 30, Westsail 32, Rhodes Meridian and Ranger, Tripp-Lentsch 29 (and others) are built in halves (or even more pieces) and glassed together. This isn't as similar as the hull-deck joints mentioned above, for a couple of reasons, but it is still an example of major structural parts glassed (and only glassed) together.

Now you might say that these boats that were joined originally have the advantage of a chemical bond, but I have my doubts as to whether the build quality on many of them means that they really do have that. My guess would be that a bond made now, with proper preparation, epoxy resin, and superior reinforcement (such as biaxial cloth) would actually be better than those original ones.

Rachel
Rachel,

The reason I asked my questions is that a while back we got discussing rig modifications and the general wisdom was not to try it without guidance from a professional rigger. I just wondered how making a major, to me anyway, structural change was any different. Why wouldn't the same caveat apply here?

I sort of think that there are three ways to size something.

*Actual loads and detailed calculations - which is just about impossible for boats since the loads don't exist and the construction methods and material properties aren't well defined.

*Equivalent strength - Replacing one structural component with another of equal or greater strength.

*Adjacent structural strength - Back in the day one of the first warning signs of trouble was when two stout parts were held together by something that looked rather flimsy. Things almost never fail out in the middle of nowhere, they fail at the joints.

The one universal truth about analysis is that everyone always thought we over-designed everything. Well until the time came for an ultimate loads test and things started popped and creaking. Religion came fast then. The problem with boats, to my eye, is that most of their life exists at a small fraction of their design loads so all repairs looks stout.

Cheers,
Bill
User avatar
Rachel
Master of the Arcane
Posts: 3044
Joined: Tue Dec 07, 2004 7:59 pm

Re: Fiberglassing a Hull to Deck Joint (?)

Post by Rachel »

I understand what you are saying, Bill, and I don't have a scientific answer. But in a practical sense, I think of glassing a hull and deck together as making them *one piece* And as one piece, they are as viable as other single pieces of fiberglass, to my mind.

I mean, to me, rigging seems like a dynamic system, with many interrelated parts and pieces that all need to fit together with no overly weak or strong links. A single fiberglass boat hull/deck doesn't feel that way to me. It's one unit. Like a patch fills in a hole, or two halves of a hull are joined together. If I didn't trust that I would have a hard time trusting any fiberglass boat.

Now yes, there are bulkheads and other stiffeners to make the hull strong, but they aren't so much making the actual fiberglass bonds strong as they are providing panel strength, right?

I don't know - I don't really have the proper knowledge to test or scientifically prove my thoughts, but I'm a worry-wart if there ever was one, and a properly fiberglassed hull deck joint is not on my worry list; on the contrary, I count it as a plus. I don't think of it as a joint, once it is properly bonded together. I think of the "new" boat as a hull/deck unit.

I hope someone who is more expert chimes in, because I am interested in what they have to say.

Rachel
User avatar
Tim
Shipwright Extraordinaire
Posts: 5708
Joined: Tue Apr 01, 2003 6:39 pm
Boat Name: Glissando
Boat Type: Pearson Triton
Location: Whitefield, ME
Contact:

Re: Fiberglassing a Hull to Deck Joint (?)

Post by Tim »

This thread isn't talking about a major structural change or re-engineering: it's talking about augmenting an existing hull-deck joint with additional reinforcement designed mainly to make the existing joint more waterproof, and with the added result of extra strength above and beyond what already exists.
---------------------------------------------------
Forum Founder--No Longer Participating
User avatar
Bluenose
Candidate for Boat-Obsession Medal
Posts: 438
Joined: Thu Apr 05, 2007 4:19 pm
Boat Name: Bolero
Boat Type: Modified Shields One Design
Location: Lopez Island, WA
Contact:

Re: Fiberglassing a Hull to Deck Joint (?)

Post by Bluenose »

Tim wrote:This thread isn't talking about a major structural change or re-engineering: it's talking about augmenting an existing hull-deck joint with additional reinforcement designed mainly to make the existing joint more waterproof, and with the added result of extra strength above and beyond what already exists.
Tim,

I guess we just disagree. In any case I have written more than enough to satisfy my conscience.
avd155

Re: Fiberglassing a Hull to Deck Joint (?)

Post by avd155 »

Since this topic has become rather detailed, I figured I would share an excerpt from Allan H. Vaitses's book "The Fiberglass Boat Repair Manual":
Ideally…a generously thick, wide tabbing on the outside of the deck joint would be the best way to both seal and mechanically join the parts. This type of joint would last virtually forever, but would require extensive refinishing of both the hull and deck surfaces. As a repair to a deck joint that is merely leaking, it is not usually worth disturbing the surfaces beyond what can be concealed by the covering rail. Nevertheless, if you are confronted with damage that involves the hull and deck surfaces and requires widespread refinishing anyway, by all means, ignore the deck joint as joined by the manufacturer and fiberglass the hull and deck into a one-piece unit. Fair the new joining laminate into both the hull and deck with proper long tapering laps, doing it all on the outside. That's the sort of joint a builder would love to have made it in the first place.

…a hull-to-deck joint needs to be strongly fastened with mechanical fasteners and a sealing compound, with fiberglass tabbing, or with both. The joint, and any mechanical fasteners through the joint, must be sealed on the exterior. The ideal joint consists of a heavy fiberglass lay-up over the outside of the joint, well faired into both the deck and topsides. Almost as good is a heavy lay-up of the joint, well faired into both the deck topsides. Almost as good is a heavy lay-up on the inside of the hull with a lighter tabbing to seal the joint from the outside. More often than not, neither of these ideal methods is practical for the repair of a leaky deck joint. …the best procedure is usually to ensure that the joint is well fastened mechanically, and then cover both the joint and the fasteners with a light fiberglas tabbing concealed under the toenail or rubric.

- Allan H. Vaises "The fiberglas Boat Repair Manual" (p. 154)
The author seems to agree with Tim in that the lay-up for the hull-to-deck joint should be on exterior of the boat. This, and probably this alone, are not only strong enough, but a vast improvement of the common hull-to-deck joint. That said, one ultimately must make the decision to go that far.

I had a long discussion with John Stone from http://www.farreachvoyages.com/. He has written an extensive - yet to be fully expanded - article on the topic which can be found here: http://www.farreachvoyages.com/projects ... joint.html . He and I are in the same exact position of willing to go to any extent to make the hull-to-deck leak free and strong. Perhaps the only difference between us is that he is currently planning to leave the mechanical fasteners in his joint, while I plan to remove all of them as well as add some finishing and fairing on the inside of the joint.

If anyone is still following along at this point, I also wanted to add that after talking with John, I, and I believe John, would agree that the repair would go something like this:

1) Grind - 4" on deck, 4" down on hull. This means up to my cove stripe for me, but John doesn't have one.
2) Lay-up - 3 layers of 17 oz. biaxial, wetted out with West System epoxy. The cloth size will be 4", 6", 8" (smallest -> largest for easier fairing)
3) Fair into hull - 407 fairing compound and more West System epoxy. No 410 will be used, since 410 is not supposed to be used in unprotected areas with high UV absorbtion.
4) Prime - the primed surface will reveal any final spots that need some fairing
5) Fair
6) Repeat steps five and six as necessary until the repair blends in perfectly.
jeffwagnpete
Rough Carpentry Apprentice
Posts: 53
Joined: Tue Jul 07, 2009 6:02 pm
Boat Name: Frogman
Boat Type: Pearson Ariel

Re: Fiberglassing a Hull to Deck Joint (?)

Post by jeffwagnpete »

I am currently doing the exact same repair work your thinking of, I just finished on my top deck grinding away 3 inches from the toe rail, and am going to do the same on the hull, I had bad stress fractures beyond the gell coat on my toe rail, this was needed to do. I turned off the lights in the shop and put a 500 watt light in my galley and stepped outside the boat. When I was done grinding away the different coats you could totally see the stress fractures in the fiberglass from the illuminating light from inside and how this really needed to be done. Definately lots of carefull grinding and a sore neck always looking down, but for me it needed to be done. Its worth doing! What I realized about fiberglass, it's always fixable, the hard part is prepping for it, like grinding.
jeffwagnpete
Rough Carpentry Apprentice
Posts: 53
Joined: Tue Jul 07, 2009 6:02 pm
Boat Name: Frogman
Boat Type: Pearson Ariel

Re: Fiberglassing a Hull to Deck Joint (?)

Post by jeffwagnpete »

I should add before some people get conufused of how is it that I am able to see through the fiberglass when I illuminate it with a light. I chipped out every bit of the balsa core along the starboard, the port and bow of my boat. I did this from the inside, so I tore out the bottom skin leaving the top skin in place, so yea, my recore will be done from the inside of my boat, sounds fun, don't it! Thats how I can see through the grinded off gelcoat and other layers. I just wanted to add this to be clear, anyways, good luck with you plan, and wear something to rest the neck on, cause your neck will start to weaken and get really sore.
User avatar
Rachel
Master of the Arcane
Posts: 3044
Joined: Tue Dec 07, 2004 7:59 pm

Re: Fiberglassing a Hull to Deck Joint (?)

Post by Rachel »

avd155 wrote:Since this topic has become rather detailed, I figured I would share an excerpt from Allan H. Vaitses's book "The Fiberglass Boat Repair Manual":
Allan Vaitses wrote:Ideally…a generously thick, wide tabbing on the outside of the deck joint would be the best way to both seal and mechanically join the parts. ...The ideal joint consists of a heavy fiberglass lay-up over the outside of the joint, well faired into both the deck and topsides.... Almost as good is a heavy lay-up on the inside of the hull with a lighter tabbing to seal the joint from the outside.
- Allan H. Vaitses "The fiberglass Boat Repair Manual" (p. 154)
The author seems to agree with Tim in that the lay-up for the hull-to-deck joint should be on exterior of the boat.


Just a nit: I don't read Mr. Vaitses' as saying the fiberglass of the joint should be on the outside of the boat; I read it that having it on the outside is slightly better, but that either outside or inside is very good (indeed, that the fiberglassed hull-deck joint is his favorite). And that the only reason to do it any other way is the impractibility or undesireability of going back to do it later.

I do appreciate your quoting his material here though - thank you.

Rachel
Post Reply