Engun electric starter motor - cleaning and overhaul

Post photos and descriptions of your ongoing projects here. No project is too big or too small.
Post Reply
Paulus
Skilled Systems Installer
Posts: 199
Joined: Mon Nov 22, 2010 12:05 pm
Boat Name: Guillemot
Boat Type: Mariner Ketch

Engun electric starter motor - cleaning and overhaul

Post by Paulus »

Towards the end of this season, had an incident where the starter motor would not engage - the (external) solenoid did it's thing, but the starter ignored the contact thus made.

When this occurred, I took the starter off the engine and gave it a spin by hand, thinking it must be sitting on a "dead spot" - then tested it successfully hardwired to the battery and then remounted it. It since operated fine, but... never could trust the darn thing again from then on.

So, now with the boat on the hard. I removed it once again and took it home for further investigation.

Image

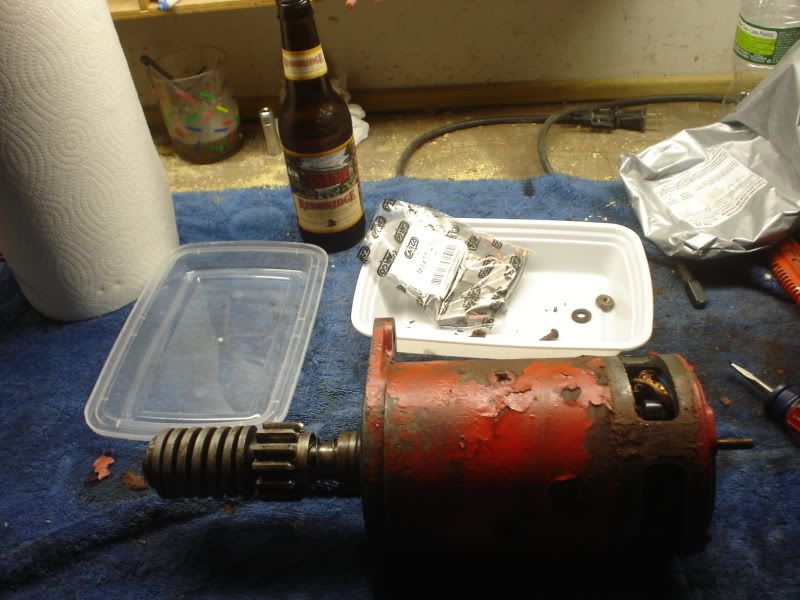
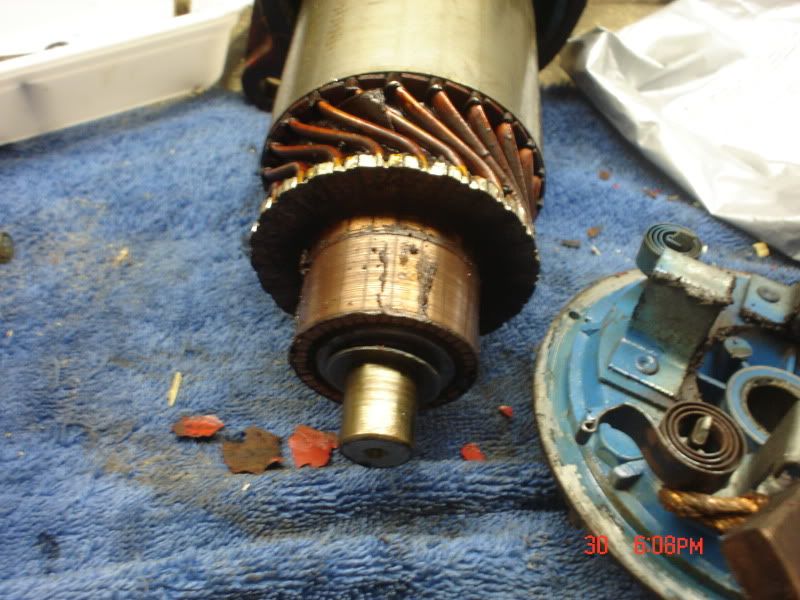
It certainly was dirty... and heavy - took off the endcap and released the suspect - thought to be worn - brushes...

Image

Hmmmm these brushes - surprisingly seem to be made from solid copper... or brass..... or bronze.... heh, heh... - but are FAR from worn - in fact, when compared to the replacements, which I bought in anticpation of needing them, they are barely worn at all...

Image

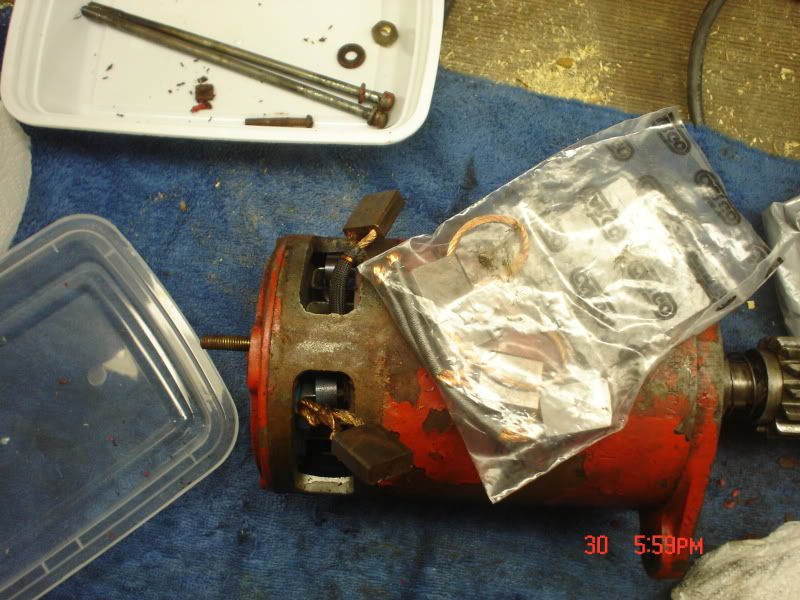
But what I did notice immediately, and some of you hawkeyes probably also already noticed - there's a whole lot of crud on the brushes as well as on the commutator ring - thick, greasy, messy, crud....

Image

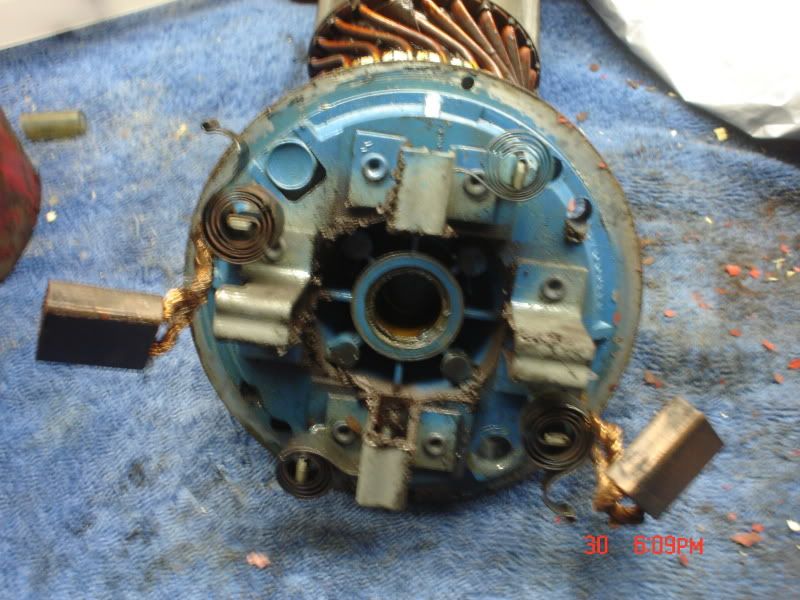
You can actually see where one of the brushes "squeegee'd" the crud ahead of it on the commutator.

Image

Soooo, engineering mind says: clean it, polish it, scuff the commutator with some 400 grit and then viola - we're good to go...

Image

So I did... Cleaned it, put a tiny thin coating of marine grease on the sleeve bearings and reassembled the darn thang. Tested it with the jumper cables connected to the car and she spun and purred like a little sewing machine...

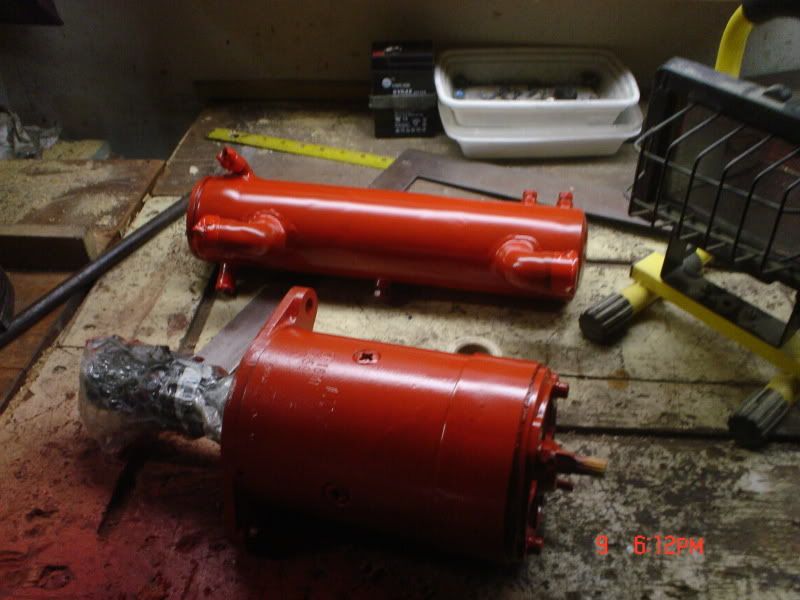
I since primed and painted it with "Universal Red" - matching the weird orange.red Westerbeke uses - and she's ready to be mounted back on the engun.

(more pics to follow...)
User avatar
Rachel
Master of the Arcane
Posts: 3044
Joined: Tue Dec 07, 2004 7:59 pm

Re: Engun electric starter motor - cleaning and overhaul

Post by Rachel »

Great post, thanks. I always enjoy a good step-by-step account with photos. It's entertaining, plus I learn new things :)

It so happens that I just had an electrical problem with my car a couple of weeks ago (all warning lights on dash glowing dimly and pulsating suddenly one day when I started the car and also when I drove). I suspected something with a ground or with the charging system, but that was as far as I could take it. My usual mechanic is two hours away including several long bridges and a tunnel, so just bringing it in wasn't sounding too appealing!

After consulting with said mechanic, and with a co-worker who owns a similar car, well, they both suggested to start by changing the voltage regulator. Luckily it's not too hard to get at, and even better, I had a spare new one on hand!

Unluckily, I had apparently already toasted the battery without realizing it, but I borrowed a car and went and picked up a new one. Got that in and then tackled the voltage regulator. Well..... all these years I have heard about "brushes" on alternators and etc. and all these years I've been envisioning little wire .... brushes. Maybe like little black toothbrushes or like those nubbins of brushes you see on vacuum cleaner rollers. But no, they are like little "chiclets" of solid metal. Who knew? If that had not happened I would have been staring at your photos in this post and saying "brushes...?"

By the way, on my car's alternator the old brushes were worn down to little nubbins and putting in the new voltage regulator with the new brushes fixed things right up :)

Rachel
Paulus
Skilled Systems Installer
Posts: 199
Joined: Mon Nov 22, 2010 12:05 pm
Boat Name: Guillemot
Boat Type: Mariner Ketch

Re: Engun electric starter motor - cleaning and overhaul

Post by Paulus »

Looks like you brushed op on the technicalities.

Good thing you fixed the problem - you could have had a.....

Ready?


"brush fire"...

Okay - I know, tacky tacky... ;-)

Image


Anyway, while we're on brushes, I found out that the ones in the pics above are actually made from copper impregnated carbon.

Most brushes are made either solely from or with lots and lots of carbon in them - it lubricates as well as conducts loads of current.
Paulus
Skilled Systems Installer
Posts: 199
Joined: Mon Nov 22, 2010 12:05 pm
Boat Name: Guillemot
Boat Type: Mariner Ketch

Another pic

Post by Paulus »

Here's the final product - cleaned, painted and ready to be put back in.

The spot light kept things above 60 degrees F so that the paint would dry (it's freeeezing out here).

Image

Yes, I also took home and cleaned out the little heat exchanger - it just seemed the prudent thing to do. Amazing how many little pieces of scrap pencil zink I was able to remove from the unit - I wonder if it actually had any effect on its performance. If you look in the plastic dish behind it, you'll see some of the crap I shook out.

The problem with this little heat exchanger is that the coil is soldered into the cylinder and one has no access at all to the back end, which is also where the pencil zink sits. It took me many, many shakes and patient, persistent fishing with aircraft wire to get all the pieces out - the largest being about 2.5" long.

After removing all the crap I rodded the tubes using a chunk of an old 3/16" shroud stuck in my drill - all tubes were clear and "roddeble" except for one, which I suspect has a piece of scrap pencil zink stuck in it.

I am hoping it will continue to disolve and give the little tube it's life back...

My son made me a new cork gasket (he goes to Suny Maritime here in NY) - I pressure tested the whole assembly and was happy to see that it is holding good.

Had some extra paint too... ;-)

This coming season I will pull the pencil zink mid-season, just to see how fast it deteriorates in there. better to replace a whole on that is wearing down, then a 1/4 one where you know it's leaving chunks in there.
User avatar
Rachel
Master of the Arcane
Posts: 3044
Joined: Tue Dec 07, 2004 7:59 pm

Re: Engun electric starter motor - cleaning and overhaul

Post by Rachel »

Shiny!

I've seen quite a few powerboats either overheat or "creep" up toward the hot range as you ran them hard; their heat exchangers were clogged, and the clogs were made of crud that gathered around bits of old impeller blades, zincs, etc. Cleaning them out and then flushing them took care of the problem, so cleaning yours seems totally worthy.

Rachel
Quetzalsailor
Master of the Arcane
Posts: 1100
Joined: Fri Aug 26, 2005 9:53 am
Boat Name: Quetzal
Boat Type: LeComte North East 38
Location: Philadelphia, PA

Re: Engun electric starter motor - cleaning and overhaul

Post by Quetzalsailor »

A little cleaning can go a long way!

Brushes are often made of blocks of carbon or graphite: black, hard and brittle. Sometimes they are sintered metallics. Sintering is where you crush metal chips together until they bond, often leaving little interstices that hold lubricants. http://books.google.com/books?id=7cmb7B ... es&f=false

I wonder why your commutator was so gummy? An oil leak? Running hot so that the bearings weeped a little lubricant?

A little wood dust will shut things down, too. Switches, commutators but most often in my shop, the 'start contacts' on a capacitor start motor can get dirty enough so that the motor will not start. The diagnosis is made if you can start the motor by grabbing the blade or whatever, and turning it. Care must be taken.
Paulus
Skilled Systems Installer
Posts: 199
Joined: Mon Nov 22, 2010 12:05 pm
Boat Name: Guillemot
Boat Type: Mariner Ketch

Re: Engun electric starter motor - cleaning and overhaul

Post by Paulus »

Quetzalsailor wrote:A little cleaning can go a long way!

I wonder why your commutator was so gummy? An oil leak? Running hot so that the bearings weeped a little lubricant?
I was as surprised... Actually wondered whether the armature needed grease of any kind (perhaps a dielectric grease) and posted the question elsewhere - the unanimous consent was that I was correct in leaving it dry and clean, and letting the carbon do its thing. (is where I found out that the brushes are made from a carbon/copper composite rather than being solid copper/brass... )

Don't have any idea where the grime came from - the motor is fairly well sealed with the strap covering the openings lined with a thin layer of cork on the inside, There are no means to add grease anywhere and the rear bearing is a dry (non-porous) copper/bonze sleeve.

The position of the motor is also away from most engine lube handling, though it is directly over the oil dipstick.

Perhaps years and years of dipstickdrip have somehow found their way under the band and collected in the armature area...

What can I say - I am miphed...
Post Reply