We purchased the boat in February, did a fast refit - new cutlass bearing and engine realignment, replaced the shot folding prop with a 3-blade Campbell Sailor, some minor repairs here and there, replaced the pressurized alcohol stove with a non-pressurized one, and added a Dickenson Newport propane heater - and spent the summer cruising Puget Sound as work schedule allowed, one 12 day trip and several weekends. At the end of November and the beginning of the reduced rate boatyard season, we pulled the mast and the boat for a more ambitious refit. We're only a few workdays in, but I think the work list is finally done growing, at least. Maybe. Please?
Firefly is a fairly standard first-flight Islander 28, with the teak and holly sole, two-part compression post (steel top half, wood below), Volvo Penta MD7A raw-water cooled diesel (2 cylinder, 13hp) including 20 gallons fuel storage in a stainless tank (in good condition), tiller steering, and a split stern pulpit with a swim ladder. She's rigged with all halyards at the mast, reefing lines and outhaul on the boom, and a full spinnaker setup with pole. Systems include 20 gallons of freshwater tankage with manual pumps galley and head, standard manual flush marine head with 10 gallon "rubber bladder" holding tank, macerator, and basic electronics. Batteries in the standard location (port lazarette behind the galley bulkhead), two Group 27s, charged by alternator and shore power. We are her third owners, she's spent most of her life in southern California as a race boat, since 2003 in Puget Sound under the care of a professional mariner with good overall maintenance. Her primary issues are age and exposure related - the gelcoat on what was her weather side in SoCal is shot, crazed and pitted including on deck and cabin top, the vinyl headliner has degraded past the point of saving it including frozen zippers restricting access to hardware backing plates etc., keel bolts are somewhat degraded, including a not-yet-leaking "smile" around the keel/hull joint. There are a total of four blisters around the bow, and some minor laminate damage at the rudder (there are no stops on the skeg-hung rudder to prevent damage if the tiller slams over.) Standing rigging is in good shape to visual inspection, running rigging is acceptable, sails are excellent including foam-luff headsail on Harken Mark III roller furling. Bottom paint is due for replacement.
Cosmetics are mediocre. The gelcoat issue doesn't help, plus no one doubts for a second this is a 70's boat - brown and yellow striped cushions, beige hull with red stripe and brown mast, forest green canvas. Interior is a teak and mahogany forest.
Work List, in no particular order:
1. Strip vinyl headliner, foam rubber behind it, and the wood paneling from the upper cabin ceiling and surfaces; replace with wood, including paneled headliner
2. Replace holding tank
3. Rehab bilge, including replacement of keel nuts and possibly bolts (using the "sister new bolts into keel" method)
4. Remove MD7A for overhaul (injector cleaning / replacement, engine inspection and tune - removal necessary only to allow access to aft interior of hull)
5. Replace through-hulls where necessary (minimum engine raw water intake, exhaust / bilge pump outlets / cockpit drains, rest determined by inspection)
6. New interior cushions
7. Blister, rudder, keel joint fiberglass repairs
8. Dodger (okay, we have the frame, this one might be "deferred")
9. Relocate mast winches etc. to cabin top, lead lines aft for more family-friendly cruising
10. Sand, sand, fair, sand, prime, sand, paint, swear, sand, prime, paint, paint, paint (just being realistic)
11. Replace mast wiring as necessary (antenna lead definitely), remove defunct (Standard Horizon WS-1) wind instruments
12. Replace external lighting - running lights, anchor light, steaming light, foredeck light
13. Replace cabin lighting - NONE at headliner, all located behind settees in storage nooks
14. Add masthead "horn" to move spinnaker halyard block clear of roller furling swivel - 2" will be more than sufficient.
15. Replace standing rigging
16. Relocate electronics from free-standing mounts starboard to "in-dash" mounts in aft starboard bulkhead
[EDIT]: 17. Replace cabin ports with fresh plexiglass / lexan, or possibly entire ports.
Current status:
1. Created small but growing list of willing accomplices, friends who like sailing and have been offered "boat time" in exchange for "work time"
2. All running rigging stripped and removed for inspection, repair, and replacement as needed
3. Headliner and foam stripped, 30% cabin woodwork slated for replacement removed
4. Holding tank removed
5. Bilge vacuumed and cleaned to Stage 1. Stage 2 (degreaser, scrubbing, possible pressure wash / steaming) to come.
Photos to be added.
1978 Islander 28 (Hull #256)
-
Matt B.
- Rough Carpentry Apprentice
- Posts: 67
- Joined: Mon Oct 10, 2005 2:23 am
- Boat Name: Firefly
- Boat Type: Islander 28
- Location: Everett, WA
1978 Islander 28 (Hull #256)
Last edited by Matt B. on Tue Dec 22, 2009 3:54 pm, edited 1 time in total.
-
mobilchuckje

- Almost a Finish Carpenter
- Posts: 81
- Joined: Sat Oct 10, 2009 12:20 pm
- Boat Name: TOFU
- Boat Type: Islander 21
- Location: Port Townsend, WA
Re: 1978 Islander 28 (Hull #256)
C'mon!! Photos?!!
I'd put a smiley, but Tim says no smileys.
;-)
Doh!
I look forward to following your project.
Fellow Islander,
chuck.
I'd put a smiley, but Tim says no smileys.
;-)
Doh!
I look forward to following your project.
Fellow Islander,
chuck.
-
Matt B.
- Rough Carpentry Apprentice
- Posts: 67
- Joined: Mon Oct 10, 2005 2:23 am
- Boat Name: Firefly
- Boat Type: Islander 28
- Location: Everett, WA
Re: 1978 Islander 28 (Hull #256)
OK, pictures:
Firefly during our summer cruise:
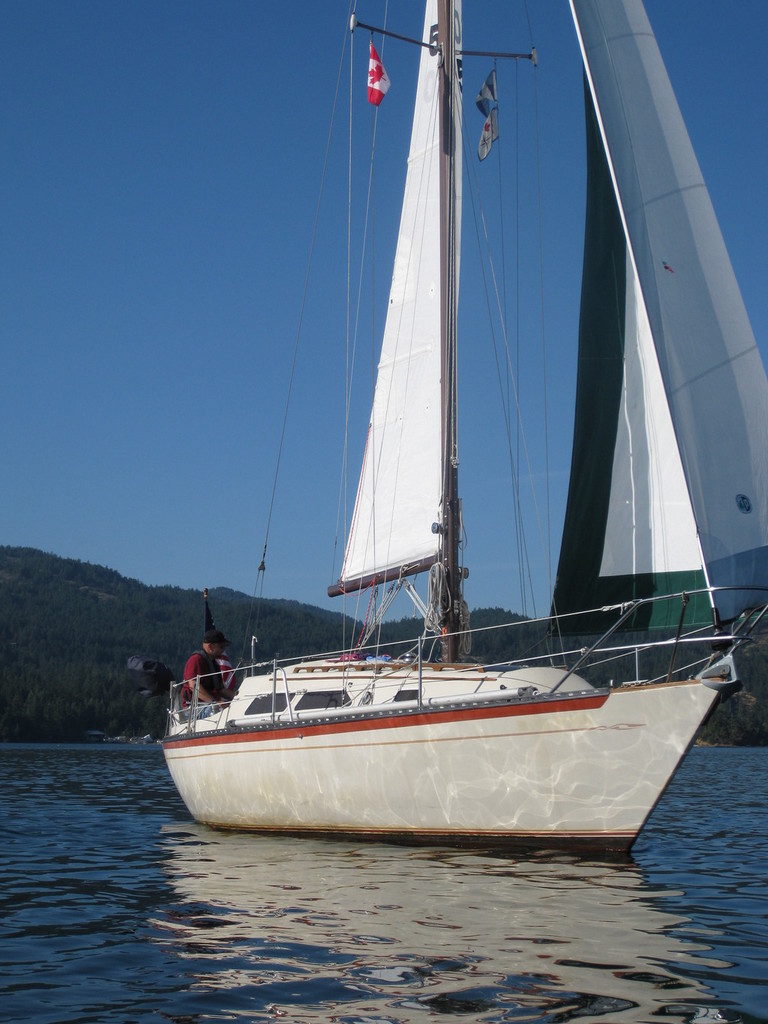
mobilchuckje: I like the change in the cove strip detail between your boat and mine. One of the complicating factors I've taken on for myself in this project is that I intend to retain the cove stripe - the color will change with the paint, but the cove stripe itself and its detail will remain the same, bow and stern.
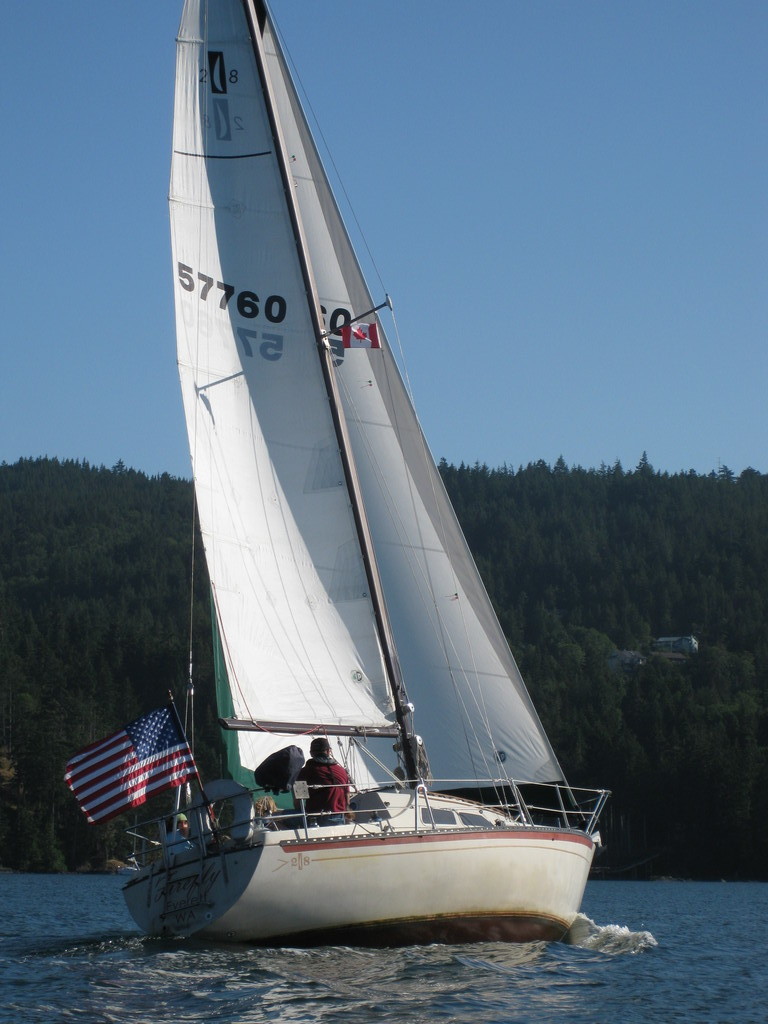
These pictures were both taken in Sooke Basin, Sooke, BC, on the southern tip of Vancouver Island. Incredible spot - the entrance is a real pain to get through, a very narrow and none to deep channel that twists and winds for a mile to get in. Then you're in what is effectively a 2-3 mile across saltwater lake with decent breezes and flat water. Just don't try the entrance except on a rising tide and with a recent Canadian chart - the channel moves and is imperfectly buoyed.
Forward cabin bulkhead before heater:
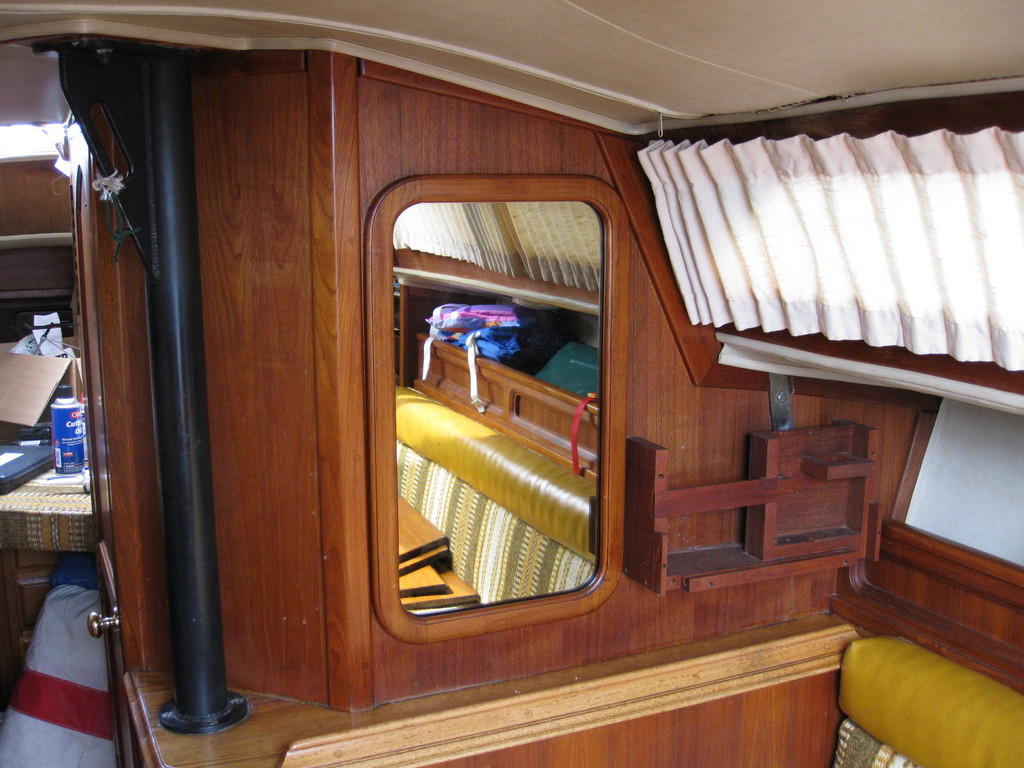
The black post is the top half of the compression post. The shelf below the post hides the folding salon table, and the compression continues, uh, behind the bulkhead but still directly below the steel half of the post. There is some distortion there, although it's pretty minimal and appears to be due to compression of the plywood base of the cabin sole, not the post or the shelf between the post halves.
And after:
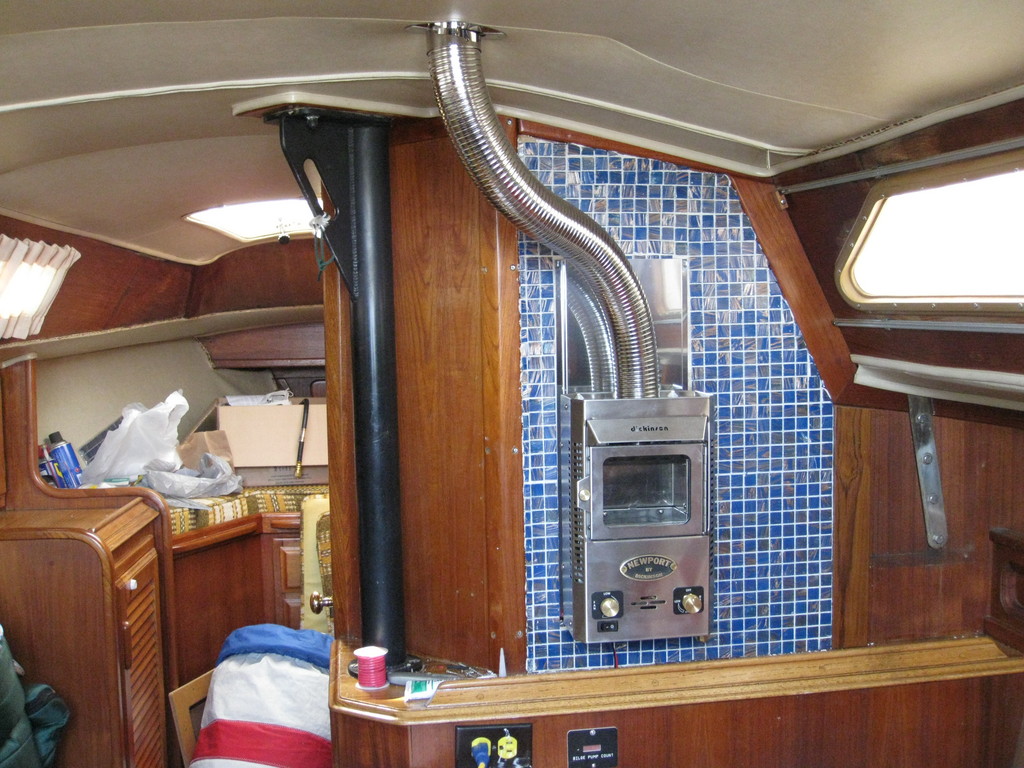
Let me add that I love this heater. Warms the whole boat very nicely, and with the double chimney (draws in air through the outer chimney, exhausts through the inner, both sealed at heater and chimney cap) it does so without introducing moisture into the cabin.
And on the jackstands right now:

If you look closely you can see the black crosses on the bottom near the bow that mark the portside blisters.
Firefly during our summer cruise:
mobilchuckje: I like the change in the cove strip detail between your boat and mine. One of the complicating factors I've taken on for myself in this project is that I intend to retain the cove stripe - the color will change with the paint, but the cove stripe itself and its detail will remain the same, bow and stern.
These pictures were both taken in Sooke Basin, Sooke, BC, on the southern tip of Vancouver Island. Incredible spot - the entrance is a real pain to get through, a very narrow and none to deep channel that twists and winds for a mile to get in. Then you're in what is effectively a 2-3 mile across saltwater lake with decent breezes and flat water. Just don't try the entrance except on a rising tide and with a recent Canadian chart - the channel moves and is imperfectly buoyed.
Forward cabin bulkhead before heater:
The black post is the top half of the compression post. The shelf below the post hides the folding salon table, and the compression continues, uh, behind the bulkhead but still directly below the steel half of the post. There is some distortion there, although it's pretty minimal and appears to be due to compression of the plywood base of the cabin sole, not the post or the shelf between the post halves.
And after:
Let me add that I love this heater. Warms the whole boat very nicely, and with the double chimney (draws in air through the outer chimney, exhausts through the inner, both sealed at heater and chimney cap) it does so without introducing moisture into the cabin.
And on the jackstands right now:
If you look closely you can see the black crosses on the bottom near the bow that mark the portside blisters.
-
mobilchuckje
- Almost a Finish Carpenter
- Posts: 81
- Joined: Sat Oct 10, 2009 12:20 pm
- Boat Name: TOFU
- Boat Type: Islander 21
- Location: Port Townsend, WA
Re: 1978 Islander 28 (Hull #256)
She's glorious.
Is your cove stripe molded in? Mine is one of my favorite parts of the boat.
The red paint that is in there comes off when I solvent wipe the hull, so I'm hoping that I can remove most of it with acetone before repainting. Doesn't seem like too much hassle.
Grind on,
chuck.
Is your cove stripe molded in? Mine is one of my favorite parts of the boat.
The red paint that is in there comes off when I solvent wipe the hull, so I'm hoping that I can remove most of it with acetone before repainting. Doesn't seem like too much hassle.
Grind on,
chuck.

Re: 1978 Islander 28 (Hull #256)
Nice!
My first cruising was done in BC - what a place to have right next door! Excellent that you bought the boat and got right out cruising :)
I have one comment on the heater, which is that as I understand it, the double chimney is not what keeps moisture from getting into the cabin from the stove. Any "normally chimneyed" stove will do that just the same. It's an unvented heater (no chimney) that expels it's combustion-byproduct moisture into the air. What the extra chimney does is draw in outside air for combustion instead of using cabin air (not that that isn't worthwhile).
I actually think that a single chimney stove might dry out the cabin a tiny bit more, because it leads to a constant (slight) negative pressure, which means that fresh outdoor air is always being sucked into the cabin through various outside cracks and openings, "whistling through" the cabin, and then going up the chimney. Of course if your outside air is damp, salty, BC air that might be a dubious benefit, but I think the principle still holds.
Regardless, that's a nice stove, and there's nothing like having a cabin heater in BC :) We had ours going every day during the waking hours (we had a diesel Sigmar).
It will be fun to follow along as you improve and sail your Islander. I'm glad you're going to share it with us.
Rachel
-
Matt B.
- Rough Carpentry Apprentice
- Posts: 67
- Joined: Mon Oct 10, 2005 2:23 am
- Boat Name: Firefly
- Boat Type: Islander 28
- Location: Everett, WA
Re: 1978 Islander 28 (Hull #256)
Thanks! Even with the color scheme, stained gelcoat, crazing, and all, I still turn around and look at her one last time as I leave. My wife loves her too, and our daughter - who just turned 3 - tells anyone who will listen and most who won't that this is "my boat". Other boats are okay, but this one is hers.mobilchuckje wrote:She's glorious.
Yes and no. The stripe itself is molded into the laminate - with the hull liner removed, you can see a bright stripe down the hull where the light shines through. (Though the laminate is still pretty thick there, it's just not AS thick.) That stripe doesn't go into the arrowhead or fletching though - those appear to be molded into the gelcoat only, and most or all of that is going away. Part of the reason for the crazing is that the gelcoat is crazy thick - there's a layer of yellow under the top layer, you can see it a little through the top layer on the aft quarters where her old name (Halcyon) was painted and sanded off. Neither layer is very thin. I've talked to a number of Islander owners, and apparently over half the boats built in the late 70s have the same gelcoat issues.Is your cove stripe molded in? Mine is one of my favorite parts of the boat.
The red paint that is in there comes off when I solvent wipe the hull, so I'm hoping that I can remove most of it with acetone before repainting. Doesn't seem like too much hassle.
Grind on,
chuck.
The plan right now is to send traced templates to the vinyl guy for the bow and stern details. We'll sand down the gelcoat to a thin, smooth layer, or possibly gone entirely (should probably discuss that point) before fairing and priming for paint. I expect at that point the cove stripe will be locatable, but the detailing will be lost. The paint scheme is going to be flag blue topsides with cream / white decks and mast, including that red bulwark stripe below the toe rail. Black bottom paint, white boot stripe at the waterline. The cove stripe, detailing, and name / hailing port are all going to be as close to gold leaf as it's possible to get in vinyl - and if I can't get vinyl I like I'll do paint instead.
-
Matt B.
- Rough Carpentry Apprentice
- Posts: 67
- Joined: Mon Oct 10, 2005 2:23 am
- Boat Name: Firefly
- Boat Type: Islander 28
- Location: Everett, WA
Re: 1978 Islander 28 (Hull #256)
Gotta get the kids indoctrinated young...Rachel wrote:Nice!
My first cruising was done in BC - what a place to have right next door! Excellent that you bought the boat and got right out cruising :)
The way I think of it, and so far at least it seems to work, is that the chimney set up makes the combustion all happen "outside". You've got this box of the outside plumbed into the boat and you light a fire inside it, then use a fan to heat and distribute air through the boat. Around here it doesn't generally get very cold, but all through the winter (and not infrequently in the summer - consider that my wife and I put this project ahead of replacing the holding tank before our July cruise) you get raw, wet days where the temp isn't that low but the moisture and the wind combine to make everything wet and uncomfortable. It chills you down pretty thoroughly in a way below-zero temperatures don't; I grew up in Minnesota, and while you get cold there in winter, go in somewhere warm and in a few minutes you'll be fine. This is different - it's a chill that seems to soak through and settle, and then you can spend the rest of the day trying to warm up. Yet the temperature is 45.I have one comment on the heater, which is that as I understand it, the double chimney is not what keeps moisture from getting into the cabin from the stove. Any "normally chimneyed" stove will do that just the same. It's an unvented heater (no chimney) that expels it's combustion-byproduct moisture into the air. What the extra chimney does is draw in outside air for combustion instead of using cabin air (not that that isn't worthwhile).
I actually think that a single chimney stove might dry out the cabin a tiny bit more, because it leads to a constant (slight) negative pressure, which means that fresh outdoor air is always being sucked into the cabin through various outside cracks and openings, "whistling through" the cabin, and then going up the chimney. Of course if your outside air is damp, salty, BC air that might be a dubious benefit, but I think the principle still holds.
So the problem there as it relates to cabin heat is that the air you draw in from the outside when you need the heat is of course cool and wet. But where really cold air is "dry" - it might come in "humid" but as you heat it to room temperature it becomes much dryer because warm air can hold so much more water - the air you get in here is only cool and very wet. You warm it to room temperature and it's STILL wet because you didn't have that far to go in temperature. This heater doesn't draw in much air - doesn't need any at all for combustion, of course - and unless you don't have a good seal with the chimney it's not going to add any water at all to the air as it raises the temperature. It's still not perfect - it got pretty humid in the cabin during a couple of rainy days in the middle of our cruise - but it's much, much better than the solid fuel heater on our old boat.
-
Matt B.
- Rough Carpentry Apprentice
- Posts: 67
- Joined: Mon Oct 10, 2005 2:23 am
- Boat Name: Firefly
- Boat Type: Islander 28
- Location: Everett, WA
Re: 1978 Islander 28 (Hull #256)
Work List, in no particular order:
1. Strip vinyl headliner, foam rubber behind it, and the wood paneling from the upper cabin ceiling and surfaces; replace with wood, including paneled headliner
2. Replace holding tank
3. Rehab bilge, including replacement of keel nuts and possibly bolts (keel bolts adequate with thread cleanup, replacement unnecessary)
4. Remove MD7A for overhaul (injector cleaning / replacement, engine inspection and tune - removal necessary only to allow access to aft interior of hull)
5. Replace through-hulls where necessary (minimum engine raw water intake, exhaust / bilge pump outlets / cockpit drains, rest determined by inspection)
6. New interior cushions
7. Blister, rudder, keel joint fiberglass repairs
8. Dodger (okay, we have the frame, this one might be "deferred")
9. Relocate mast winches etc. to cabin top, lead lines aft for more family-friendly cruising
10. Sand, sand, fair, sand, prime, sand, paint, swear, sand, prime, paint, paint, paint (just being realistic)
11. Replace mast wiring as necessary (antenna lead definitely), remove defunct (Standard Horizon WS-1) wind instruments
12. Replace external lighting - running lights, anchor light, steaming light, foredeck light
13. Replace cabin lighting - NONE at headliner, all located behind settees in storage nooks
14. Add masthead "horn" to move spinnaker halyard block clear of roller furling swivel - 2" will be more than sufficient.
15. Replace standing rigging
16. Relocate electronics from free-standing mounts starboard to "in-dash" mounts in aft starboard bulkhead
17. Replace cabin ports with fresh plexiglass / lexan, or possibly entire ports.
Current status:
1. Created small but growing list of willing accomplices, friends who like sailing and have been offered "boat time" in exchange for "work time"
2. All running rigging stripped and removed for inspection, repair, and replacement as needed
3. Headliner and foam stripped, 30% cabin woodwork slated for replacement removed
4. Holding tank removed
5. Bilge vacuumed and cleaned to Stage 1. Stage 2 (degreaser, scrubbing, possible pressure wash / steaming) to come.
6. All plumbing slated for removal is gone (that's the vent lines, toilet outlet to holding tank, macerator to seacock, holding tank to deck fill)
7. Macerator removed for cleaning and relocation
8. Primary (automatic) bilge pump removed, wiring traced and labeled (will need to be replaced)
9. Bilge cleared and cleaned ready for restoration of keel bolts and nut replacement
Spent about five hours on the boat Saturday. The first three hours were spent removing plumbing; the old holding tank was located under the starboard settee, the new one will be under the v-berth. All of the old hoses were good quality sanitation hose but they were also several years old and in some cases permeated with unpleasant smells, so I decided to replace most of them. The only hose from the head system that I'm leaving in place is the water intake line. In the process, I found a line that doesn't make sense; it was located in the holding tank locker, clear old potable water hose with a slant-cut bare end, and ran from there aft under the freshwater tank (through an existing conduit), under the pilot berth, where it was coupled to a heavier-wall line of the same diameter that ran through a port in the bulkhead into the engine compartment. There it was capped off and lying loose. I have no theories as to what purpose this line served and have removed it entirely.
In the process of removing the plumbing I also removed the macerator; it is in good condition and I will be reinstalling it, as it's very useful in BC waters. (During our July cruise we found exactly one pumpout facility in Canadian waters, in Victoria's inner harbor). The wiring was substandard and the switch faulty, so it'll need to be rewired, but that shouldn't present any difficulties. It did make me wonder about what I would find in other areas of the boat's electrical system; the factory installed stuff is mostly quite good, especially for a 1978 boat, but somewhere along the line several systems upgrades were made to the boat and those changes to the electrical panel are very poor. The macerator and, later, the bilge pump, both proved to be wired with lamp cord - in the case of the bilge pump, I literally suspect someone cut the power cord off of an old lamp and used the wire.
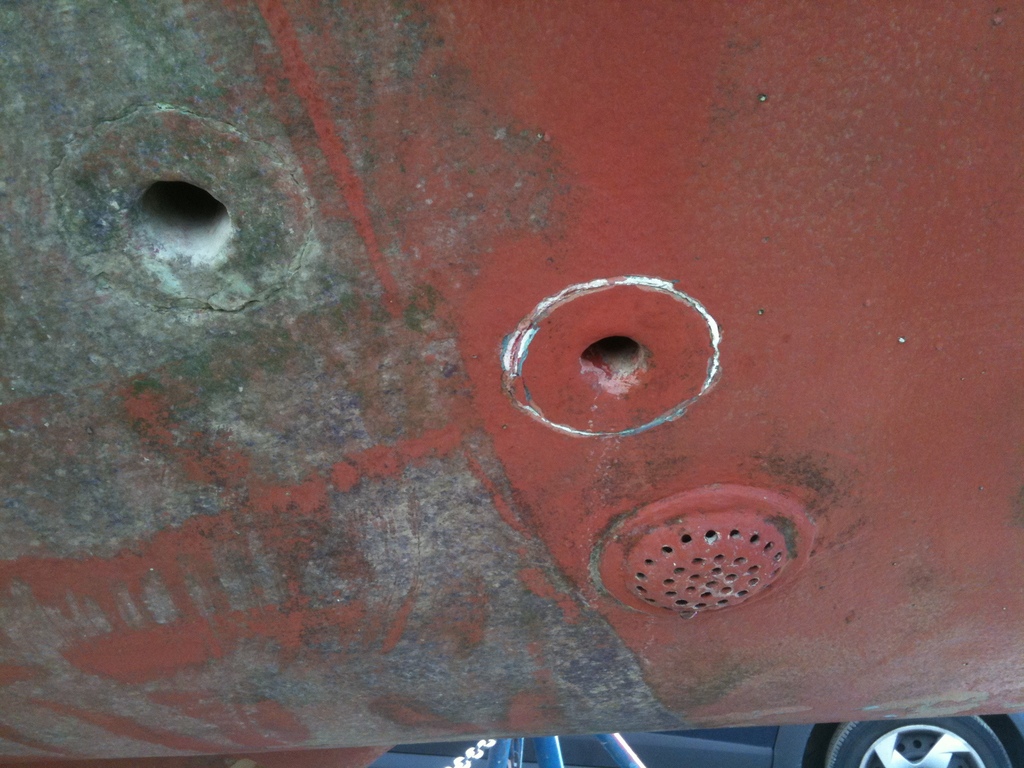
I inspected all three head seacocks (head water inlet, sink drain, and macerator outlet) and determined that all three are good bronze through-hulls and modern seacocks. I also determined the existing vent line's through-hull will need to be replaced; it's a chromed fuel tank vent, badly corroded and nearly plugged. The location is mediocre - high under the toe rail on the starboard side - and I may use the opportunity to plug the hole and relocate the vent. The macerator outlet seacock has some surface rust and may need to be replaced - due to its location I'm uncertain as to its overall quality without removing it entirely, which I haven't yet done. The head inlet has a very large screen over the outside of the through hull that I'm inclined to remove and replace with an inline filter after the seacock.
Top left to bottom right, macerator outlet, sink outlet, head intake
Cleaning the bilge wasn't too difficult, most a matter of wiping and scrubbing off the remaining oil and grease from the earlier cleaning. I was able to determine that of the eight keel bolts (one each fore and aft, three pairs down the middle) the single fore and three aftmost nuts are more or less intact - the pair of aft nuts are rounded off from corrosion but are otherwise good, and the fore and aft are solid and nearly fully usable. This might or might not be related to the fact that both are grounded - the aft appears to be the common ground for the boat's DC system and the fore is ground for the mast. The other four are corroded to uselessness, in two cases to the point that it almost looks like there's no nut there at all. In all eight cases, however, the bolt itself is solid and it is apparent after cleaning that relatively little needs to be done to them - removing the remnants of the old nuts will in some cases not be easy, and I want to run a die over all eight to rehab and clean up the threads, but otherwise there aren't any serious issues with the bolts. I decided not to do the full clean job (with solvents, etc. to remove the remaining oil) because the die cutting job will require the use of cutting oil and I'd prefer to just clean it up once. I do intend however to do a thorough clean and paint job on the bilge.
The bilge pump is an older but solid and reliable Rule 1500 pump with a standard float switch. Other than cleaning them both up I see no reason not to reinstall them without changes. The wiring however is very poor. The direct battery connection for power is acceptable - good quality, well sealed at all connections, installed no more than 3 years ago (and email from the previous owner confirms he installed it as a replacement for a failed piece of speaker wire) - but the manual override is more of the lamp cord from the macerator install. Oddly, it's routed from the starboard settee - the panel is located portside aft of the galley, a very short run with no obstructions and with existing conduits and pathways. I don't understand the reasoning, but at least I don't feel obligated to duplicate it - the old wire has been cut and taped ready to remove and the new wire will follow the shorter, simpler path from the battery box and panel.
-
Matt B.
- Rough Carpentry Apprentice
- Posts: 67
- Joined: Mon Oct 10, 2005 2:23 am
- Boat Name: Firefly
- Boat Type: Islander 28
- Location: Everett, WA
Re: 1978 Islander 28 (Hull #256)
Work List, in no particular order:
1. Strip vinyl headliner, foam rubber behind it, and the wood paneling from the upper cabin ceiling and surfaces; replace with wood, including paneled headliner
2. Replace holding tank
3. Rehab bilge, including replacement of keel nuts and possibly bolts (keel bolts adequate with thread cleanup, replacement unnecessary)
4. Remove MD7A for overhaul (injector cleaning / replacement, engine inspection and tune - removal necessary only to allow access to aft interior of hull)
5. Replace through-hulls where necessary (minimum engine raw water intake, exhaust / bilge pump outlets / cockpit drains, rest determined by inspection)
6. New interior cushions
7. Blister, rudder, keel joint fiberglass repairs
8. Dodger (okay, we have the frame, this one might be "deferred")
9. Relocate mast winches etc. to cabin top, lead lines aft for more family-friendly cruising
10. Sand, sand, fair, sand, prime, sand, paint, swear, sand, prime, paint, paint, paint (just being realistic)
11. Replace mast wiring as necessary (antenna lead definitely), remove defunct (Standard Horizon WS-1) wind instruments
12. Replace external lighting - running lights, anchor light, steaming light, foredeck light
13. Replace cabin lighting - NONE at headliner, all located behind settees in storage nooks
14. Add masthead "horn" to move spinnaker halyard block clear of roller furling swivel - 2" will be more than sufficient.
15. Replace standing rigging
16. Relocate electronics from free-standing mounts starboard to "in-dash" mounts in aft starboard bulkhead
17. Replace cabin ports with fresh plexiglass / lexan, or possibly entire ports.
18. Replace cabin top handrails
Current status:
1. Created small but growing list of willing accomplices, friends who like sailing and have been offered "boat time" in exchange for "work time"
2. All running rigging stripped and removed for inspection, repair, and replacement as needed
3. Headliner and foam stripped, 30% cabin woodwork slated for replacement removed
4. Holding tank removed
5. Bilge vacuumed and cleaned to Stage 1. Stage 2 (degreaser, scrubbing, possible pressure wash / steaming) to come.
6. All plumbing slated for removal is gone (that's the vent lines, toilet outlet to holding tank, macerator to seacock, holding tank to deck fill)
7. Macerator removed for cleaning and relocation
8. Primary (automatic) bilge pump removed, wiring traced and labeled (will need to be replaced)
9. Bilge cleared and cleaned ready for restoration of keel bolts and nut replacement
10. Removed cabin top handrails, determined there are areas of rot in both rails
11. Removed all six ports
12. Stripped all hardware from cabin top, side decks, started on bow pulpit area and cockpit
13. Removed all six chainplates and lifeline stanchions aside from the bow and stern pulpits
14. Removed most of the interior plywood from the cabin sides
15. Stripped headliner and plywood from head
16. Removed companionway hatch slides and hatch
17. Removed traveler
Two good days. A helper arrived Saturday to enthusiastically start removing hardware, so I left her to it and started working on the interior plywood, determining how much of it was rotted or damaged and working to remove it. Sunday, with a different helper, was entirely dedicated to hardware removal.
The plywood triage shortly meant the ports had to go, so I worked on pulling them out. Each is a plastic frame, low profile on the outside and rounded over on the inside. Dozens of screws (no exaggeration) hold the frames together and they're thoroughly bedded in good-quality butyl rubber. Either the original install was very well done or a previous owner redid it with the exact same methods as the factory - either way, none of the six came out easily.
The ports are going to be an issue. Close examination reveals that none of the six are in great shape - they're all cracked and pitted on the outside of the frame, and I broke the inner frame on one of the smaller ones. Those smaller ones won't be much trouble to replace, they're simple rounded rectangles about 8" by 4". The other four, though, are a tapered and angled shape, set in pairs on each side of the cabin. The effect is very nice and works beautifully to mimic the shape of the cabin, but where am I going to find replacement ports? The only good news is that those four are in the best shape, so if I have to reuse them it's probably doable - it just won't be perfect.
With the ports out of the way (and the bulk of the butyl cut off) it was fairly easy to strip off the plywood. On both sides, there are three layers - an inner veneer of teak or mahogany, a middle layer of about 1/4" plywood, and an outer veneer - or possibly the last layer from the plywood, poorly glued - bonded to the inside of the fiberglass. Port side is not in bad shape, overall - the veneer and middle layer of plywood is shot forward of the middle port, but aft of that it's all okay, and the outermost layer (a thin veneer itself) is fine and well-bonded all the way to the v-berth. Starboard is much worse (this was the weather side for most of the boat's life in her slip). There, I've stripped almost all the plywood, including large areas of outermost veneer - that's been done using everyone's favorite carbide scraper to peel it off the fiberglass.
Removing the hardware has gone well but revealed several lurking problems that are making me very happy with my decision to rebed everything. Of the six chainplates, with four bolts each, seven bolts had significant corrosion. (All six chainplates themselves are fine.) Several items installed after the factory finished with the boat were installed with wood screws, not bolts, and the holes are not sealed very well - this is one reason why the cabin plywood is rotted. The traveler is aluminum track on a bed of aluminum with stainless screws. The amount of aluminum oxide powder removed from the area after I managed to remove the track - no small feat given the track was through-bolted with the nuts inside the integral fiberglass sea hood - was pretty impressive, so I think replacement might be something to consider.
Most of the deck hardware itself was in good shape - some of the fasteners were shot, and more had problems with inadequate seals. I did find that the toe rail on both sides is very secure and has no signs of any leaking; I noted that the original installation included a bed of butyl rubber under the entire toe rail, and spot checks of fasteners revealed no significant issues. Given the fasteners are located every four inches, that there are no discernible issues, and that the placement of the nuts inside the cabin make removal a major project all its own, I'm electing not to remove the toe rails. I may change my mind later.
The exceptions to the "deck hardware is in good shape" are the previously mentioned traveler and some or most of the exterior woodwork. The companionway hatch slides are worn and thin, the cabin trim rail (along the upper edge of the cabin) is badly worn and cracked in several places, both handrails have areas of rot, and several other pieces of wood here and there on the boat are cracked, worn, or otherwise pushing me to replace it. So most of the exterior woodwork will be replaced over the winter. The only definite exceptions are the companionway facings (bright and shiny with multiple coats of recent varnish), the hatch boards (need varnish but in good shape otherwise) and the wooden area of toe rail at the very bow, which is also in good shape but in need of some varnish.
Overall, I left the boatyard excited. One more solid work day, perhaps two, and we'll be completely finished with deconstruction and be ready to begin construction.
We also managed a careful evaluation of the diesel and a thorough discussion with a diesel expert, and determined that there's no real need to remove it or do any significant work - the injectors need cleaning, which can be done easily, and she's due for filter replacement and an oil change. The rest of the work I'd like to do there is not on the engine itself, but the space behind the engine, which is inaccessible with the engine in place. Rather than remove the engine to do that work, however, I'm going to go a different route and solve the lack of access problem by installing a new hatch in the floor of the cockpit. So I took measurements for that and we'll see what we can find that will fit the space.
-
earlylight

- Candidate for Boat-Obsession Medal
- Posts: 342
- Joined: Fri Dec 19, 2008 7:15 pm
- Boat Name: Early Light
- Boat Type: 1982 Sabre 34 MK I
- Location: MD
- Contact:
Re: 1978 Islander 28 (Hull #256)
Try the following for replacement of the larger fixed portlights. Chances are they were the original manufacturers. Not cheap, but you may be able to get exact replacements.:
Mark Plastics/GO Marine Windows
369 E. Harrison St., Unit G
(Corona 92879, CA USA)
T 951-735-7705
F 909-735-0701
Hope this helps
Mark Plastics/GO Marine Windows
369 E. Harrison St., Unit G
(Corona 92879, CA USA)
T 951-735-7705
F 909-735-0701
Hope this helps
-
Matt B.
- Rough Carpentry Apprentice
- Posts: 67
- Joined: Mon Oct 10, 2005 2:23 am
- Boat Name: Firefly
- Boat Type: Islander 28
- Location: Everett, WA
Re: 1978 Islander 28 (Hull #256)
Thanks, I just got off the phone with him. (Well, at any rate, his name's Mark and he talked about working on the original Islander parts.) For reference to anyone else who might be interested, as of right now the price is $180 per for the four big ports and $80 each for the small, with tinted acrylic. With tempered tinted glass, add $40 each for the large and $30 each for the small.
He's also got pretty much everything else plastic on the boat - instrument panel and covers, trim frames for cubbys and such, the molded and curved acrylic forward hatch... sounds like I need to rework the budget some more. <grin>
He's also got pretty much everything else plastic on the boat - instrument panel and covers, trim frames for cubbys and such, the molded and curved acrylic forward hatch... sounds like I need to rework the budget some more. <grin>
-
Matt B.
- Rough Carpentry Apprentice
- Posts: 67
- Joined: Mon Oct 10, 2005 2:23 am
- Boat Name: Firefly
- Boat Type: Islander 28
- Location: Everett, WA
Re: 1978 Islander 28 (Hull #256)
Not a bad day today, but no major steps were completed. Had yet another new helper onboard today, we got some more hardware removed but didn't quite finish due to a large number of stubborn fasteners. Broke off six different bolts trying to remove them (which, I suppose, counts as a success since they're not installed anymore.)
The one significant milestone is that I removed the primary and secondary winches from the cockpit, and discovered something that I, at least, find truly horrifying. The winches are Barlows, 16 single speed secondaries and 23-26 two-speed primaries, and I've not had any trouble out of them so far (though the secondaries have seen very little use.) As I removed them, however, I found that all four had been serviced at some time in the past - and completely filled with lithium grease and sealed with silicone. Not just "a little lithium grease to protect from corrosion and smooth out operation" the way some guides recommend, but literally filled, all loose spaces inside the winch cover, with the silicone to keep it from leaking out. Oh, the mess...
So I very carefully disassembled and reassembled them as part of removal, and used a dozen or more paper towels removing as much of the grease and silicone as I could. I did find all pawls and pawl springs intact and in good condition, so that's a plus, although the pawls were very sluggish to respond from all the grease on them. Now - how do I rehab them?
My first thought is to soak them overnight in clean gasoline or kerosene and scrub them out with soft brushes, then reassemble with maybe a very little grease. My main concerns there are making sure I don't lose the pawl springs, and I'm wondering what that'll do to the chrome finish - all four are chromed, and while I prefer bronze myself, I prefer good looking chrome to flaking chrome that might someday be bronze. Thoughts?
-
One Way David
- Skilled Systems Installer
- Posts: 183
- Joined: Sat Aug 02, 2008 8:46 pm
- Boat Type: Pearson Ensign
- Location: Kansas
Re: 1978 Islander 28 (Hull #256)
Hey Matt B. Very good post. I kinda feel these project posts are a stimulus to getting the job done. Or maybe the kinda person that gets the job done tends to post. puzzling questions of life. Like your boat.
I'm always against cleaning anything with gas (unless you're in the middle of nowhere with nothing else...). Diesel, kerosene, Simple Green, engine de-greaser, vegtable oil followed by Dawn. Anything but gas.
Silicone in a winch? To what, seal a rotating/moving part? Sealed bearings have a lot more technology in them than a $2.95 tube of silicone. I bet you were as perplexed as horified!
Never finish all your projects or you'll be bored.
-
Tim

- Shipwright Extraordinaire
- Posts: 5708
- Joined: Tue Apr 01, 2003 6:39 pm
- Boat Name: Glissando
- Boat Type: Pearson Triton
- Location: Whitefield, ME
- Contact:
Re: 1978 Islander 28 (Hull #256)
Does the absence of pictures of these grease-filled horrors mean that you didn't take pictures to share with us?
I suggest kerosene or diesel for cleaning; gasoline is great only if you hope someday to be featured on The Darwin awards.
Light applications of appropriate winch grease and light oil (for pawls and springs) is the proper way to lubricate a winch once the parts are clean.
I suggest kerosene or diesel for cleaning; gasoline is great only if you hope someday to be featured on The Darwin awards.
Light applications of appropriate winch grease and light oil (for pawls and springs) is the proper way to lubricate a winch once the parts are clean.
---------------------------------------------------
Forum Founder--No Longer Participating
Forum Founder--No Longer Participating
Re: 1978 Islander 28 (Hull #256)
That does sound hideous. Who would have thought the silicone devil would show up there. Geez. Is it silicone caulk or silicone grease? (Here's hoping it's the latter, at least.)
Photos would definitely help us to commiserate (and, jointly recoil in horror).
Photos would definitely help us to commiserate (and, jointly recoil in horror).
-
Zach
- Boat Obsession Medal Finalist
- Posts: 684
- Joined: Wed Jan 25, 2006 6:28 pm
- Location: Beaufort, North Carolina
- Contact:
Re: 1978 Islander 28 (Hull #256)
As far as losing small parts goes... Go get a gallon of carburetor cleaner and drop the bits in the mesh bucket that comes inside.
The solvent is lighter than most grease and oils, so the goo settles out to the bottom so you can still see the stuff, unlike diesel that turns into a black hole full of goo... Grin.
Keep the lid closed, it evaporates quickly. No rubber parts, and avoid the gold colored cadium plated stuff, as sometimes it'll strip it.
When you pull the bearings out, blast them clean with brake parts cleaner until it runs clean, let them sit till the solvent flashes off and everything is dry and then reassemble. You don't want to leave a solvent residue inside a bearing, as it degrades the grease...
Good time for nitrile gloves... Grin. Both carb cleaner and brake cleaner dissolve latex.
1961 Pearson Triton
http://pylasteki.blogspot.com/
1942 Coast Guard Cutter - Rebuild
http://83footernoel.blogspot.com/
http://pylasteki.blogspot.com/
1942 Coast Guard Cutter - Rebuild
http://83footernoel.blogspot.com/
-
Hulukupu
- Skilled Systems Installer
- Posts: 165
- Joined: Tue Oct 23, 2007 9:54 pm
- Boat Name: Mahana
- Location: Bristol, Maine
Re: 1978 Islander 28 (Hull #256)
I'm doing one of my Barlow winches at the moment and find the old caked "grease" is mostly dirt that comes off nicely with a small brass brush without the use of solvents. I soaked the parts in kerosene (a cheapskate's choice) afterwards, but there was little old grease left to remove.
I couldn't tell what the old grease was, but silicone grease shouldn't alarm you- it is used by at least one major winch manufacturer.
I couldn't tell what the old grease was, but silicone grease shouldn't alarm you- it is used by at least one major winch manufacturer.
-
Matt B.
- Rough Carpentry Apprentice
- Posts: 67
- Joined: Mon Oct 10, 2005 2:23 am
- Boat Name: Firefly
- Boat Type: Islander 28
- Location: Everett, WA
Re: 1978 Islander 28 (Hull #256)
Sorry no pictures - the camera didn't survive being handled by a toddler. Well, okay, it survived the toddler's handling fine, it was the sudden stop at the end of the handling that killed it. My phone takes reasonable photos but in this case they don't show anything useful - after scraping off the worst of the grease and silicone, it just looks like really dirty winch parts.
Anyway - the silicone isn't as bad as it first appeared, but we are talking about silicone caulk here, not silicone grease. It was used under the mounting and on top of the bolts, apparently for waterproofing, from which chunks had broken free and worked themselves into the upper portion of the winch body. And I know some manufacturers used heavy amounts of grease, but I've never seen a Barlow lubricated that way nor seen any recommendation that it be done for a Barlow winch.
Anyway - the silicone isn't as bad as it first appeared, but we are talking about silicone caulk here, not silicone grease. It was used under the mounting and on top of the bolts, apparently for waterproofing, from which chunks had broken free and worked themselves into the upper portion of the winch body. And I know some manufacturers used heavy amounts of grease, but I've never seen a Barlow lubricated that way nor seen any recommendation that it be done for a Barlow winch.
-
Matt B.
- Rough Carpentry Apprentice
- Posts: 67
- Joined: Mon Oct 10, 2005 2:23 am
- Boat Name: Firefly
- Boat Type: Islander 28
- Location: Everett, WA
Re: 1978 Islander 28 (Hull #256)
Spent Sunday working on the boat, but didn't achieve anything grand - no helpers for the day, and part of the day was wasted moving tarps back and forth as rain rolled through a few times. (I know, I know, in western Washington?! What a shock!) I did manage to gain access to the forepeak - I'd been having trouble getting to the bolts in the bow around the chain locker because I didn't have room for a wrench and couldn't get a socket extension on there that would clear the chain locker without hitting the sides of the boat. Turns out the secret was to come in from the top, through the chain locker - there's a, I guess an inspection port, screwed on to the front wall of the chain locker. Remove that, and it's now relatively easy (compared to before, anyway) to get a socket on the nuts under the deck. Bow pulpit removed, now the only remaining hardware forward of the companionway is the anchor roller / forestay (which is all one fitting). The port genoa track has one bolt left - a very stubborn one, so far resistant to PB Blaster, brute force, light taps with a hammer, heavy taps with a hammer... all methods that worked on the rest of the bolts and on all bolts in the starboard genoa track. Next step is, I think, a grinder or sawzall - slip a blade under the track or above the backing washer and cut the bolt, or grind off the nut.
I also got around to removing the forward and lazarette hatches. The lazarette was simple save in one small respect - the nuts are the first metric fasteners I've found on the entire boat. I'm embarrassed to admit how long it took to figure that out. The forward hatch on the Islander 28 is a piece of molded acrylic, about 3/8" thick and curved to match the shape of the cabin trunk - when it's closed, you can't see that there's a hatch there except from forward. It has two hinges on the aft edge bolted into the deck - badly, with mismatched small stainless bolts and no sealant worth the name. Two retaining latches forward - set screws from the hatch side tighten down to keep the hatch from opening, both latches screwed into the hatch frame. And a locking arm to hold the hatch open on the aft side, also screwed into the frame. Removing the locking arm required drilling out two of the screws, and there are definite signs of water intrusion around the frame; I'm going to have to do some repair and rebuilding in that area, although it's not too serious.
Aft, the remaining hardware consists of the stern pulpit - four mounting bases, plus two on the transom for the swim ladder - the diesel fill, two vents, and several plastic through-hulls for the exhaust, bilge pumps, etc. I am determined to replace those - I prefer bronze anyway, but in particular when they exit the transom well above the waterline. I haven't yet figured out how, though, unless I can borrow a nephew... there's one who's about 7, just big enough to handle a screwdriver...
-
mobilchuckje
- Almost a Finish Carpenter
- Posts: 81
- Joined: Sat Oct 10, 2009 12:20 pm
- Boat Name: TOFU
- Boat Type: Islander 21
- Location: Port Townsend, WA
Re: 1978 Islander 28 (Hull #256)
Good work. Keep it up. Encouragement is good during these dark, wet, windy days. And the weather's been awful too.
I figured one boat project this winter wasn't enough:

This one comes with a helper. Since the mothership is called TOFU, we're calling the tender MISO.
http://s738.photobucket.com/albums/xx22 ... %20Dinghy/
Cheers,
chuck.
I figured one boat project this winter wasn't enough:
This one comes with a helper. Since the mothership is called TOFU, we're calling the tender MISO.
http://s738.photobucket.com/albums/xx22 ... %20Dinghy/
Cheers,
chuck.
-
Matt B.
- Rough Carpentry Apprentice
- Posts: 67
- Joined: Mon Oct 10, 2005 2:23 am
- Boat Name: Firefly
- Boat Type: Islander 28
- Location: Everett, WA
Re: 1978 Islander 28 (Hull #256)
Haven't had much to say - toddlers have been ill and most of the progress has been slow and involved finding different methods of removing 30 year old frozen fasteners and squirming into uncomfortable locations inside the hull. Today, however, the last piece of deck hardware and the last stubborn fastener came off the boat and the sanding began.
We went through a bunch of crap discs (we already had them on hand) and got a reasonable start on the keel, around the detail portions of the rudder, and along the waterline (working in relays with different people in different areas). 100 of the best Tim-approved discs are on their way from McMaster Carr as we speak.
I did add one more project to the list - I removed the foremost bulkhead from inside the cabin. It's not structural but I will be replacing it; while sound, the old one was water-stained and it's too dark, the interior is going to go "Herreshoff-style" white panels with teak or mahogany trim. Removing the bulkhead will make it easier to refinish and makes accessing the forepeak immensely easier.