Awlgrip of C&C 40 "Delphinus"

Post photos and descriptions of your ongoing projects here. No project is too big or too small.
George ( C&C 40 )
Skilled Systems Installer
Posts: 254
Joined: Thu Jan 06, 2005 12:39 pm
Location: Williamsburg, VA

Awlgrip of C&C 40 "Delphinus"

Post by George ( C&C 40 ) »

Let the games begin...


The Project: Topsides Awlgrip of 1979 C&C 40 "Delphinus"


I've got some time over the next few weeks and I just couldn't put the Awlgrip job off any longer.

Image


Image


These photos shows the original green 1980 Imron paint job in all its glory. At this point I've got half of the staging built. I'll be picking up the other half of the staging tomorrow from a friend who has 50 feet of staging left over from his own boat project.

I'll update with photo's as I move along.


George Jones

C&C 40 "Delphinus"
Wavelength 24 "Poco Loco"
User avatar
Tim
Shipwright Extraordinaire
Posts: 5708
Joined: Tue Apr 01, 2003 6:39 pm
Boat Name: Glissando
Boat Type: Pearson Triton
Location: Whitefield, ME
Contact:

Post by Tim »

Can't wait to watch the transformation, George! Good luck.
---------------------------------------------------
Forum Founder--No Longer Participating
George ( C&C 40 )
Skilled Systems Installer
Posts: 254
Joined: Thu Jan 06, 2005 12:39 pm
Location: Williamsburg, VA

Post by George ( C&C 40 ) »

Thanks for the note Tim! I'm also going to try and keep track of the time spent on this job along with taking the pictures.


Day 1 report :

Purchased staging material at Lowe's, trucked it to the site, and built half of the staging. Total time for day 1: 6 hours


Day 2 report :

Completed construction of staging and began 100 grit sanding of old topsides paint. Got about two thirds of the boat sanded. Total time for day two: 6 hours


Day 3 report :

Previous owner had put adhesive backed gold foil in cove stripe. Spent over three hours removing this with a heat gun and large rounded screwdriver. Underneath the foil was a soft gold color paint. Spent another three hours and a quart of 3M Adhesive Remover removing this gooy old paint. Total time for day three : 6.5 hours.


I'll take some more pictures next time I'm out.


George
Robert The Gray
Candidate for Boat-Obsession Medal
Posts: 351
Joined: Thu Feb 19, 2004 1:54 pm
Location: Oakland California
Contact:

Post by Robert The Gray »

Ouch!
6 plus hours for what amounts to maybe 3 square feet of gold paint.
I remember boat work. Like the greek guy who gets his liver eet out every every day by a bird, or is it the guy who is always is rolling the rock. I think it is the rock guy. the liver guy is fire. Anywaaaay.........

Best of luck and thanks for showing the process.

R
Former Owner: Whisper, now Alma 1960 WC Triton
Whisper Projects
Daysailfilms
Figment
Damned Because It's All Connected
Posts: 2846
Joined: Tue Apr 08, 2003 9:32 am
Boat Name: Triton
Boat Type: Grand Banks 42
Location: L.I. Sound

Post by Figment »

What are your ultimate plans for the cove stripe? Are you going to leave it broken and paint the name in the gap, or close the gap?

(yes, a truly irrelevant question. I'm great for those.)
George ( C&C 40 )
Skilled Systems Installer
Posts: 254
Joined: Thu Jan 06, 2005 12:39 pm
Location: Williamsburg, VA

Post by George ( C&C 40 ) »

Hi Figment,

The cove stripe is molded in place so there's no good way to extend it. "Delphinus" is a little big to fit in the cove stripe gap, however, I'm still considering putting it there so I can make the "Williamsburg VA" a little bigger on the stern. Here's a close up the the cove stripe molding.

Image


I was able to get out to the boat for 2.5 hours after work today and got some more sanding in as well as took some more pictures. This next picture shows the finished staging and the sanding in progress from a couple of days ago.

Image


When I first brought the boat down from Ohio to Virginia I had the boatyard sand all the bottom paint off so I could aply a few coats of Interlux Interprotect barrier coat. Since I still race the boat I use a somewhat hard racing ablative paint called CPP ablative. This stuff can be sanded perfectly smooth prior to launching and can be scrubbed throughout the season. This photo shows the gelcoat bootstripes, a gray band of barrier coat and the bottom paint itself as the sander came up. The whiteish line on the bottom paint is the actual waterline.

Image

This shot shows the full width of the double boot stripe that was molded into the gelcoat. Once again note the barrier coat, bottom paint, and true waterline.

Image


As mentioned above, I barrier coated the boat prior to launching it here in Virginia. Because I wasn't exactly sure where the true waterline was going to fall I barrier coated and bottom painted all the way up to the upper boot stripe and just used this upper boot stripe the past two seasons. This is why the boot stripe looks so narrow on the boat. Part of this painting process will be to bring the full sized double boot stripe back. The new double boot stripe will start about 4 inches above the boats true waterline.

A final picture

Image

Everyone who works on their own boat needs to own a full face mask respirator. This is the 3M model.


Total time spent on day 4 : 2.5 hours


George Jones
User avatar
Tim
Shipwright Extraordinaire
Posts: 5708
Joined: Tue Apr 01, 2003 6:39 pm
Boat Name: Glissando
Boat Type: Pearson Triton
Location: Whitefield, ME
Contact:

Post by Tim »

George (C&C 40) wrote:The new double boot stripe will start about 4 inches above the boats true waterline.
That'll be sharp, George. You're fortunate to have such a clear idea of your actual waterline. I wondered about the narrow boottop you had--it seemed kind of tiny.

My dad's C&C 40 always sat too low on the original boot stripes, which were the same as the ones you are now uncovering. This always fouled the boot at the stern and generally looked wrong. I wish I'd known what I know now back when he had the boat; I would have repainted the boot in a heartbeat and solved an irritating aesthetic problem.

I have mentioned before that I'm rather obsessive about bootstripes, haven't I? :<)
---------------------------------------------------
Forum Founder--No Longer Participating
George ( C&C 40 )
Skilled Systems Installer
Posts: 254
Joined: Thu Jan 06, 2005 12:39 pm
Location: Williamsburg, VA

Post by George ( C&C 40 ) »

Hi Tim,


Funny you should mention that. I was talking about your obsession with boot stripes earlier today with some of the yard guys. They were wondering why I just didn't make the stripes dead level using a laser level. I was telling them about you and your need to have all bootstripes rise slightly at the ends. Otherwise it looks look like they are drooping at the ends. That and the need for the bootstripe to be a certain distance off the water to look proper -- a distance that increases with the size of the boat. Also, your theory that it's the bootstripe and the bootstripe alone that ties the whole paint job together.

As to my personal boat, I like the double bootstripe that's molded into the gelcoat. It just needs to be raised four or five inches to achieve the proper aesthetic.

One question Tim. My plan is to scribe the top line of the existing bottom bootstripe with an engravers tip attached to a Dremel tool. I know once I begin painting that I'll lose the gelcoat stripes and have to start from scratch so I thought a scribe line would preserve the original curve -- The gelcoat stripes seem to be excellent, just a bit low. This way the double bootstripe will start exactly the width of the lower bootstripe higher - about three to five inches. Sound like a good idea or is there a better way to do it.


George Jones
PGplastic
Deck Grunge Scrubber
Posts: 35
Joined: Thu Jul 06, 2006 11:08 pm
Location: Morganton, North Carolina

Post by PGplastic »

If I may add a question regarding the bootstripes. What are the criteria, if any, for choosing a double stripe vs a single? I noticed the "daysailor" has relatively thin double stripes and looks fantastic. Is there a time when that would look stupid say on a shorter boat?

It's amazing to me how something so simple can make or break the look of the boat.
s/v Little Wing
Com-Pac 16
User avatar
Tim
Shipwright Extraordinaire
Posts: 5708
Joined: Tue Apr 01, 2003 6:39 pm
Boat Name: Glissando
Boat Type: Pearson Triton
Location: Whitefield, ME
Contact:

Post by Tim »

George ( C&C 40 ) wrote: My plan is to scribe the top line of the existing bottom bootstripe with an engravers tip attached to a Dremel tool. I know once I begin painting that I'll lose the gelcoat stripes and have to start from scratch so I thought a scribe line would preserve the original curve -- The gelcoat stripes seem to be excellent, just a bit low. This way the double bootstripe will start exactly the width of the lower bootstripe higher - about three to five inches. Sound like a good idea or is there a better way to do it.
I remember the gelcoat stripes on the C&C being very well done and accurate, so using an existing line to start from should work well--as long as the top of the bottom stripe is visually level. When you set things up, make sure there's no sheer to this stripe. There probably isn't in this case, but you want to make sure that you're starting from a line that is parallel to the waterline plane.

Creating the additional three tape lines you'll need for your double stripe will be quite a challenge, though. The counter area will require extremely wide stripes, with more spacing between them, in order to look straight and level when viewed from the side. If you keep sanding till you can see the original stripes, you'll see what I mean. Plus, you have those tight buttock lines (shut up, Britton) down by the waterline where the counter pinches into the skeglet. Raising the waterline as you are may mean that the lower stripe no longer has to deal with this pinched area, though.

In the end, your eye is the absolute best way to determine the proper aesthetics of the stripes, but you need help to get there. My old-fashioned "string between two level boards at the ends" method won't work that well at the counter because you'll never get the string in far enough to mark the hull. Still, the string helps give you a good visual reference to double check marks made by any other method. I've described this on my websites, but let me know if you need the links.

A laser level (can anyone say "laser" without putting the air quotes around it now, thanks to Dr. Evil?) works pretty well as long as you don't have to move it. If you have a good one that you can set up far enough away to mark the entire side, you'll have decent luck as long as you check your line by eye. Without a perfectly level ground surface (which you don't even get on a slab, much less outside), moving the level changes the settings and reduces the effectiveness. A rotary laser would be the unit of choice.

A transit would work even better if you can beg, borrow, or rent one. They're pretty pricey to buy for limited use. Measurements with a transit are accurate and not affected by grade, of course, so you could mark all areas of the waterline with just one setup.

It is possible to mark the lines entirely by eye, just by pulling the tape. This is very challenging and time-consuming, though, and I wouldn't recommend it. You'll pull your hair out enough marking it by one of the other methods.

I used a combination of string, cheap laser level, and eyeball to mark the daysailor stripes. Don't count on both sides being exactly the same, though having one side done does help with the second side.

On a more modern design like the C&C, the stripes should be visually level, though this always means that the lines are taller at the ends than at the center. A very slight sweep up in the forward third of the boat looks OK, but don't overdo it. The eye shouldn't really notice the sweep.

Traditional designs can get away with more sweep/sheer to the stripes, but I still think that visually level looks best in nearly all cases. I'm not a fan of stripes filled with curvy character.
---------------------------------------------------
Forum Founder--No Longer Participating
User avatar
Tim
Shipwright Extraordinaire
Posts: 5708
Joined: Tue Apr 01, 2003 6:39 pm
Boat Name: Glissando
Boat Type: Pearson Triton
Location: Whitefield, ME
Contact:

Post by Tim »

PGplastic wrote:If I may add a question regarding the bootstripes. What are the criteria, if any, for choosing a double stripe vs a single? I noticed the "daysailor" has relatively thin double stripes and looks fantastic. Is there a time when that would look stupid say on a shorter boat?

It's amazing to me how something so simple can make or break the look of the boat.
There are no criteria other than personal taste and aesthetics.

In general terms, a double stripe, properly executed, will appear more elegant and dressier than a single stripe. Typically, traditional designs have a single stripe, while double stripes of varying configuration are more common on modern designs. But this is not a hard and fast rule. Double stripes can look good on a traditional boat as long as they are done properly; the applicability will depend on the boat, though. A lot of traditional boats have no boottop at all, harking back to their workboat heritage. I think boats look boring without boottops.

The height of the topsides has something to do with the choice. High topsides benefit from double striping because it helps reduce the visual height of the topsides. Lower topsides don't require this visual reduction.

I like the look of two stripes of equal width on a traditional boat, which is why I went that direction with the daysailor striping. For that boat, it just seemed to fit.

That said, Glissando has a single stripe, which I think looks good (though similar stripes like those on the daysailor would look nice too). I can't explain why I went one way with one boat and the other with another boat. Each situation is different.

Another decision to make is whether to leave a space between the bottom paint and the bottom of the boot. I think there needs to be a space when double stripes are used; it adds to the elegance. A single stripe can be butted against the bottom paint or raised with a gap, though each way looks a little different. Again, the gap adds a bit of elegance to any boat.

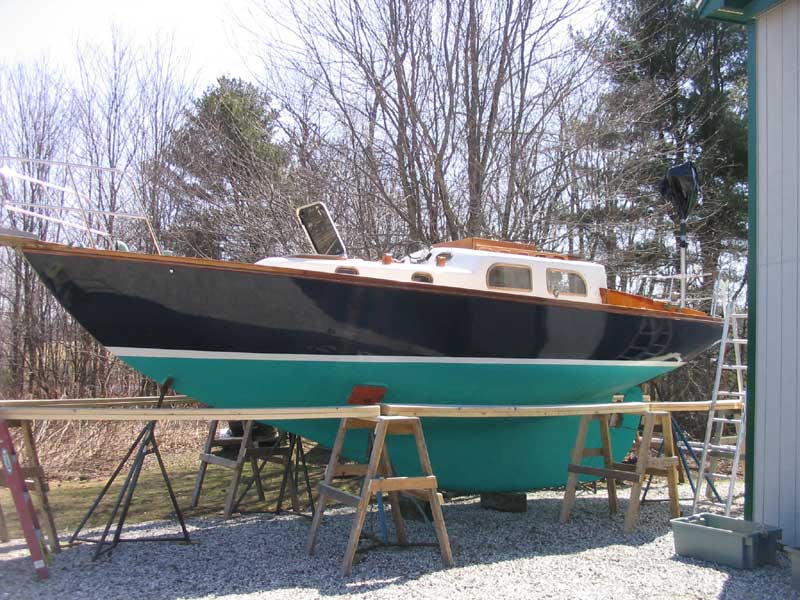
The amount of contrast between the various colors makes a difference in the choice too. For example, blue and green look great together, but they really need that definition of a white stripe between them to make the colors jump. So in the two examples here, note how the blue and green are separated by white in each case. I think this looks better than having the green and blue touching, which lacks definition.

Image

Image

Well done stripes never look "stupid" on any boat. The key is ensuring that the stripes, whatver they are, fit the boat--size- and stylewise. For a boat like your Com-Pac, you could go either way, depending on the look you want. If you went double, the stripes would need to be narrow--3/4" to 1" max. I think the double stripes on the daysailor are 1-1/8" visually; the single stripe on Glissando is 2" visually. The smaller the boat, the narrower the stripes need to be in order to keep things in proportion. The higher the topsides, the wider the stripes can be.

There's a lot to this, and it's hard to explain in writing, but it's not complicated in the end. What looks good, looks good. There are usually a few different ways to get to the "looks good" criteria for any given situation, so there's no single right answer.

While personal taste and opinion certainly factor in here, I believe there's an indefinable quality to something that looks "just right" that all (or at least 90th percentile) people can see. Not everyone can put their finger on what makes something look better than something else, but it typically comes down to little details. With boats, that's often things like boottops, proper proportioning, and finish trim details. Often, the style of the boat doesn't even matter.

It matters. The devil is in the details.
---------------------------------------------------
Forum Founder--No Longer Participating
PGplastic
Deck Grunge Scrubber
Posts: 35
Joined: Thu Jul 06, 2006 11:08 pm
Location: Morganton, North Carolina

Post by PGplastic »

Well said. Thanks for your explanation and photos.
s/v Little Wing
Com-Pac 16
George ( C&C 40 )
Skilled Systems Installer
Posts: 254
Joined: Thu Jan 06, 2005 12:39 pm
Location: Williamsburg, VA

Post by George ( C&C 40 ) »

Bootstripe Day!


The 100 grit sanding of the hull is now complete and it is time to lay down the scribe line for the base of the botstripe. As Tim will tell you, this is a long difficult process...

I first scribed in a reference line in the scum line on the boats true waterline. The scum line is about a quarter inch thick and I needed a line about 1/64 inch thick to base my measurements off of. I then used 3" wide blue tape to make a rough bootstripe about 3.5 inches off the true waterline scribe line. I adjusted this tape and kept refining my measurements until the tape appeared to be an even 3.5" off the waterline with a slight sheer up to 4" at the bow. It's a very slight sheer that raises the base of the bootstripe 1/2 inch over the front 14 feet of the boat. I then taped up a 100 foot tape measure so I could get reference measurements every 6 inches for the whole length of the waterline. The waterline is 34 feet so I ended up with 68 measurements accurate to a 64'th of an inch. I will use these measurements to transfer the base of the bootstripe over to the other side of the boat. An engraving tool attached to my Dremmel Tool and a 6" piece of aluminum straight edge was then used to scribe the base of the bootstripe into the glelcoat. I chose the bottom of the bootstripe as the reference line for painting the stripes because it sits out of the water so barrier coatings aren't a problem and it is at the joint between the awlgrip and the bottompaint so it won't be visable in the finished paint.

Note: the only way the above process works is if you know exactly where the boat's true waterline is. You have to use a different process if you don't have this reference line.


Getting the measurements right...

Image

The finished scribe line...

Image


Total time to finish sanding the old paint was two hours and time to scribe the first half of the bootstripe reference line was 5 hours. I spent another hour sanding the lead keel of the boat getting it ready for new primer and bottom paint. Total time for day 5 : 8 hours


George Jones
George ( C&C 40 )
Skilled Systems Installer
Posts: 254
Joined: Thu Jan 06, 2005 12:39 pm
Location: Williamsburg, VA

Post by George ( C&C 40 ) »

Hi All,


Day 6...

Spent a couple of hours transferring the bootstripe scribe line to the starboard side of the boat. The scribe will go along the bottom edge of the blue tape in this photo.

Image

It took another hour or so with an engravers tool to cut the starboard scribe line into the gelcoat. After I was done with this I spent another two hours grinding the lead keel centerboard trunk down to bare metal in preperation of lead metal primer and fresh bottom paint. While the boat is out of the water I'm doing a few little jobs like these along with the big painting job.

Total time for day 6 : 3 hours on paint job and 2 hours on keel


Day 7...

Spent four hours grinding out gelcoat cracks and making epoxy repairs to the hull getting the boat ready for the first coat of Awlgrip primer. The fun just keeps on coming!


George Jones
Challenger949L
Almost a Finish Carpenter
Posts: 80
Joined: Sun Aug 21, 2005 10:17 pm
Boat Name: ESPADON Kittiwake
Boat Type: Sabre 28, Alden Challenger
Location: Central Virginia

Post by Challenger949L »

Are you at Wormley Creek Marina?
Jimmy Small
George ( C&C 40 )
Skilled Systems Installer
Posts: 254
Joined: Thu Jan 06, 2005 12:39 pm
Location: Williamsburg, VA

Post by George ( C&C 40 ) »

I keep the boat over at York River Yacht Haven. She's currently up in the boatyard there. YRYH is in Gloucester Point directly accross the York River from Wormley Creek marina

George Jones
George ( C&C 40 )
Skilled Systems Installer
Posts: 254
Joined: Thu Jan 06, 2005 12:39 pm
Location: Williamsburg, VA

Post by George ( C&C 40 ) »

Hi All,


Stopped by after work yesterday and sanded out the epoxy repairs I had made on the boat. Mostly, they were spider gelcoat cracks that I had dug out with a Dremel tool and a cutting bit, filled with epoxy and sanded fair.

Here's an example of some filled repairs. The blue tape is used to hold the epoxy in place if I think it's going to run or sag.

Image


After I removed the tape I wiped off the tape residue with some 3M adhesive remover and then sanded the repairs fair.

Image


There were about 30 repairs like this all over the hull. All the repairs came out great.

Total time for day 8 : 2.5 hours
George ( C&C 40 )
Skilled Systems Installer
Posts: 254
Joined: Thu Jan 06, 2005 12:39 pm
Location: Williamsburg, VA

Post by George ( C&C 40 ) »

Hi All,

Finally got back to the boat today. Did some more sanding and filling as well as the final sanding of the lead keel. Mixed up some two part Pettit metal primer and painted the bright shiney lead. I then cleaned up areas to be painted with barier coat and brushed on two coats with a few hours of drying time in between coats. The barrier coat was applied anyplace below the bootstripe scribe line where I has sanded down to the gelcoat. At this point everything below the scribe line is completely sealed in either epoxy barrier coat or two part lead primer.

Total time for day 9 was 4 hours.

In the picture you can see the green Pettit metal primer on the lead portion of the keel as well as fresh barrier coat covering previously sanded areas up to the scribe line.

Image
George ( C&C 40 )
Skilled Systems Installer
Posts: 254
Joined: Thu Jan 06, 2005 12:39 pm
Location: Williamsburg, VA

Post by George ( C&C 40 ) »

Hi All,


Finished up the last of the filling and sanding this afternoon. Once that was complete I hosed down the entire boat to get most of the dust off.

I'll be taping off the white rubber rubrail that runs just below the toerail so I wanted to make sure that it was clean enough to take tape and have no chance of contaminating the paint job. This required a scrub down of the rubrail with MEK to get it completely clean. The rubrail is now bright white again and ready for tape. This actually made a big difference in how the boat looked. I wish I had done it sooner.

The last thing I did today was wash the boat again with pure water, followed by a wash down with a big sponge and soapy water, and then a final freshwater rinse. Surface is now nice smooth and clean.

Total time for day 10 was 4 hours.


George Jones
User avatar
Tim
Shipwright Extraordinaire
Posts: 5708
Joined: Tue Apr 01, 2003 6:39 pm
Boat Name: Glissando
Boat Type: Pearson Triton
Location: Whitefield, ME
Contact:

Post by Tim »

George,

How goes the progress?
---------------------------------------------------
Forum Founder--No Longer Participating
George ( C&C 40 )
Skilled Systems Installer
Posts: 254
Joined: Thu Jan 06, 2005 12:39 pm
Location: Williamsburg, VA

Post by George ( C&C 40 ) »

Hi Tim,


It has rained every day since the last post including an unexpected mini hurricane along the York River where by boat is kept. We got a little over 12" of rain on Friday alone when Ernesto came ashore and wind speeds along the York in the 30 to 55 knot range with a couple gusts at 68 knots. I then spent the Labor Day weekend clearing branches and fallen trees off my rental properties and the main house in Williamsburg. Lots and lots of work with none of it getting the boat painted any quicker.

I did get out today though and got things moving again. I washed the topsides down with Acetone to make sure there was no dampness left on the gelcoat topsides. The boat had spent all day yesterday out in the sun but I didn't want to take any chances. I washed it down with Acetone a second time just to make sure. Went to lunch, came back and taped the boat for painting. I used 3M #225 long mask silver at the joint of the rubrail and the topsides and regular blue painters tape about an inch below the scribe line for the bootstripe. I then wiped the topsides down with a cloth rag and Awlgrip T0031 reducer to get it perfectly clean and while that was drying mixed up some gray 545 Awlgrip primer. Once the mixture had inducted for 15 minutes I added 20% T0031 reducer to get it really thin -- I didn't want there to be any chance of brush strokes in the primer when I was done. As it turned out I didn't even have to use a brush. I rolled the primer on with a 6" Ultra Smooth foam roller from Lowe's. The primer was thin enough that it leveled perfectly right off the roller. I went around the whole boat like this while mixing in T0031 reducer every 5 minutes to keep the primer thinned properly. I changed out the roller once one side of the boat was finished. First coat of primer came out perfectly. I mixed up 60 total ounces of primer and converter and then added 12 ounces of T0031 reducer for a total of 72 ounces of product to do my C&C40. When all was said and done I had 3 oz of paint left. Felt that this had been a pretty good estimate and will mix the same amount for the second coat. I always like having just a little bit of paint left over -- just in case.

Total time for day 11 : 6.5 hours

Note: Painting a boat like this by yourself is an endurance contest. You against the boat. Once you start you cannot stop because the wet edge must be maintained. Mixing, rolling, tipping if needed, moving supplies along the staging, all as fast as you can go for two or more hours straight out in the hot sun. Be ready.


George
George ( C&C 40 )
Skilled Systems Installer
Posts: 254
Joined: Thu Jan 06, 2005 12:39 pm
Location: Williamsburg, VA

Post by George ( C&C 40 ) »

Hi All,


Stopped by the boat this morning for a few hours and applied the second coat of Awlgrip 545 gray primer. Application went perfectly and I'm very happy with the result. Total time for day 12: 3 hours

I took the below photos when I showed up this morning so they are of the first coat of primer.

Image

Image


George Jones
1979 C&C 40 "Delphinus"
Figment
Damned Because It's All Connected
Posts: 2846
Joined: Tue Apr 08, 2003 9:32 am
Boat Name: Triton
Boat Type: Grand Banks 42
Location: L.I. Sound

Post by Figment »

smoooooooth.
George ( C&C 40 )
Skilled Systems Installer
Posts: 254
Joined: Thu Jan 06, 2005 12:39 pm
Location: Williamsburg, VA

Post by George ( C&C 40 ) »

Hi Figment,


Yeah, you only apply overly thick 545 primer once in your life because once you do you will spend the next 6 hours sanding and repeating the phrase "always keep adding reducer" "always keep adding reducer" "always keep adding reducer"... If you can see brush strokes when you are done you are screwed. Fortunately, when I made this mistake it was on a much smaller boat.

On the plus side, with the proper amount of thinner, 545 is really beautiful stuff to work with. I didn't even tip it out with a brush this time. Those 6" ultra smooth "sausage" rollers they sell at Lowe's for doing trim work get the primer on thin enough that it will self level but still flash off before sagging. I should have also mentioned in the last post that the outside air temperature while I was doing this job was 82 degrees F.


George
George ( C&C 40 )
Skilled Systems Installer
Posts: 254
Joined: Thu Jan 06, 2005 12:39 pm
Location: Williamsburg, VA

Post by George ( C&C 40 ) »

Hi All,


Today was the big day -- got to apply the first coat of color topcoat. Unfortunately, it was also going to have to be a very long day to get to that point.

Showed up at the boat at 8:15am and began sanding the primer with 220 grit sandpaper. I used a combination of the Porter Cable random orbit sander and a sanding block. Machine for the big flat areas and the block for tight stuff and corners. Sanded as fast as I could until about 12:45pm.

No time for lunch if I was going to get this done today so I immediately began hosing down the boat, including the deck, keel, staging, and surrounding ground area. I then washed down the boat with a sponge and some soapy water to get the really fine dust off the surface. Once this was dry I did a two rag method wipe down of the boats topsides with Awlgrip T0031 reducer just to make sure. Time is now 1:45pm

Immediately began to set up for the first coat of Awlgrip topcoat paint. Laid out the brushes, rollers, reducer, converter, base color, rags, drill and paint spinner for mixing, plastic measuring buckets, etc. Mixed up 2 parts color to 1 part converter and reduced by 20% of the total with the T0031 reducer. I'm using 2.5" brushes and a 7" roller for the roll and tip work.

It's now 2:10 pm. Took a deep breath... The first 3' panel was a little thick so I quickly added reducer to bring the total to 25%. Next panel was still a little thick so added reducer to bring the mix up to 30%. The third panel was pretty much perfect. Went around the rest of the boat remembering to add reducer every five minutes or so. I was by myself so I looked a bit like a Whirling Dervish flying around the boat but the job came out pretty much perfect so I was happy. Packed up the car and left at 5:15pm.

Total time for day 13: 9 hours


Question:

I was able to maintain a wet edge as I went around the boat and the panels flowed together seemlessly, however, as I was leaving I noticed that each panel appears to have a 3 to 5 inch wide edge that is a little darker in color that the next panel. No seam, just a darker color. Looks like a mirror from any kind of oblique angle, you can only see the stripes when looking straingt on. I have no idea what could cause this and hopefully it is something that will go away as the paint cures. We'll see. Paint does have a nice glassy reflective surface. If anyone knows what might cause the dark stripe at each panel edge please let me know. I think you can see the stripes in the second photo.

Image

Image


George
keelbolts
Skilled Systems Installer
Posts: 271
Joined: Mon Jun 12, 2006 12:20 pm
Location: Tidewater, VA

Post by keelbolts »

Rolling & tipping by yourself is a good deal like the proverbial one armed paper hanger. I apply 2 coats of Z-Spar 99 each year. I would say that the paint is thicker, and you're getting better coverage, where it overlaps & that's why it looks darker, but over that gray primer I wouldn't think that'd matter. Hopefully, the thicker bands just hadn't flashed off as quickly as the thinner panels. Other than that, she looks great. Good luck.
User avatar
Tim
Shipwright Extraordinaire
Posts: 5708
Joined: Tue Apr 01, 2003 6:39 pm
Boat Name: Glissando
Boat Type: Pearson Triton
Location: Whitefield, ME
Contact:

Post by Tim »

Agreed. Clearly, those areas are where you overlapped between sections, and where you had double the coverage. The first coat of Awlgrip is so thin that areas like that can be extremely visible. The second coat should cover much better, eliminating such areas.

If you continue to experience this in subsequent coats, though, you might need to look at your technique. I don't really think it's that, though.

Overlaps in Awlgrip can create many problems--runs, sags, and occasionally visible overlaps in the cured surface. When applying the paint with the roller, don't extend into the previous section at all; just use your tipping brush to flow the sections together at that juncture.

Looks good so far!
---------------------------------------------------
Forum Founder--No Longer Participating
George ( C&C 40 )
Skilled Systems Installer
Posts: 254
Joined: Thu Jan 06, 2005 12:39 pm
Location: Williamsburg, VA

Post by George ( C&C 40 ) »

Hi All,


Got the second coat applied today and also found the answer to the dark color streaks in the paint.

Arrived at the boat today and began sanding the thicker paint area's from the first two panels I did yesterday. The paint job looked so good I decided to make a bit more serious bid for perfection and did a complete wet-sand of the topsides with 320 grit wet/dry sandpaper. This required a washing of the boat again before I did a two rag wipe down of the topsides with the T0031 reducer. A friend of mine who is planning his own Awlgrip paint job stopped by to help with the rolling and tipping and will also help with the last two coats after today. Reduced the mix to 30% right off the bat and the paint went on perfectly. It looks really good with no runs, drips, sags, or errors. There were a couple of flys that decided to commit "Death by Awlgrip". I'll sand them out before the next coat goes on. Otherwise the paint looks perfect.

Total time for day 14: 5 hours

The answer to yesterday's question...

The streaks aren't in the overlap area but in the area immediately adjacent to the overlap. We watched what happens today as we worked with the paint. The 3' strip is rolled on and I begin to tip it out vertically. The first brush strokes are very gray/blue and get darker the longer it takes me to get to tipping the paint out. It appears that the longer the rolled-on paint sits there before I get to it the more of the black color compound, or perhaps a type of anime blush rises to the surface. Because the first brush strokes of a new 3' section are adjacent to the last brush strokes of the old 3' section the difference is most obvious there. I'm thinking it's a type of anime blush because it sanded off with the 320 grit sandpaper I used to prep the topsides today. Very weird but it doesn't appear to hurt anything and with two of uf working on it today it is much less obvious. This is something that appears to be unique to "Stars and Stripes Blue" as I've never come accross this in any other color of Awlgrip.

Here's some pictures of the second coat...

Image

Image


George
User avatar
Tim
Shipwright Extraordinaire
Posts: 5708
Joined: Tue Apr 01, 2003 6:39 pm
Boat Name: Glissando
Boat Type: Pearson Triton
Location: Whitefield, ME
Contact:

Post by Tim »

Nice...very nice!
---------------------------------------------------
Forum Founder--No Longer Participating
Figment
Damned Because It's All Connected
Posts: 2846
Joined: Tue Apr 08, 2003 9:32 am
Boat Name: Triton
Boat Type: Grand Banks 42
Location: L.I. Sound

Post by Figment »

YEAH, Baby!
Ric in Richmond
Boat Obsession Medal Finalist
Posts: 518
Joined: Fri Sep 09, 2005 12:26 am
Boat Name: Andiamo
Boat Type: Alberg 35
Location: Richmond VA

Post by Ric in Richmond »

I know these pics are both in this thread...but I had to do this....

BEFORE

Image


AFTER

Image


WOW!!!!
Ric Bergstrom

http://andiamoadventures.blogspot.com/

Archived old blog:

http://andiamo35.blogspot.com/

~~~~~([\~~~([\~~([\~~~~~~([\~~([\~~~~~~
~~~~~~([\~~~~~~~([\~~~~~~~~~~~~~~~
Figment
Damned Because It's All Connected
Posts: 2846
Joined: Tue Apr 08, 2003 9:32 am
Boat Name: Triton
Boat Type: Grand Banks 42
Location: L.I. Sound

Post by Figment »

I know I may be jumping the gun, but what's your whole-color-scheme plan?

(bootstripe, bottom, canvas colors)
George ( C&C 40 )
Skilled Systems Installer
Posts: 254
Joined: Thu Jan 06, 2005 12:39 pm
Location: Williamsburg, VA

Post by George ( C&C 40 ) »

Hi Figment,


I've got two more coats of the blue to apply and then I'm going with a double boot stripe and cove stripe in Awlgrip "eggshell white". I already own some "snow white" but I like the slightly warmer tone of the "eggshell white" with the "Stars and Stripes" blue. The name and hailing port will be the same white I had before -- in other words whatever the good people at SpeedySigns.com use for their white vinyl letters.

As to the canvas, I just got done making a new cruising 120% genoa and did the UV cover in off-white to match the bimini. I'll look at some of the different blues or maybe a gray or silver for the new sail cover. I'll lay some bolts of Sunbrella fabric over the mainsail and see what looks good up there -- definately a color though, I've got enough white on the deck already.


George
George ( C&C 40 )
Skilled Systems Installer
Posts: 254
Joined: Thu Jan 06, 2005 12:39 pm
Location: Williamsburg, VA

Post by George ( C&C 40 ) »

Oops,

Sorry Figment, forgot the bottom paint. For now, I'll stick with the CPP hard racing ablative in Black that's on there already. I've got one more gallon of the stuff left in my shop and that should be enough to do the keel and the strip below the boot stripe as well as a couple of coats of the entire bottom. I should be good until this time next year. After that who knows.

George
User avatar
Tim
Shipwright Extraordinaire
Posts: 5708
Joined: Tue Apr 01, 2003 6:39 pm
Boat Name: Glissando
Boat Type: Pearson Triton
Location: Whitefield, ME
Contact:

Post by Tim »

I'm glad to hear you're planning on replacing the mainsail cover. I didn't want to say anything about it in case you didn't plan to replace the cover, but I was hoping! The green just doesn't fit anymore.

I think the gray and silver tones might look best. There are a lot of blues too, but they're just so...so everyboat, and to me none of them are really the proper match for the unique S&S blue.
---------------------------------------------------
Forum Founder--No Longer Participating
dasein668
Boateg
Posts: 1637
Joined: Thu Apr 03, 2003 9:09 am
Boat Name: Dasein
Boat Type: Pearson Triton 668
Location: Portland, Maine
Contact:

Post by dasein668 »

Very nice, George!
Figment
Damned Because It's All Connected
Posts: 2846
Joined: Tue Apr 08, 2003 9:32 am
Boat Name: Triton
Boat Type: Grand Banks 42
Location: L.I. Sound

Post by Figment »

I copycatted Nathan's silver sunbrella sail cover, and it looks pretty good with the GUNSMOKE blue <wink>. A darker grey would look nice as well, though.
I briefly considered something red, but chickened-out in the end.

I agree with your thoughts on the warmer eggshell white with relation to this blue. I did my toerail and bootstripe in a true white, and it's just too bright. It tones-down the blue by contrast.
George ( C&C 40 )
Skilled Systems Installer
Posts: 254
Joined: Thu Jan 06, 2005 12:39 pm
Location: Williamsburg, VA

Post by George ( C&C 40 ) »

Hi Again All,


It was way too windy to paint today so I did the wet sanding with 320 grit and called it a day. Total time for day 15: 2 hours.

For those at home keeping score the total number of project hours now stands at 71.


George
User avatar
Tim
Shipwright Extraordinaire
Posts: 5708
Joined: Tue Apr 01, 2003 6:39 pm
Boat Name: Glissando
Boat Type: Pearson Triton
Location: Whitefield, ME
Contact:

Post by Tim »

George ( C&C 40 ) wrote:For those at home keeping score the total number of project hours now stands at 71.
And people wonder why it costs so much to hire this work out...
---------------------------------------------------
Forum Founder--No Longer Participating
George ( C&C 40 )
Skilled Systems Installer
Posts: 254
Joined: Thu Jan 06, 2005 12:39 pm
Location: Williamsburg, VA

Post by George ( C&C 40 ) »

Hi All,

More wind and rain today. Looks like Saturday or Sunday before I will be able to apply the final two coats.

George
Figment
Damned Because It's All Connected
Posts: 2846
Joined: Tue Apr 08, 2003 9:32 am
Boat Name: Triton
Boat Type: Grand Banks 42
Location: L.I. Sound

Post by Figment »

Tim wrote:
George ( C&C 40 ) wrote:For those at home keeping score the total number of project hours now stands at 71.
And people wonder why it costs so much to hire this work out...
And then there are other people whose firsthand knowlege leaves them amazed that the pros can do it for so little!!
George ( C&C 40 )
Skilled Systems Installer
Posts: 254
Joined: Thu Jan 06, 2005 12:39 pm
Location: Williamsburg, VA

Post by George ( C&C 40 ) »

Hi All,

We had come clear weather today and I was able to get the third coat on. I was by myself and even though it was cooler ( high of 80 ) I still ended up with some small dark streaks where the paint cooked too long in the sun before it got its final tip out. Dark streaks notwithstanding, the paint looks really good and with any luck I'll be able to finish the fourth and final coat tomorrow.

Total time for day 16: 3 hours

George
George ( C&C 40 )
Skilled Systems Installer
Posts: 254
Joined: Thu Jan 06, 2005 12:39 pm
Location: Williamsburg, VA

Post by George ( C&C 40 ) »

Hi All,

More rain today but I was able to get out for a couple of hours and wet sand the paint I had applied yesterday. At this point my wet sanding is really more just a scuffing of the paint with 320 grit wet/dry sandpaper. I've included a couple of photo's of the third coat from yesterday. Total time for day 17: 2 hours

Image

Image


George
Figment
Damned Because It's All Connected
Posts: 2846
Joined: Tue Apr 08, 2003 9:32 am
Boat Name: Triton
Boat Type: Grand Banks 42
Location: L.I. Sound

Post by Figment »

Good stuff, George!
George ( C&C 40 )
Skilled Systems Installer
Posts: 254
Joined: Thu Jan 06, 2005 12:39 pm
Location: Williamsburg, VA

Post by George ( C&C 40 ) »

Hi All,


My wife Denise and I arrived at the boat this morning to do the final coat of the S&S Blue Awlgrip. I had prepped the boat the day before so everything was ready to go when we arrived at 8am. We did a two rag wipe down of the topsides and then started in on the painting.

Every other day I've started the painting around 11:45 am when the sun is shining directly on the transom and both sides are in shadow. The problem with this approach is that the side that gets the morning sun is hot by the time I start painting and this leads to the dark streaks in the S&S Blue. Today I thought to start the morning sun side just as the sun was starting to warm it and by the time I got around to the shadowed side the ambiant air temp would be warm enough to flash the paint without any sagging.

The first part of the job went exactly as planned and the morning sun side turned out absolutly perfect. Glass smooth with no dark streaks -- really really nice! The shadowed side however was not warm enough to flash the paint and in about a dozen places it sagged on me despite my best efforts. This was very depressing.

As it stands now, my plan is to leave the perfect side alone and only paint the bad side again. To do this and still make the paint look perfect I'll seam the bow with 3M fine line tape right on the corner and seam under the counter at the stern as well. The counter will be covered with the boot stripe so that won't be a problem. I'll pull the fine line tape off the bow the second I'm done painting that area to soften the edge to the point where it should be invisible. If there's any visible seam on the corner when I'm done I can always 1500 grit wet sand the seam and buff it out entirely. Shouldn't be a problem though because each side of the corner has different reflective properties and the seam should be invisible there. This should leave me with a visibly perfect paint job. ( I hope )

Total time for day 18: 3 hours.


George
Jason K
Boat Obsession Medal Finalist
Posts: 741
Joined: Fri Mar 18, 2005 10:41 pm
Boat Name: Rambunctious
Boat Type: J/30
Location: Mandeville, LA
Contact:

Post by Jason K »

This should leave me with a visibly perfect paint job. ( I hope )
I'm sure it will. Fantastic job, George.
- Jason King (formerly #218)
J/30 Rambunctious
http://www.rambunctiousracing.com
User avatar
Tim
Shipwright Extraordinaire
Posts: 5708
Joined: Tue Apr 01, 2003 6:39 pm
Boat Name: Glissando
Boat Type: Pearson Triton
Location: Whitefield, ME
Contact:

Post by Tim »

Sorry to hear about your troubles, George. I think your plan sounds good, though. Even if the tape seam on the bow is slightly visible as you stand there beneath it, remember that you will never see it in the water.

It's going to turn out fine. Can't wait to see the finished product!
---------------------------------------------------
Forum Founder--No Longer Participating
George ( C&C 40 )
Skilled Systems Installer
Posts: 254
Joined: Thu Jan 06, 2005 12:39 pm
Location: Williamsburg, VA

Post by George ( C&C 40 ) »

Hi All,


I did the final Stars and Stripes Blue today and the job looks great. I showed up at 9am to do the wet sanding and other prep work. My assistant and I waited until 12pm which gave us 1/2 hour before the sun started to hit the port side of the boat. I figured that this was as warm as it was going to get without direct sun. Temp in the shade was about 76 F. Even so, there were still a couple of very tiny sags in the final product. The good news is that there was no color banding at all. I'll buff the sags out before I apply the AwlCare and she should look perfect.

As a side note, we started at the stern and worked forward. As soon as the tip of the bow was finished we pulled the 3M fine line tape off and the seam dissappeard entirely. Even standing right next to the boat and looking for it, it's impossible to find the seam. That idea, at least, worked perfectly.

In addition to the painting I also spent some time today removing the tape on the starboard side of the boat. Total time for day 19: 5 hours

Here are some pics of the final coat of S&S Blue.

Port Side

Image

Starboard side

Image


George
keelbolts
Skilled Systems Installer
Posts: 271
Joined: Mon Jun 12, 2006 12:20 pm
Location: Tidewater, VA

Post by keelbolts »

Very nice.
Summersdawn
Skilled Systems Installer
Posts: 279
Joined: Fri Nov 04, 2005 6:34 pm

Post by Summersdawn »

Nice work! I'm glad your tape trick worked well.
Rick
Summer's Dawn
24 San Juan #380
Post Reply