How to make caned cabinet door

This is the place to post your ideas, thoughts, questions and comments as relates to general boatbuilding and reconstruction techniques and procedures (i.e. recoring, epoxy, fiberglass, wood, etc.)
Post Reply
Triton106
Candidate for Boat-Obsession Medal
Posts: 392
Joined: Fri Apr 18, 2003 4:51 pm
Location: San Francisco Bay Area

How to make caned cabinet door

Post by Triton106 »

Hi All,

I hate winters even in the temprate Northern California. It's not that it is cold here or wet (this year is drier than usual) it's the days are so short. It seems that no sooner than I get my tools out and set up the work space the sun is already hanging low on the western horizon. Sorry that is not why I am writing so let me get to it...

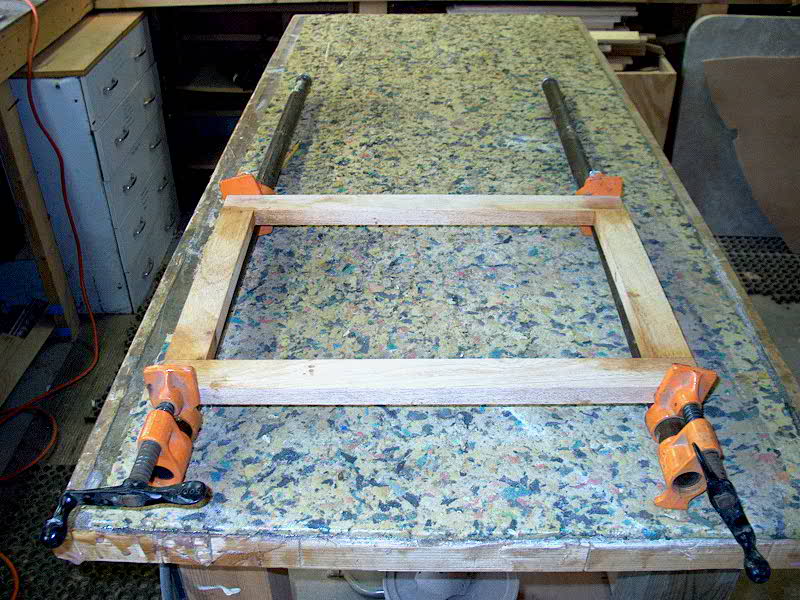
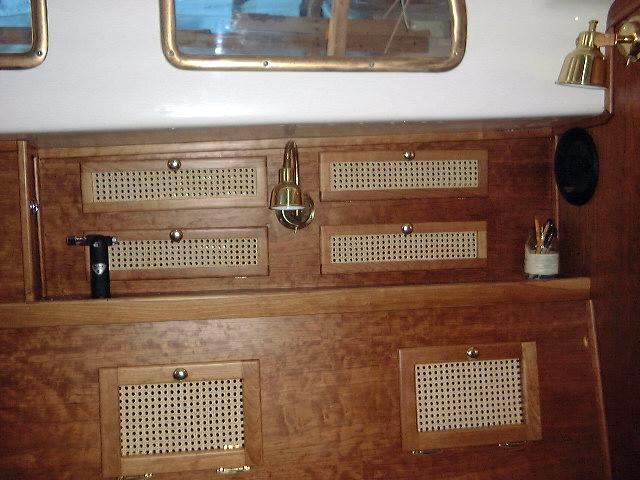
The galley/saloon project is moving sloooooowly forward and the scope seems to be expanding ever so slightly that it just seems like I will never get it done. I am now at a point where I am enclosing the shelf area above the port settee to creat a electrical panel area on the left end and a small cabinet on the right end. I am planning to make caned cabinet doors not unlike the ones that Tim, Ray Alsup, and Jim Bissonette have done. I think they are both attractive and functional (helps ventilation). Image Image Image
* Courtesy Triton381.com and Tritonclass.org.

The question I have is how to attach the prewoven cane sheet into the door frame. I have read Tim's description -
I installed the caning in the larger doors by first cutting the caning slightly oversize, then wetting it by briefly immersing it in water. The installation involved pressing the cane into the spline grooves with a wedge (I made the mistake of not ordering dedicated caning wedges for this, so I improvised with several tools on hand--the most effective was a school-type protractor). Once the caning was pressed into the groove, I applied a bead of glue and then hammered the spline into place with a rubber mallet. I left the excess caning and spline overhanging until the glue dried, when I trimmed it off with a utility knife and wood chisel. As the wet caning dried, it shrank somewhat, leaving a drum-tight surface. The process went fast once I had figured out a few tricks to make it easier for me.
More specifically, I would like to know if in cutting the spline grooves on the table saw the groove should go from end to end of the door frame and if so, will the end of the groove be visible from the edge of the door. If not, how could that be achieved (it will seem that it is impossible to stop the table saw cut right before the end of the frame)?

Secondly, I bought reed splines that is specified for 3/16 grooves. I don't imagine that I will be able to cut exactly 3/16 grooves using Tim's method of running the frame through the table saw twice. How important is the fit between the reed spline and the groove? How much give and take can I expect?

Thirdly, can woven canes be varnished? The material I bought is very light color and I would like to varnish it (with Cetol) to darken it a bit. Is that doable?

Thanks you all in advance for your help.

Best regards,
Ray D. Chang
Triton 106 in Berkeley, CA
User avatar
Tim
Shipwright Extraordinaire
Posts: 5708
Joined: Tue Apr 01, 2003 6:39 pm
Boat Name: Glissando
Boat Type: Pearson Triton
Location: Whitefield, ME
Contact:

Post by Tim »

Triton106 wrote:I would like to know if in cutting the spline grooves on the table saw the groove should go from end to end of the door frame and if so, will the end of the groove be visible from the edge of the door.
If your doors are an overlay type, like mine, where the edge of the door frame has a rabbet milled in it that overlaps the door opening by a set amount (typically 3/8"), then cutting the grooves for the caning won't show through the ends because the grooves are only in the inner portion of the door, and aren't deep enough to extend into the rabbeted part--which is the only part you see when the door is closed.

Image
Triton106 wrote:Secondly, I bought reed splines that is specified for 3/16 grooves. I don't imagine that I will be able to cut exactly 3/16 grooves using Tim's method of running the frame through the table saw twice. How important is the fit between the reed spline and the groove? How much give and take can I expect?
How are you planning on cutting these grooves? They do need to be the specified size to ensure that the spline fits correctly. Why do you foresee a problem creating the proper width?

Note that I now have a proper spline roller, unlike when I wrote the description quoted in Ray's post.
Triton106 wrote:Thirdly, can woven canes be varnished? The material I bought is very light color and I would like to varnish it (with Cetol) to darken it a bit. Is that doable?
I guess you could, though the caning won't absorb finish as well as the surrounding wood (or maybe even at all). Do a sample first to make sure you like how it goes. Caning is very firm and burnished, and while I imagine you can get some color on it, it could end up blotchy or otherwise weird-looking. I could also see the finish (especially Cetol) clogging up the fine weave of the caning, and collecting in low spots in unattractive ways.

I left mine natural because I like the contrast, and because the caning doesn't need a finish tor longevity.
---------------------------------------------------
Forum Founder--No Longer Participating
Quetzalsailor
Master of the Arcane
Posts: 1100
Joined: Fri Aug 26, 2005 9:53 am
Boat Name: Quetzal
Boat Type: LeComte North East 38
Location: Philadelphia, PA

Post by Quetzalsailor »

If you don't like to see the unused portion of the spline groove, rout it instead of dadoing it. That's typical for pre-woven cane used on chair seats. You could also glue a little smidge of matching wood into the unused portion before caning. The varnish would stick to the cane, but unreliably; cane moves with moisture and cracks the varnish. Traditional splines are some sort of reed, current cheepie splines are plastic (sometimes the 'cane' too), some furniture splines are varnished wood matching the wood elsewhere in the piece.
Triton106
Candidate for Boat-Obsession Medal
Posts: 392
Joined: Fri Apr 18, 2003 4:51 pm
Location: San Francisco Bay Area

Post by Triton106 »

Thanks Tim, Quetzalsailor for your quick response!

Tim wrote -
How are you planning on cutting these grooves? They do need to be the specified size to ensure that the spline fits correctly. Why do you foresee a problem creating the proper width?
I am planning to use my table saw and make two passes as you described. My router does not have plunger feature so cannot do as Quetzalsailor suggested. Having seen the picture Tim posted it really helps me visualize the outcome and I think that will be fine. The reason I was concerned about not being able to cut exactly 3/16" groove is due primarily to my lack of experience with table saw and having a very basic Ryobi table saw I have not been able to execute very precise cuts.

Tim wrote -
I guess you could [apply varnish to caning], though the caning won't absorb finish as well as the surrounding wood (or maybe even at all). Do a sample first to make sure you like how it goes. Caning is very firm and burnished, and while I imagine you can get some color on it, it could end up blotchy or otherwise weird-looking. I could also see the finish (especially Cetol) clogging up the fine weave of the caning, and collecting in low spots in unattractive ways.

I left mine natural because I like the contrast, and because the caning doesn't need a finish tor longevity.
I decided not to varnish for now. Looking at Tim's and Jim's pictures again I noticed that the light color caning actually looks very good in contrast with the frame. I will wait to see how it turns out.

Thanks again and best regards,
Ray D. Chang
Triton 106 in Berkeley, CA
kendall
Master Varnisher
Posts: 121
Joined: Thu Nov 17, 2005 9:58 pm
Location: grand rapids mi

Post by kendall »

If you're not familiar with the saw, make sure that the blade and fence are aligned with the table. That is actually one of the most frustrating things for people who try to do fine details on a tablesaw.
A lot of saws have the blade out of square from the factory (unless you buy top of the line, and even then you should check)
it's specially critical if you want to make a precise cut. There are a pair of trunions below the table that the blade assembly pivots on and holds it in alignment, normally held with two bolts (or more) per side
Last saw I picked up went real cheap because it "wouldn't cut for ****"
Only thing wrong was that it needed a minor adjustment.

To darken the cane, try a waterbased stain in the soak water, or as my grandpa used to do, soak the cane in strong coffee, tea or a brew made of walnut husks.

Ken
User avatar
Rachel
Master of the Arcane
Posts: 3044
Joined: Tue Dec 07, 2004 7:59 pm

Post by Rachel »

Soaking in tea for a dye was what came to mind for me, too (although I do like the idea of leaving them natural).

R.
User avatar
Tim
Shipwright Extraordinaire
Posts: 5708
Joined: Tue Apr 01, 2003 6:39 pm
Boat Name: Glissando
Boat Type: Pearson Triton
Location: Whitefield, ME
Contact:

Post by Tim »

Triton106 wrote:TThe reason I was concerned about not being able to cut exactly 3/16" groove is due primarily to my lack of experience with table saw and having a very basic Ryobi table saw I have not been able to execute very precise cuts.
Spend a little time learning how to tune up the saw and how to ensure that your fence is properly aligned with the blade, and I think you'll find these cuts are a cinch.
---------------------------------------------------
Forum Founder--No Longer Participating
Quetzalsailor
Master of the Arcane
Posts: 1100
Joined: Fri Aug 26, 2005 9:53 am
Boat Name: Quetzal
Boat Type: LeComte North East 38
Location: Philadelphia, PA

Post by Quetzalsailor »

You can plunge a router without the plunge feature. You'd be using an edge guide or jig of some sort anyway (you wouldn't guide it by hand, w/o more nerve and strength than most people have). Place the router at an angle, tightly against the guide and tip it down into the work. Think it though and practice on junk.

Cutting a measly 3/16" x 3/16" groove will be easy. A 3/4" wide x 1" deep groove is beyond the tipping technique.

None of my three routers have the feature.
Triton106
Candidate for Boat-Obsession Medal
Posts: 392
Joined: Fri Apr 18, 2003 4:51 pm
Location: San Francisco Bay Area

Post by Triton106 »

Thanks Rachel, Kendall for the tip. The tea and coffee soaking idea is really intriguing. I love ideas that make use of natural resources. Since I have to soak the prewoven cane in hot water anyway I may try that. What kind of coffee will work best? Colombian or French roast? :-)

Quetzalsailor wrote -
You can plunge a router without the plunge feature. You'd be using an edge guide or jig of some sort anyway (you wouldn't guide it by hand, w/o more nerve and strength than most people have). Place the router at an angle, tightly against the guide and tip it down into the work. Think it though and practice on junk.
I see, it is kind of like making a plunging cut with a sabre saw, right? Thanks!
Ray D. Chang
Triton 106 in Berkeley, CA
Robert The Gray
Candidate for Boat-Obsession Medal
Posts: 351
Joined: Thu Feb 19, 2004 1:54 pm
Location: Oakland California
Contact:

Post by Robert The Gray »

colombian is a bean growing location, french roast is a roasting style. french roast is a darker roast than most so it might be a darker stain. try peets french roast for the darkest brew. peets has a dark roasting style.

r
Former Owner: Whisper, now Alma 1960 WC Triton
Whisper Projects
Daysailfilms
Quetzalsailor
Master of the Arcane
Posts: 1100
Joined: Fri Aug 26, 2005 9:53 am
Boat Name: Quetzal
Boat Type: LeComte North East 38
Location: Philadelphia, PA

Post by Quetzalsailor »

<<<I see, it is kind of like making a plunging cut with a sabre saw, right?>>>

No, much less exciting and much more controllable and neat. A small bit, and a shallow dadoe, will barely make an extra little divot. And you'd arrange that to be on the concealed side.
Hirilondë
Master of the Arcane
Posts: 1317
Joined: Thu Dec 28, 2006 8:50 am
Boat Name: Hirilondë
Boat Type: 1967 Pearson Renegade
Location: Charlestown, RI

Post by Hirilondë »

Triton106 wrote:
Quetzalsailor wrote -
You can plunge a router without the plunge feature. You'd be using an edge guide or jig of some sort anyway (you wouldn't guide it by hand, w/o more nerve and strength than most people have). Place the router at an angle, tightly against the guide and tip it down into the work. Think it though and practice on junk.
I see, it is kind of like making a plunging cut with a sabre saw, right? Thanks!
I don't have a plunge router, and make plunge cuts all the time. I would definitely recommend practicing on junk first though. Routers like to move in a direction of their own choosing.

Here is a picture of my router and a seam repair I was channeling out for in a Concordia 31 mast. The channel is 3/8" wide and 7/8" deep. I did it in 3 passes, each 1/4" deeper than the previous.

Image
Dave Finnegan
builder of Spindrift 9N #521 'Wingë'
--------------------------------------------------------------------------------------------------------------------------------------------------------------------
Gresham’s Law of information: Bad information drives out good. No matter how long ago a correction for a particular error may have appeared in print or online, it never seems to catch up with the ever-widening distribution of the error.
David

Post by David »

<<Routers like to move in a direction of their own choosing.>>

If you are hand holding a router it must always move from left to right facing the wood. If it is mounted in a table, the stock must always move from right to left (from the front of the table, facing the stock). To do otherwise can be damaging to the stock and very dangerous to the user or someone nearby.
Triton106
Candidate for Boat-Obsession Medal
Posts: 392
Joined: Fri Apr 18, 2003 4:51 pm
Location: San Francisco Bay Area

Post by Triton106 »

Kendall wrote -
A lot of saws have the blade out of square from the factory (unless you buy top of the line, and even then you should check)
it's specially critical if you want to make a precise cut. There are a pair of trunions below the table that the blade assembly pivots on and holds it in alignment, normally held with two bolts (or more) per side
You will probably have a good chuckle - I never realized that the blade can be out of alignment with the fence. When I checked it sure engouh it is (no wonder my cuts always seem to pull to the left). However, when I looked up Rioby website for how to adjust the blade and fence it says to adjust the fence (not the blade) and there is no mention of adjusting the trunions below the table. Although I was able to adjust the fence to align it with the saw blade but now both of them are out of square with the table and, therefore, the miter fence. I must be misunderstanding the manual.

Hirilonde wrote -
I don't have a plunge router, and make plunge cuts all the time. I would definitely recommend practicing on junk first though. Routers like to move in a direction of their own choosing.

Here is a picture of my router and a seam repair I was channeling out for in a Concordia 31 mast. The channel is 3/8" wide and 7/8" deep. I did it in 3 passes, each 1/4" deeper than the previous.
That's really useful to know. I will be testing that. What is that tool that is attached to the base of your router? Please don't laugh, is that a routing guide?
Ray D. Chang
Triton 106 in Berkeley, CA
User avatar
Tim
Shipwright Extraordinaire
Posts: 5708
Joined: Tue Apr 01, 2003 6:39 pm
Boat Name: Glissando
Boat Type: Pearson Triton
Location: Whitefield, ME
Contact:

Post by Tim »

Inexpensive table saws lack the adjustments (and accuracy) of the "real" saws, but most real inaccuracies come from the way the cheap fences work.

The inexpensive fences found on most benchtop saws are not designed so that they lock into perfect position parallel with the blade; the user must measure from both ends of the blade to the fence with each setup to ensure that the fence runs parallel with the blade.

This small step will greatly enhance the utility of a small table saw.

All saws require periodic checking and tune-ups for best accuracy.
---------------------------------------------------
Forum Founder--No Longer Participating
Hirilondë
Master of the Arcane
Posts: 1317
Joined: Thu Dec 28, 2006 8:50 am
Boat Name: Hirilondë
Boat Type: 1967 Pearson Renegade
Location: Charlestown, RI

Post by Hirilondë »

David wrote:

If you are hand holding a router it must always move from left to right facing the wood. If it is mounted in a table, the stock must always move from right to left (from the front of the table, facing the stock). To do otherwise can be damaging to the stock and very dangerous to the user or someone nearby.
This is only true if you are shaping the edge of the material. In the case of a channel or any application where the entire bit is within the material, it does not apply.
triton 106 wrote: What is that tool that is attached to the base of your router? Please don't laugh, is that a routing guide?
An edge guide, fence guide or invent your own name. That one is by Porter Cable. The router is a Makita. Makita didn't want to make their own, so they designed it to accept the Porter Cable. I think Porter Cable has the best accessories, but I like the hand grips on the Makita router better. Its just a matter of personal preference. You have to feel in control.
Dave Finnegan
builder of Spindrift 9N #521 'Wingë'
--------------------------------------------------------------------------------------------------------------------------------------------------------------------
Gresham’s Law of information: Bad information drives out good. No matter how long ago a correction for a particular error may have appeared in print or online, it never seems to catch up with the ever-widening distribution of the error.
David

Post by David »

<<This is only true if you are shaping the edge of the material. In the case of a channel or any application where the entire bit is within the material, it does not apply. >>

considering how dangerous a hand held router is, and considering that every router I have warns in very large print exactly what I said about left to right hand held ALWAYS and right to left mounted, ALWAYS, you might want to warn folks new to routers here. I have never seen a caveat that said those rules only apply to edging material.
Hirilondë
Master of the Arcane
Posts: 1317
Joined: Thu Dec 28, 2006 8:50 am
Boat Name: Hirilondë
Boat Type: 1967 Pearson Renegade
Location: Charlestown, RI

Post by Hirilondë »

If you are using a router table with fence you will want to go with the directions stated as the material will try to come off the fence in the wrong direction for channels. If you are shaping the edge the stock and going in the wrong direction it will not only try to come off the fence, but will try to take off down the fence. When using an edge guide there are other factors in controlling the router. To say one direction must be used only isn't always the best advice. This is particularly true when approaching the end of the stock or in deciding how you will reach each end of the pass. I find more control starting somewhere not at either end and working towards both ends once plunged. Often when approaching the end of a channel for projects like the doors mentioned here, the edge guide will be almost half off the door at the ends of the channel. Starting a plunge at the ends can be more dangerous than working in the "wrong" direction.

It would have been more accurate for me to say: it does not always apply. Routers are very dangerous, and you the user have to learn not only what the supposed rules are, but gain first hand information from use just what the router or the stock will do under different circumstances. It bothers me when people make carte blanche definitive statements about things that just aren't that definitive.

Personally, I would use a table saw if I were making those doors. There is less chance for mistakes and it is safer.
Dave Finnegan
builder of Spindrift 9N #521 'Wingë'
--------------------------------------------------------------------------------------------------------------------------------------------------------------------
Gresham’s Law of information: Bad information drives out good. No matter how long ago a correction for a particular error may have appeared in print or online, it never seems to catch up with the ever-widening distribution of the error.
David

Post by David »

Here is an excellent article warning of climb cutting, the practice of running material essentially backwards-- right to left hand held or left to right fixed.

http://www.newwoodworker.com/clmbcuttng.html
User avatar
Rachel
Master of the Arcane
Posts: 3044
Joined: Tue Dec 07, 2004 7:59 pm

Post by Rachel »

Dave,

I really appreciate your input here, especially on carpentry subjects.

I agree with you that there is much that is subjective and situation-based when it comes to tools. That's one reason it's so wonderful to get input from people like you. After all, we can all (I hope) read the manual for ourselves.

I guess what I'm trying to get across is that I hope you won't stop giving us tips from your experienced vantage point (and with good humor, I might add), and that you don't feel that you have a special burden to "cover yourself" in lawyerly fashion in order to make a post.

Tim will probably have an opinion on this (and it is his forum, after all), but my feeling is that we all know that tools can be dangerous, and although we may be given advice on this forum, we still need to take responsibility for our own usage of said tools, and for any of the repair methods advocated by forum members.

Rachel
Quetzalsailor
Master of the Arcane
Posts: 1100
Joined: Fri Aug 26, 2005 9:53 am
Boat Name: Quetzal
Boat Type: LeComte North East 38
Location: Philadelphia, PA

Post by Quetzalsailor »

Clearly, care, thought, and practice are the bywords when working with tools. My dad always said that any tool that would cut wood would cut meat!

I've been using routers since high school. The game here is to spend the time to build jigs suitable to the job, use sharp bits, and take small bites. Good jigs give precious little freedom to the tool (some may be too restrictive). I've even used my router to cut mortices for hinges and other hardware in architectural aluminum, using a carbide 'end mill' for the bit. Works fine if you're gentle and not greedy.

I've been making mouldings on a radial arm saw (yeah, I know...) for 35 years. And of course, dadoeing etc. Again, the game is to spend the time to build the jigs and anti-kickback tooling.

For both of these, and the drill press too, the motors are far more powerful than your measly personal 1/4 horsepower. If the tool wants it, it can have it! And don't stand in the way. Always think about your fingers and which way bad things will want to happen.
Triton106
Candidate for Boat-Obsession Medal
Posts: 392
Joined: Fri Apr 18, 2003 4:51 pm
Location: San Francisco Bay Area

Post by Triton106 »

Thank you all for your advice and helpful tips (safty or otherwise). I certainly learned a lot from this thread about not only canning doors but unexpectedly about table saws and routers. My own router is Porter Cable so my next purchase will be the edge guide in Dave's picture (I am also think of building a router table based on Fred Bingham's book).

On the subject of safety I had a pretty trumatic experience when I was a kid in high school. Where I come from (China) we all had to work in factories and farms two months a year during the crazy cultural revolution period. One time our class was assigned to a lumber yard and my job was to cut logs into lumbers on those huge bandsaws. I still remember till this day not only once but twice the blade of the bandsaw flew out of the machine and one time landed about two feet away from me. Because of that experience I am still scared *hitless everytime I touch a power tool. When in doubt I always err on the conservative side.
Ray D. Chang
Triton 106 in Berkeley, CA
User avatar
Rachel
Master of the Arcane
Posts: 3044
Joined: Tue Dec 07, 2004 7:59 pm

Post by Rachel »

Triton106 wrote: I still remember till this day not only once but twice the blade of the bandsaw flew out of the machine and one time landed about two feet away from me.
Yikes! I can see where that would have a lasting impression. I guess on the good side, as you say, it will probably keep you safer now, with your healthy respect for power tools.

R.
User avatar
Tim
Shipwright Extraordinaire
Posts: 5708
Joined: Tue Apr 01, 2003 6:39 pm
Boat Name: Glissando
Boat Type: Pearson Triton
Location: Whitefield, ME
Contact:

Post by Tim »

The golden rule of power tools: if the situation looks unsafe, it probably is.

Better to be too careful than not careful enough.

Routers are incredibly versatile and useful. But they spin incredibly fast (20,000 RPM or more), so sure, the potential for injury in careless hands is there. It takes very little to stay safe. Few of the things we discuss here are safe if the person doing them isn't safe. One should always know the basics of the tools they are using, but one has to learn those on their own terms.

I think I'd better avoid expressing what I think of today's society's tendency towards the litigious over-disclaiming of the blatantly obvious to try and "save" people from their own foolishness and lack of personal responsibility. Suffice it to say that I think everyone here knows enough to take their own responsibility for which advice they give and/or choose to heed, if any. If not, well, then I don't want to be here.

Ray, I'd suggest you practice with your router to become comfortable, but that for this specific task (that's what we were talking about, after all), you'll probably have quicker and better results with the table saw you have, with only a couple minutes' measuring to keep the fence in line with the blade.
---------------------------------------------------
Forum Founder--No Longer Participating
Triton106
Candidate for Boat-Obsession Medal
Posts: 392
Joined: Fri Apr 18, 2003 4:51 pm
Location: San Francisco Bay Area

Post by Triton106 »

Thanks Tim. I was thinking of doing just that. After I adjusted the fence to be parallel with the saw blade the execution improved significantly. I have a lot more confidence to control the width and the angle of the dado groove. One other question - do you use butt joint or halflap joint on the canned door frames? I am using mahogany for the frames. One guy at the marina tossed out 10 pieces of 1"x6"x24" African mahogany because they were taking up too much room in his garage. I picked them up - they are perfect for making cabinet door frames or framing cabinets.
Ray D. Chang
Triton 106 in Berkeley, CA
User avatar
Rachel
Master of the Arcane
Posts: 3044
Joined: Tue Dec 07, 2004 7:59 pm

Post by Rachel »

Triton106 wrote:One guy at the marina tossed out 10 pieces of 1"x6"x24" African mahogany because they were taking up too much room in his garage.
Now there's a guy to start following around. Score!

R.
Triton106
Candidate for Boat-Obsession Medal
Posts: 392
Joined: Fri Apr 18, 2003 4:51 pm
Location: San Francisco Bay Area

Post by Triton106 »

Sometimes I can be real careless. In my last posting on this thread I wrote -
One other question - do you use butt joint or halflap joint on the canned door frames?
I found Tim's very detailed documentation of making a caned door for his chain locker bulkhead here: http://www.triton381.com/projects/small ... locker.htm
With the four pieces for the door frame cut, I mixed up a small batch of thickened epoxy. Because of the strength of the epoxy, I am relying only on butt joints for the corners--no fancy joinery. In other instances I find it desirable to create a stronger joint at the corners, but haven't found it necessary on the doors for the boat--the epoxy is simply strong enough that the butt joints seem to work well. They certainly take less time to create. I glued up the door frame and clamped it securely to sit overnight before continuing.
And the accompanying picture clearly shows the butt joint being made:
Image
* Courtesy Triton381.com.

Furthermore on page 2 of the same section he went on to describe in detail the process of caning the door.

Thanks Tim for very detailed documentation!
Ray D. Chang
Triton 106 in Berkeley, CA
Quetzalsailor
Master of the Arcane
Posts: 1100
Joined: Fri Aug 26, 2005 9:53 am
Boat Name: Quetzal
Boat Type: LeComte North East 38
Location: Philadelphia, PA

Post by Quetzalsailor »

I sympathize with short cuts but, for butt joints in something I care a bit about, it's easy to drill oversize, sloopy loose dowell holes and bed the dowells in place with thickened epoxy. It's also easy to drill correcly sized dowell holes and install the dowells after the butt joint epoxy has cured. Did the former on the 19 huge interior storm window frames that I made for the house. Did the latter for picture frames.

No substitute for fiber crossing a joint, and particularly important where butts are meeting longitudinal wood: lots of differential swelling and shrinkage.

I did butt join sections of maple player piano action using filled hardware store epoxy back in the '60s. I could not scarpf the joints because the valves and bellows were still in the action. Still intact today.
CharlieJ
Wood Whisperer
Posts: 649
Joined: Fri Aug 19, 2005 7:42 pm
Location: South coast of Texas, Matagorda Bay

Post by CharlieJ »

First post for me in a LONG time, but I had to respond to this.

I have been a furniture restorer and refinisher for 28 years now ( now retired) Part of our work was caning in it's various forms - splined ( machine cane), hand woven, danish etc.

Varnish will work quite nicely on cane. Stain however does exactly what Tim mentioned way back- it looks splotchy. The only stain we ever had any success with was a spray stain made by a company who no longer makes it. The MinWax spray stains don't do the job.

However, if you do choose to varnish, varnish only the front side- DON'T put any on the back side. That way, when the cane starts to go slack (if it does) you can rewet the back and reshrink it. By the way- leave the cane in the water til it get good and wet- don't just dip it. let it soak. Might even add a few drops of glycerin to the water- makes the cane much more pliable when putting it into the groove- less trouble with it breaking at the edge.

One more thing- lightly "break" the inside edge of the spline groove with some sand paper- you don't want a good sharp corner there- the cane bends over that edge and a nice sharp corner tends to cut it.
User avatar
Rachel
Master of the Arcane
Posts: 3044
Joined: Tue Dec 07, 2004 7:59 pm

Post by Rachel »

CharlieJ wrote: ( now retired)....
Whoo! :high fives:

Nice to have you stop by and share your experience :)

Rachel
CharlieJ
Wood Whisperer
Posts: 649
Joined: Fri Aug 19, 2005 7:42 pm
Location: South coast of Texas, Matagorda Bay

Post by CharlieJ »

Thanks Rach- And the weekend trip went????
User avatar
Rachel
Master of the Arcane
Posts: 3044
Joined: Tue Dec 07, 2004 7:59 pm

Post by Rachel »

It was postponed. Instead I spend the weekend alternately outside in the rain, hunched over the cockpit locker working on the new fuel tank and instrument panel installation; and belowdecks, hunched over the bilge working on the battery compartments, or ... hunched over working in the engine compartment.

I was so soaked that I went to pay for something today and my money was still wet!

A piece of good news is that I rebuilt the old gauge panel and I think the gauges all work (although I'm not sure about the "Amps" meter -- it wasn't doing anything much but then the engine barely ran). It looks pretty good, if you don't mind a bit of "patina." I'll have to post a photo of it in the thread where I was searching for a new one.

So maybe this coming weekend for the trip (heading to Maine).

Thanks for asking :)

Rachel
CharlieJ
Wood Whisperer
Posts: 649
Joined: Fri Aug 19, 2005 7:42 pm
Location: South coast of Texas, Matagorda Bay

Post by CharlieJ »

I can dig it. I spent Friday down Port Aransas working on the Vanguard- in the drizzle and winds gusting 30, right ON the water.

Saturday here was completely miserable. I think the word is "YUCK!!". Sunday not a whole lot better

18- 22 mph winds, steady drizzle-rain-drizzle and 45 degrees. Wind chill of 36- you shoulda heard Laura when she headed for work Sat morning- remembering that on Thursday we could have been wearing shorts.

Of course today was picture perfect- sunny, 78 with a gentle breeze. Ah well- she has two more days then she says she's gonna be " a boat bum"
Post Reply