Sealing Deck Core From Moisture

This is the place to post your ideas, thoughts, questions and comments as relates to general boatbuilding and reconstruction techniques and procedures (i.e. recoring, epoxy, fiberglass, wood, etc.)
Post Reply
Maine Sail
Skilled Systems Installer
Posts: 243
Joined: Fri Feb 24, 2006 10:47 am
Location: Casco Bay
Contact:

Sealing Deck Core From Moisture

Post by Maine Sail »

Hi All,

For years I have been trying to describe, as have others, in words, how to "pot" or fill deck hardware penetrations with thickened epoxy to seal the decks core from further moisture damage.

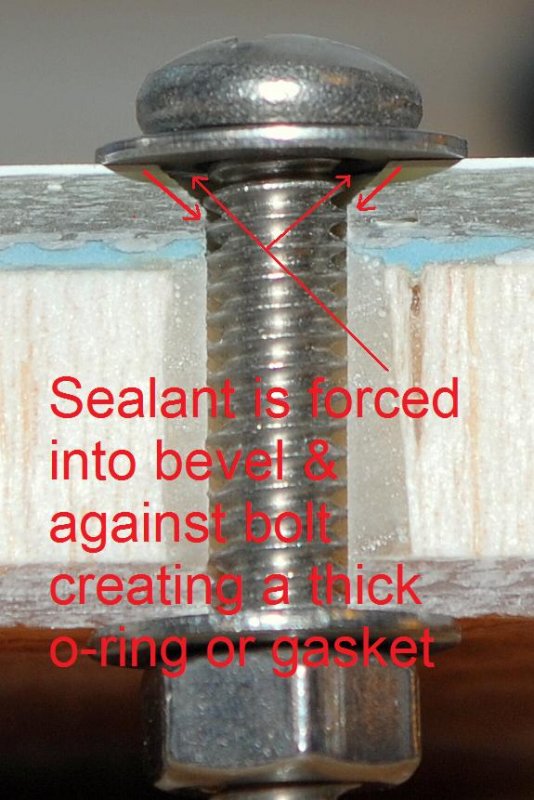
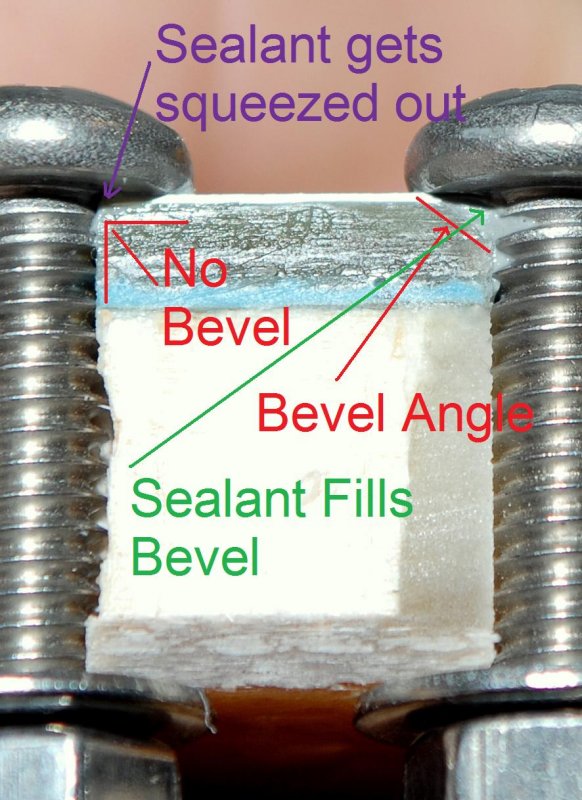
I have also been trying to describe why a slight bevel to each hole that penetrates the deck is a good idea. Sometimes folks understand it via words, and sometimes they don't.

I have had this article on my mind for years and finally over the last month or so had the chance to make it all happen with some late nights in the barn.

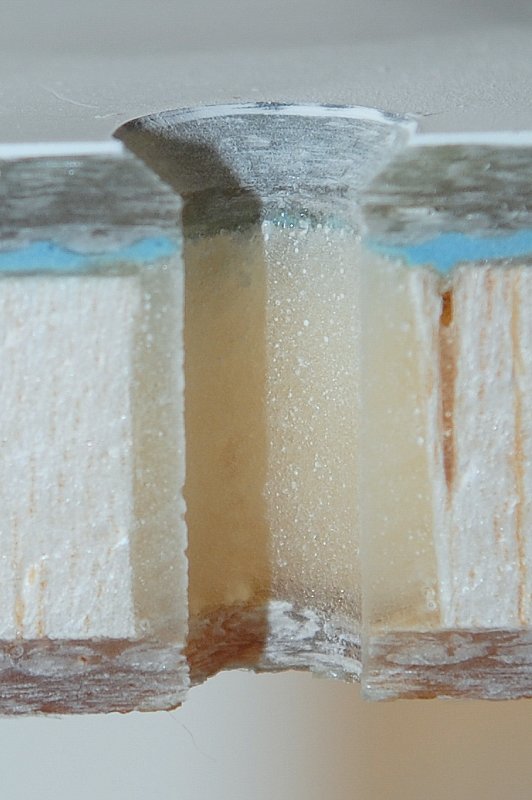
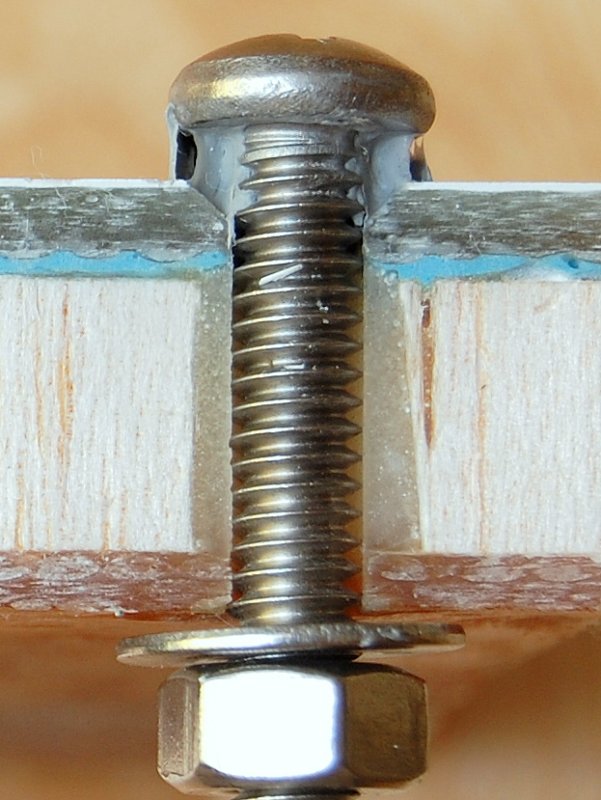
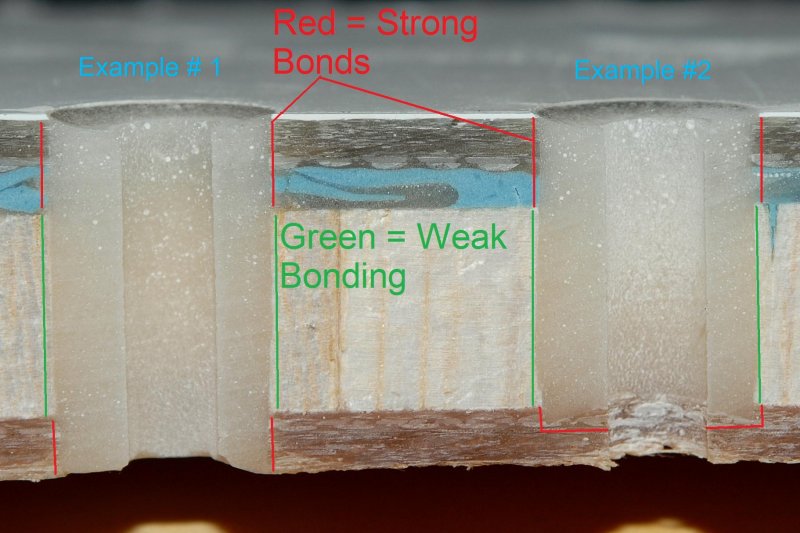
As far as I know this is the only article of it's type that uses deck lamination cut-a-way samples to show what goes on inside the deck when you "pot" with epoxy and countersink the bolt holes..

Of course, on this site, most of you guys have your decks torn up and thus have the luxury of doing a fill of a larger area or laying in some G-10.

I hope this helps make some sense of something that really isn't all that difficult to tackle just difficult to describe..

If you see any typos, and I'm sure you will, please let me know and I'll fix them as soon as I can. I'm not a writer, but do have a lot of tricks & techniques I've learned over my years of boating that I like to share with fellow boaters. Some of these I feel can best be illustrated through pictures, with the help of some words of course..

Click this to read it:

http://www.pbase.com/mainecruising/sealing_the_deck


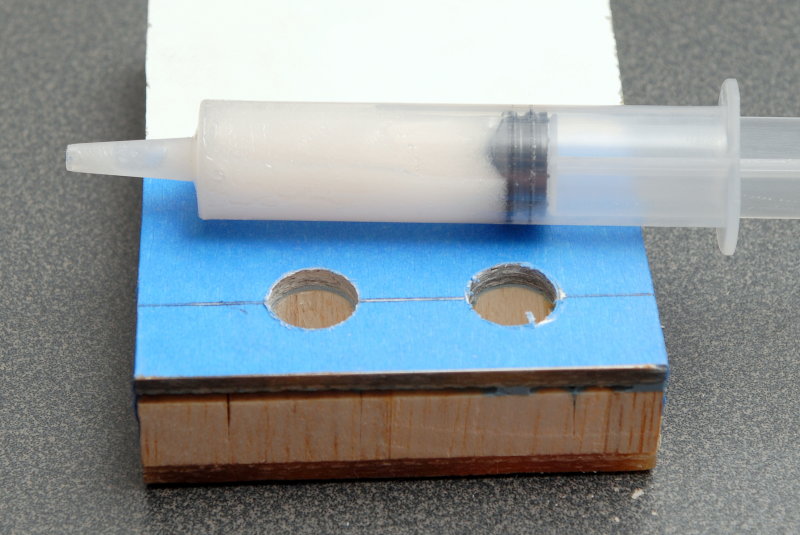
And some of the photos from the article;
Image
Image
Image
Image
Image
Image
-Maine Sail

Canadian Sailcraft 36T
Casco Bay, ME
http://www.marinehowto.com
Idon84
Skilled Systems Installer
Posts: 245
Joined: Tue Mar 04, 2008 8:06 pm
Boat Name: Cosmic Dancer
Boat Type: Hess Cutter
Location: Olympia, WA
Contact:

Post by Idon84 »

Great visuals! Helps to understand why chamfering is so important for sealing.
Bryon
Cosmic Dancer
1980, Hess Cutter.
http://www.picasaweb.com/idon84
User avatar
Peter
Boat Obsession Medal Finalist
Posts: 580
Joined: Mon Nov 15, 2004 11:23 pm
Boat Name: Pagan
Boat Type: Albin Ballad 30
Location: Pedder Bay (Victoria), BC, Canada
Contact:

Post by Peter »

Good stuff, Maine Sail ... I've bookmarked the site for later reference.

And a reminder for all those "single-handing" their repairs: Tim's ( I believe) great trick of under-drilling the hole then using a tap to thread the epoxy plug. This allows you to wind in the bolt and put on the nut from the other side ... sans helper!

This method has allowed me to cheat Neptune of many good bits and pieces :-)
Peter
==================
Victoria BC Canada
Albin Ballad 30

http://www.mostlyaboutboats.ca
Maine Sail
Skilled Systems Installer
Posts: 243
Joined: Fri Feb 24, 2006 10:47 am
Location: Casco Bay
Contact:

Post by Maine Sail »

Peter wrote:Good stuff, Maine Sail ... I've bookmarked the site for later reference.

And a reminder for all those "single-handing" their repairs: Tim's ( I believe) great trick of under-drilling the hole then using a tap to thread the epoxy plug. This allows you to wind in the bolt and put on the nut from the other side ... sans helper!

This method has allowed me to cheat Neptune of many good bits and pieces :-)
Another option for single handing is a cordless impact wrench. I have not yet found any deck hardware that I could not tighten, unless it was a space issue, with my impact driver from one side and alone..

If I have room constraints I use my needle nose vise grips and some Gorilla tape and that has worked very well also..
Image
-Maine Sail

Canadian Sailcraft 36T
Casco Bay, ME
http://www.marinehowto.com
wfraser
Bottom Paint Application Technician
Posts: 14
Joined: Wed Oct 15, 2008 9:52 am
Location: Tokyo, Japan

Post by wfraser »

This is great! Thanks for the obvious time and effort you put into making this crystal clear.

Warren
s/v Voyager of Yokohama
Warren Fraser
s/v Voyager of Yokohama
Ric in Richmond
Boat Obsession Medal Finalist
Posts: 518
Joined: Fri Sep 09, 2005 12:26 am
Boat Name: Andiamo
Boat Type: Alberg 35
Location: Richmond VA

Post by Ric in Richmond »

Maine sail...do you like your impact wrench???

I have all the other tools in that line!!!
Ric Bergstrom

http://andiamoadventures.blogspot.com/

Archived old blog:

http://andiamo35.blogspot.com/

~~~~~([\~~~([\~~([\~~~~~~([\~~([\~~~~~~
~~~~~~([\~~~~~~~([\~~~~~~~~~~~~~~~
Maine Sail
Skilled Systems Installer
Posts: 243
Joined: Fri Feb 24, 2006 10:47 am
Location: Casco Bay
Contact:

yep..

Post by Maine Sail »

I used to mock Ryobi until I had spent over $400.00 on "contractor quality" drill batteries in just two years. On a trip to buy yet another battery I saw a Ryobi kit that was just to damn cheap to pass up..

I used to think it was junk but I've got a lot of use on the stuff and it keep on ticking, including the batteries, of which I now own ten..

Don't get me wrong I still use high quality tools for certain tasks. My Ryobi jig saw is not even in the same league as my Bosch and is far from accurate..
-Maine Sail

Canadian Sailcraft 36T
Casco Bay, ME
http://www.marinehowto.com
Quetzalsailor
Master of the Arcane
Posts: 1100
Joined: Fri Aug 26, 2005 9:53 am
Boat Name: Quetzal
Boat Type: LeComte North East 38
Location: Philadelphia, PA

Post by Quetzalsailor »

Outstanding trick, and entirely new to me.

One negative is possibly inherent only in your photo-presentation and that is that there's very little bearing area under the head of that bolt that can carry load.

Putting my architect's hat on and referring to the way we specify sealant joints, we are instructed by sealant manufacturers to design and specify a joint with the proper width and depth so that the cured sealant has the right aspect ratio for the best chance of stretching or accomodating movement. Your photo showing the tearing sealant is a good example. The tearing occured where the sealant was thinnest. Had your bolt been sitting on an annulus of cured sealant, including not bonded to the threaded shaft, the joint would have accomodated more movement. It would not be tight, but it would accomodate movement.

Of course, the post started by talking about bedding stuff here, not about creating joints which accomodate movement. Even so, there will be movement in any joint that's variously loaded, and made with dissimilar and flexible materials. Under a simple and lightly loaded bolt head, I think this bevel idea is very good: the dimensions are small and the differential movement would be small, too. Under a small heavily loaded plate, like a stanchion base, I think the equivalent of a gasket is appropriate - sealant with an intended and reliable thickness. Bedding under a long genoa sheet track is another kettle of fish since the differential movement could be quite high. I don't have an idea that sounds plausible to me for that.
User avatar
Peter
Boat Obsession Medal Finalist
Posts: 580
Joined: Mon Nov 15, 2004 11:23 pm
Boat Name: Pagan
Boat Type: Albin Ballad 30
Location: Pedder Bay (Victoria), BC, Canada
Contact:

Post by Peter »

Quetzalsailor wrote:One negative is possibly inherent only in your photo-presentation and that is that there's very little bearing area under the head of that bolt that can carry load.
Perhaps a good place for a washer, or even a fender washer?
Peter
==================
Victoria BC Canada
Albin Ballad 30

http://www.mostlyaboutboats.ca
Ryan
Skilled Systems Installer
Posts: 223
Joined: Wed Aug 17, 2005 2:14 pm
Location: NE GA

Post by Ryan »

Peter wrote:
Quetzalsailor wrote:One negative is possibly inherent only in your photo-presentation and that is that there's very little bearing area under the head of that bolt that can carry load.
Perhaps a good place for a washer, or even a fender washer?
Keep in mind that in the actual use of this technique, you would typically be bolting a piece of hardware to the deck that would provide a load bearing surface for the bolt head, not putting a plain bolt into the hole.

Great photos!
Maine Sail
Skilled Systems Installer
Posts: 243
Joined: Fri Feb 24, 2006 10:47 am
Location: Casco Bay
Contact:

Guys...

Post by Maine Sail »

Peter wrote:
Quetzalsailor wrote:One negative is possibly inherent only in your photo-presentation and that is that there's very little bearing area under the head of that bolt that can carry load.
Perhaps a good place for a washer, or even a fender washer?

Guys the machine screw was an illustrative metaphor and was merely REPRESENTING a piece of deck hardware. Deck hardware would have significantly more surface area than the head of a machine screw. Also, as I mentioned, you don't need to chamfer very deeply to make a big difference in elongation before break or sealant failure..

Sometimes even the simplest things are taken sooo literally. Perhaps I'll need to find an old stanchion to illustrate this with...
-Maine Sail

Canadian Sailcraft 36T
Casco Bay, ME
http://www.marinehowto.com
Shoalcove
Skilled Systems Installer
Posts: 169
Joined: Thu Dec 28, 2006 8:45 pm
Location: New Brunswick, Canada

Post by Shoalcove »

Thanks,
I've used your idea of chamfering the fastener hole for a while and think that it's a great one. I enjoy your site as well. My only complaint is that you and so many others here always remind me that I am an all thumbs hack! We need a butchered project thread here to make me feel better. Some topics could be:
- installing fittings upside down ( either you or the fitting)
-removing sealant from boat cushions, car seats or dogs
- how to find the absolutely required piece you just dropped in the bilge
- why ALL the wires should be connected, and most importantly
- how to avoid doing it wrong twice before you do it right once.
Any tips on hiding boat expenses would also be appreciated.
Best regards, David
Zach
Boat Obsession Medal Finalist
Posts: 684
Joined: Wed Jan 25, 2006 6:28 pm
Location: Beaufort, North Carolina
Contact:

Post by Zach »

Great visuals, thanks!
1961 Pearson Triton
http://pylasteki.blogspot.com/
1942 Coast Guard Cutter - Rebuild
http://83footernoel.blogspot.com/
David

Post by David »

I have four words for you......

Offshore bank account!
Quetzalsailor
Master of the Arcane
Posts: 1100
Joined: Fri Aug 26, 2005 9:53 am
Boat Name: Quetzal
Boat Type: LeComte North East 38
Location: Philadelphia, PA

Post by Quetzalsailor »

<<Guys the machine screw was an illustrative metaphor>>

As I'd said <<possibly inherent only in your photo-presentation>>. There are very few small, relatively heavily loaded applications where there would only be something the size of a bolt head to be sealed. Small, dinghy-sized cheek blocks and eyestraps come to mind; a soft or flexible object, like a vinyl ventilator is another, since it is not stiff enough to maintain a seal. Anything else would be bigger, by virtue of large washers or (stanchion) bases etc., and would have the advantage of area of sealant.

'Nothing is worth doing once that is not worth doing twice!' (Usually screamed at the heavens...)
Hirilondë
Master of the Arcane
Posts: 1317
Joined: Thu Dec 28, 2006 8:50 am
Boat Name: Hirilondë
Boat Type: 1967 Pearson Renegade
Location: Charlestown, RI

Post by Hirilondë »

Quetzalsailor wrote:
'Nothing is worth doing once that is not worth doing twice!' (Usually screamed at the heavens...)
Or: "We don't have the time to do it right, but we do have the time to do it twice"
Dave Finnegan
builder of Spindrift 9N #521 'Wingë'
--------------------------------------------------------------------------------------------------------------------------------------------------------------------
Gresham’s Law of information: Bad information drives out good. No matter how long ago a correction for a particular error may have appeared in print or online, it never seems to catch up with the ever-widening distribution of the error.
dee
Bottom Paint Application Technician
Posts: 17
Joined: Sat Oct 18, 2008 2:21 pm
Boat Type: Seafarer/Sailmaster
Location: OBX, North Carolina

filling holes...

Post by dee »

A few months ago I removed the rotted toe rails along with lots of other hardware on my boat and found some small areas of water infiltration in the balsa core where the stantions were mounted. It turns out that the the toe rails I removed were the second set to be put on the boat and the first set of holes weren't filled too well so all holes were redone.

For the stantions I drilled exploration holes around the area through the top only, till I found good clean balsa. Then cleaned out all the core with a bent nail ground to a chisel point and edges. I also used a dremal with a small round burr bit to grind a few places where the nail didn't do a good job. Vac and cleaned the area with acetone, lots of tape on the inside.

For filler I used epoxy thickened with lots of chopped strand and high density filler. After wetting out with neat epoxy I used a long cake decorating tip and desposible iceing bags to fill the holes, starting from the bottom of the hole and working up as I squeezed the bag. This allowed no air to get into the hole and insured a good solid fill. Leaving a little dome on top to be sanded flush when I do the deck.

The cake decorating setup came with four or five tips that look like stainless and the bags are throwaway. I bought an extra 20 pack of bags, but didn't need them. Total cost for the set and extra bags was under $20.00. The tips clean up easy with vinegar to be used again, ( with epoxy of course.)

The mix had a lot of chopped strand, 406 and 404 fillers, all added with measuring spoons to ensure each batch was the same. Each batch was then spooned out of the mixing cup into the iceing bag and squeezed to get any air bubbles out. Filling the holes and voids this way went very quick. Over 200 of them!

dee
User avatar
Rachel
Master of the Arcane
Posts: 3044
Joined: Tue Dec 07, 2004 7:59 pm

Post by Rachel »

The cake decorating bags are a great idea! Not as expensive as syringes, I bet, and a whole lot more exact than baggies with the corners cut off.

Thanks for the tip,

R.
dee
Bottom Paint Application Technician
Posts: 17
Joined: Sat Oct 18, 2008 2:21 pm
Boat Type: Seafarer/Sailmaster
Location: OBX, North Carolina

Post by dee »

Cheap, plus they come with many tips from large to small openings. The larger ones may be good for material placement for fillets prior to pulling them with pvc pipe. But the best is filling holes from the bottom up. I don't have a use for the star shaped one yet, but I didn't throw it away, just in case.

The bags were cheap and I used the same rig several times before I'd throw away the bag, clean the tip and start fresh. It took much longer to prep the holes than it took to mix material and fill them. Using slow hardener allows you to mix larger amounts and it not kick on you. Be aware that by holding it in your hands heat transfer occurs, speeding up the curing process. After cleaning the tip in vinegar it was cleaned in acetone to remove traces of vinegar.

I first looked at plastic ketchup squeeze bottles like some restaurants use because of their caulk gun tips, but they were a couple of dollars each and they would have to be cleaned or let the leftovers harden and then squeeze and beat them to crack the hardened resin from them. Plus they are harder to fill. I haven't ruled them out for other similar use though.

dee
Post Reply