My rudder is shot. The wood is old, weak and flimsy. Even as I pulled her from the cold November water the rudder boards hadn't expanded enough to make the whole thing firm.
So...
I tried just lifting the rudder off the pintils but as you lift the top (of the rudder) hits the bottom of the boat. Anyway, Tim, how does one best remove the whole thing? I looked on your site but didn't see this story if you've already told it.
Anyone rebuilt a Triton rudder from scratch? Thinking of glassing the old rudder but may just rebuild entirely.
Any thoughts appreaciated.
Thank you!
riplefct/STARLIGHT
Removing the Rudder
-
Tim

- Shipwright Extraordinaire
- Posts: 5708
- Joined: Tue Apr 01, 2003 6:39 pm
- Boat Name: Glissando
- Boat Type: Pearson Triton
- Location: Whitefield, ME
- Contact:
You probably need to unbolt the pintles from the rudder, which will enable you to pull it up and out as needed. Or, if it's easier, just unbolt the gudgeons from the keel. In the Triton's case, the pintles need to be captive to prevent the rudder from lifting on its own. But this makes it more of a pain to remove.
If you plan on removing the rudder while it is still attached to the shaft, you'll probably need to dig a hole beneath the boat as well, so that the shaft can drop all the way out of the boat. It's pretty long.
Here's my description of my rudder removal and repairs:
http://www.triton381.com/projects/resto ... udder.html
Rebuilding the rudder as original would be rather straightforward. I do not recommend glassing the rudder, particularly if the boards are in bad shape to begin with, but I maintain that fiberglass over solid wood planks is a bad technique no matter what. My advice would be to study the construction of the existing rudder and build a new one using similar methods. It works well, and is very simple. Basically, it's several boards attached together with drift pins, and shaped into something roughly hydrodynamic. Think about how long your rudder has lasted to date...there's really no need to reinvent the construction!
I'll be building a new rudder this winter for the daysailor project, but have not yet determined the building techniques. It will either be solid wood or fiberglass on a male mold--but not a combination of the two. The only reason I'm considering something other than "original" construction is because the whole project is so far removed from a basic Triton that the opportunity is there to try something different. If I had to replace Glissando's rudder, I'd choose the same construction as original.
---------------------------------------------------
Forum Founder--No Longer Participating
Forum Founder--No Longer Participating
-
Tim
- Shipwright Extraordinaire
- Posts: 5708
- Joined: Tue Apr 01, 2003 6:39 pm
- Boat Name: Glissando
- Boat Type: Pearson Triton
- Location: Whitefield, ME
- Contact:
Here's also a brief description of removing the original rudder from #100, the daysailor:
http://www.tritondaysailor.com/unbuilding/parts.htm
http://www.tritondaysailor.com/unbuilding/parts.htm
---------------------------------------------------
Forum Founder--No Longer Participating
Forum Founder--No Longer Participating
-
JetStream
- Skilled Systems Installer
- Posts: 169
- Joined: Sat Apr 26, 2003 8:53 pm
- Boat Name: Sojourn
- Boat Type: Pearson 27
- Location: Jamestown, RI
Just a general thought that I have read about rudder construction -
I hear that the rudder should end up neutrally buoyant. This is so that when the hull is heeling, it will neither have a tendency to float (same effect as weather helm), or sink (same effect as lee helm). My rudder uses foam core but the weight of the foam core is about 20 pounds per cubic foot, heavier than most. Seawater is 64.2 lbs. per cubic foot and freshwater is 62.4 lbs per cubic foot. So, ideally, your rudder construction should end up about 63 punds per cubic foot of volume. This only applies of course, to the part that is in the water.
I hear that the rudder should end up neutrally buoyant. This is so that when the hull is heeling, it will neither have a tendency to float (same effect as weather helm), or sink (same effect as lee helm). My rudder uses foam core but the weight of the foam core is about 20 pounds per cubic foot, heavier than most. Seawater is 64.2 lbs. per cubic foot and freshwater is 62.4 lbs per cubic foot. So, ideally, your rudder construction should end up about 63 punds per cubic foot of volume. This only applies of course, to the part that is in the water.
Bruce
-
Riplefct
THANK YOU!
Wow! Great and thoughtful replies. I will take a shot at removing the rudder this weekend and let you all know how I fared. Never even considered digging a hole but that sounds very possible - great suggestion.
Removing the pintils may be intersting but I think I can do that, too.
Again - thank you for this advice. I'll keep you posted.
Best,
riplefct/STARLIGHT
Removing the pintils may be intersting but I think I can do that, too.
Again - thank you for this advice. I'll keep you posted.
Best,
riplefct/STARLIGHT
-
riplefct
More rudder questions
I have at last begun removing the rudder, but the rudder post can't pass downward as the prop obstructs the line down. Can someone explain to this novice how the prop comes off once the two nuts are off that hold it on? Is there a special tool I need?
Also -- the orginal pintils, of copper it appears, are not bolted but appear actually to be riveted. I fear that as I hack away at prying these off I'll demo the pintils. Any suggestions for removing rivets? I am using H& H to remake the rudder post, maybe have them remake the pintils, too?
Lastly, the old rudder is made with four pieces of wood, as Tim explained. Is there any reason why the new one shouldn't be made from a single piece of wood?
Thanks for your help.
riplefct/STARLIGHT
-
Figment
- Damned Because It's All Connected
- Posts: 2846
- Joined: Tue Apr 08, 2003 9:32 am
- Boat Name: Triton
- Boat Type: Grand Banks 42
- Location: L.I. Sound
Yes, you need a special tool for separating the propellor from the shaft.
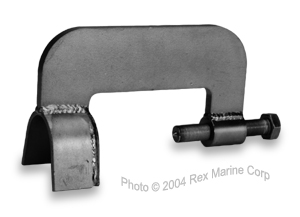
http://shopping.rexmar.com/Merchant2/me ... ode=280109
That's the first one that came up on Froogle. Looks as good as any I've ever used, though it appears that a couple of inches of clear shaft is required ahead of the propellor, which may or may not be practical on your boat.
Put down the hammer. Don't touch the hammer. Step away from the hammer.
BUT... once the prop is off, won't the shaft still be in the way? You might need to press the shaft out of the engine coupling and just pull the whole shaft. On a Triton, that's two hours of grunting and sweating with your arm stuffed shoulder-deep into the cockpit access hole.
H&H? Formerly "Essex Propellor"? They probably won't make the new pintles themselves, but will farm it out to a foundry. Depending on how much legwork you want to do on your own, you might just want to find the foundry on your own.
Removing rivets of this age is generally a matter of drilling out the pin. Take your best shot at a dead-center straight hole with a small bit, and then bore with larger and larger bits until the pin is gone.
If your initial pilot hole isn't dead straight (really really tough to do) you'll probably need a small rat-tail file to remove the last bits of the pin once you find you're cutting the pintle itself.
A rudder cut from a single plank of wood would require one monster of a plank. Such a plank would almost certainly be a plain-sawn cut, and would develop a nasty cup with changes in moisture.
Kidding.
Yeah, plywood rudders are fairly common.
-
bcooke
- Master of the Arcane
- Posts: 2272
- Joined: Sat Oct 04, 2003 10:55 pm
- Boat Name: Jenny
- Boat Type: 1966 Pearson Triton
- Location: Rowley, MA
- Contact:
Mike since I am looking at pulling my propeller shaft in the next week or so could you elaborate a bit. When I look through the hole I see the three well rusted bolts on the coupling connecting the shaft to the engine and then is that a set screw that anchors the coupling to the shaft? Any tricks for getting the rusted coupling off the shaft in the tight confines? Is THIS where I can use the 2 pound hammer?On a Triton, that's two hours of grunting and sweating with your arm stuffed shoulder-deep into the cockpit access hole.
"Take your best shot at a dead-center straight hole".
You can use a center punch and a suitable hammer to mark a point in the middle of the rivet. The indentation will be enough to guide the twist drill for the initial turns until the hole is established.
If the rivets are single piece, which is what I would expect, then just drill down past the level of the head (with a drill the same size as the orginal rivet body size), stick in a pin punch that just fits the hole, and wiggle the punch to make the head of the rivet pop off. Then drive the rivet shank out with a proper sized pin punch and hammer.
If on the other hand they are the two piece "pop" style rivets then the intallation process usually locks the inner pin near the head of the rivet. Drilling (or grinding) just a little bit into the head of the rivet will destroy the locking ring/collar/barbs whatever is used in your type of rivet and then a hammer and pin punch can be used to drive the inner pin out. Once that is done you have an easy pilot hole to drill out the body of the rivet or you can try popping the head and driving out the shank like a one part rivet.
-Britton[/quote]
-
bcooke
- Master of the Arcane
- Posts: 2272
- Joined: Sat Oct 04, 2003 10:55 pm
- Boat Name: Jenny
- Boat Type: 1966 Pearson Triton
- Location: Rowley, MA
- Contact:
Mike since I am looking at pulling my propeller shaft in the next week or so could you elaborate a bit. When I look through the hole I see the three well rusted bolts on the coupling connecting the shaft to the engine and then is that a set screw that anchors the coupling to the shaft? Any tricks for getting the rusted coupling off the shaft in the tight confines? Is THIS where I can use the 2 pound hammer?On a Triton, that's two hours of grunting and sweating with your arm stuffed shoulder-deep into the cockpit access hole.
"Take your best shot at a dead-center straight hole".
You can use a center punch and a suitable hammer to mark a point in the middle of the rivet. The indentation will be enough to guide the twist drill for the initial turns until the hole is established.
If the rivets are single piece, which is what I would expect, then just drill down past the level of the head (with a drill the same size as the orginal rivet body size), stick in a pin punch that just fits the hole, and wiggle the punch to make the head of the rivet pop off. Then drive the rivet shank out with a proper sized pin punch and hammer.
If on the other hand they are the two piece "pop" style rivets then the intallation process usually locks the inner pin near the head of the rivet. Drilling (or grinding) just a little bit into the head of the rivet will destroy the locking ring/collar/barbs whatever is used in your type of rivet and then a hammer and pin punch can be used to drive the inner pin out. Once that is done you have an easy pilot hole to drill out the body of the rivet or you can try popping the head and driving out the shank like a one part rivet.
-Britton
-
Figment
- Damned Because It's All Connected
- Posts: 2846
- Joined: Tue Apr 08, 2003 9:32 am
- Boat Name: Triton
- Boat Type: Grand Banks 42
- Location: L.I. Sound
Start soaking those three bolts with PB Blaster now. Don't be bashful. Soak the whole assembly. Then give the coupling a dozen or so raps with a small hammer or large wrench to give the juice a chance to get into the crevices.
Do this several times over the course of a week or so before you actually attempt to play with the coupling bolts.
Oh, but if you can get that set-screw bolt out ahead of time, do so. and get some blaster soaking in that hole.
You say your bolts are well rusted, so I think it's a bad idea to employ them in pressing the shaft from the coupling. Go out and buy new ones. Get three sets, in successively longer lengths. And a dozen washers.
Also, root around in your toolbox and find a shallow-set and a deep-set socket of slightly less diameter than the shaft to act as spacers.
Unless you're svelte enough to be able to work from within the engine compartment with your chest on the motor and the coupling within reach, all of the following will be done by "feel" and with one hand:
Delicately set the shallow-set socket between the coupling halves. You're going to press the halves together, and this socket is going to press the shaft backward. If you can remember, try to have the open end of the socket toward the engine, it self-centers more easily this way.
Thread three of the new bolts into the coupling and hand-tighten to take out any slack. Use the shortest bolts you can, as long as you have at least 3 or 4 threads caught. This first part is the high-force part of the operation.
Tighten each bolt a few turns at a time. You'll need to keep popping the engine in and out of neutral in order to spin the shaft and then have some resistance to turn against.
After each round of tightening, pull your arm out of the hole and get a visual on the shaft to see if it's started moving backward yet. Also, check to see if the ends of the bolts are about to start binding against the rear of the gearbox. (hence the need for different lengths of bolts and all of those washers)
Once the shaft starts moving, the battle is half won. Getting it to budge in the first place is the killer. Chemical penetrating sprays may not be enough to separate pieces that have been together for many years. A mappgas torch may become your good friend before this day is done.
Anyway, once the shaft starts moving, you can shift gears from Power to Speed.
Replace the shallowset socket for the deepset, and just keep tightening each bolt a few turns at a time again. Around and around and around, changing to shorter bolts when they start to bind against the gearbox. Eventually, the shaft will be free. Don't lose the key down into the depths of the bilge.
Of course, all of the above assumes that you can get those rusty old bolts to budge in the first place. If not, or if you strip the heads while trying, then I've got good news and bad news...
Good news: you needn't endure the process described above. (and there was much rejoicing)
Bad news: you need to pull the engine.
-
dasein668
- Boateg
- Posts: 1637
- Joined: Thu Apr 03, 2003 9:09 am
- Boat Name: Dasein
- Boat Type: Pearson Triton 668
- Location: Portland, Maine
- Contact:
Now may also be the time to invest in a real cockpit sole access hatch. I can't believe that people are actually able to work through those tiny access holes! Yikes.
Nathan
dasein668.com
dasein668.com
-
bcooke
- Master of the Arcane
- Posts: 2272
- Joined: Sat Oct 04, 2003 10:55 pm
- Boat Name: Jenny
- Boat Type: 1966 Pearson Triton
- Location: Rowley, MA
- Contact:
Thanks for the walkthrough. I have been soaking the fasteners for a couple of days now. Maybe I will keep it up for another week or so. Pulling then engine isn't on my to-do list. I am afraid if the engine comes out it will not go in. Someone has already made an offer on it and I could use the money for more boat stuff...
I have been wanting to rip out the icebox for a year now but I kept holding myself back so as not to get too many projects going at once. Today I was contemplating a thorough inspection of the engine and realized that I wasn't going to get a hand on much with that icebox in the way. A two pound hammer and crowbar fixed that problem and while I was on a roll I took out the galley unit as well. Now I am ready to give the engine a thorough going over.
-Britton
Unless you're svelte enough to be able to work from within the engine compartment with your chest on the motor and the coupling within reach, all of the following will be done by "feel" and with one hand:
Hehe... Way ahead of you guys. When I removed the steering pedestal and recored my cockpit sole I installed a Bomar hatch. Access isn't a problem.Now may also be the time to invest in a real cockpit sole access hatch
I have been wanting to rip out the icebox for a year now but I kept holding myself back so as not to get too many projects going at once. Today I was contemplating a thorough inspection of the engine and realized that I wasn't going to get a hand on much with that icebox in the way. A two pound hammer and crowbar fixed that problem and while I was on a roll I took out the galley unit as well. Now I am ready to give the engine a thorough going over.
-Britton
-
Tim
- Shipwright Extraordinaire
- Posts: 5708
- Joined: Tue Apr 01, 2003 6:39 pm
- Boat Name: Glissando
- Boat Type: Pearson Triton
- Location: Whitefield, ME
- Contact:
Uh oh...destruction in late March? Yikes!bcooke wrote:I have been wanting to rip out the icebox for a year now but I kept holding myself back so as not to get too many projects going at once. Today I was contemplating a thorough inspection of the engine and realized that I wasn't going to get a hand on much with that icebox in the way. A two pound hammer and crowbar fixed that problem and while I was on a roll I took out the galley unit as well. Now I am ready to give the engine a thorough going over.
Amazing how much one thing leads to four others, isn't is. Boats are one big pyramid scheme, I think.
You will never miss that mess of scrap wood and foamie bits that Pearson called an icebox, nor will you miss the old galley either. What are your plans for the area? Are you building new, or do you plan a "back to basics" layout with a portable cooler or some such?
...or haven't you thought about the rebuilding part yet? hehe
---------------------------------------------------
Forum Founder--No Longer Participating
Forum Founder--No Longer Participating
-
bcooke
- Master of the Arcane
- Posts: 2272
- Joined: Sat Oct 04, 2003 10:55 pm
- Boat Name: Jenny
- Boat Type: 1966 Pearson Triton
- Location: Rowley, MA
- Contact:
Exactly. My plan for a sailing restoration has been modified a bit. It is just so much easier to rip it all out and start fresh than to work around all the stuff you know you are going to rip out later anyway. I love good access and it doesn't get any better than a bare interior.Amazing how much one thing leads to four others, isn't is. Boats are one big pyramid scheme, I think.
I AM going to sail this summer and probably cruise for a couple of months. I could get a real job or I could continue my part time work at the boatyard. Conveniently, the boat yard shuts down for July and August so I might just move aboard and float around for those two months. Maybe I will get a real job in the fall.
For this season I think my galley will be a temporary plywood table across the back where the normal galley is. Water can be pored out of jugs, dishes can be done in a plastic tub, cooking on a portable camp stove or I think I have a little stand for a gimbaled one burner affair using those little propane bottles. A bucket or porta-potty for sanitary needs and a cushion out of an old RV trailer I used to own with a sleeping bag. Very primitive but workable and when I think of it, it is just what I had on my little 20 footer a few years back. "Need" is such a relative term and one can forget that little is really needed to go sailing. I WILL be in the water this year. I have sails, I have oars, I have a dry place to sleep. What else is required?
Ultimately, a finely finished yacht. Just not this year.What are your plans for the area?
I had a thought on the icebox actually though this is really getting off topic. I don't need a big icebox (and have never had one one a boat before so it is quite a luxury actually) and was wondering if I could squeeze one in the old hanging locker area. Getting the icebox out of the rear cabin area would free up a lot of space in the galley area and then I could create access to the port side of the A4 which is where the carburetor and other stuff hangs out. Or I could hang an outboard and remove the A4 altogether.... whoah there big fella! THINK!... Tearing things out is so much easier than putting them back.
Details, details... My immediate needs were getting all around the engine. I haven't decided much about the rebuilding part yet but I know the original icebox isn't part of that picture....or haven't you thought about the rebuilding part yet? hehe
-Britton
-
Tim
- Shipwright Extraordinaire
- Posts: 5708
- Joined: Tue Apr 01, 2003 6:39 pm
- Boat Name: Glissando
- Boat Type: Pearson Triton
- Location: Whitefield, ME
- Contact:
My advice: stick with the inboard engine, even if you don't plan on using it that much. Your boat happens to have a pretty decent A4 (by all appearances), which will, with a modicum of care, serve you well. I just don't see outboards as convenient on a Triton, not to mention the ugly factor.bcooke wrote:Or I could hang an outboard and remove the A4 altogether....
If the A4 turns into a nightmare for some reason, you can always make a shift to something else later. Give the inboard a chance. I bet you'll like it more.
I think that's a great idea, if that particular layout works for you. The "hanging locker" is such a waste, and is better served being turned into quality storage (as on Dasein) or a vanity with storage (Glissando). The icebox idea is one I hadn't heard before, but I like it. You'd have room beneath the icebox for storage and a drain, and even with 4" of insulation on all sides you should have plenty of room for a compact icebox, if that's what you need.bcooke wrote:I don't need a big icebox (and have never had one one a boat before so it is quite a luxury actually) and was wondering if I could squeeze one in the old hanging locker area. Getting the icebox out of the rear cabin area would free up a lot of space in the galley area...
It is nice to open up the aft end of the cabin, particularly for engine access, but also because it creates a more spacious feel...and also allows for other storage ideas and such. While that plan might not work for me, I think it's a very good idea in general.
See you in Maine this summer!bcooke wrote:I AM going to sail this summer and probably cruise for a couple of months.
---------------------------------------------------
Forum Founder--No Longer Participating
Forum Founder--No Longer Participating
-
Tim
- Shipwright Extraordinaire
- Posts: 5708
- Joined: Tue Apr 01, 2003 6:39 pm
- Boat Name: Glissando
- Boat Type: Pearson Triton
- Location: Whitefield, ME
- Contact:
I used a blue waterproof grease on the bolts, inside the coupling, and on the shaft taper. My goal was to break the coupling, prop, and nuts free every other year for maintenance, inspection, and to prevent things from freezing up. This past fall was supposed to be the year, but I didn't get to it back in the fall after haulout. I will do it this coming fall for sure.
---------------------------------------------------
Forum Founder--No Longer Participating
Forum Founder--No Longer Participating