Replacing Cutlass Bearing on an Alberg 30

Ask a question...get an answer (or two).
Post Reply
User avatar
preserved_killick
Skilled Systems Installer
Posts: 220
Joined: Wed Oct 24, 2007 8:01 am
Boat Name: Seagrass
Boat Type: Alberg 30
Location: NH
Contact:

Replacing Cutlass Bearing on an Alberg 30

Post by preserved_killick »

Hi everyone,

On my winter (now spring) list is to replace the cutlass bearing on my Alberg 30.

This is what it looks like:

Image

Image

Image

Image

My plan is to remove the prop, hoping that I can get it off w/o needing to take the coupling apart (sort of a nightmare). I may not have the clearance with the rudder there. Once the prop is off, I should be able to remove the bearing housing from the boat to deal with getting the old bearing out in the shop. Get the new bearing (7/8" shaft), install bearing, and reassemble. Sound ok?

Any potential issues I'm missing?

Jeff
Last edited by preserved_killick on Mon Mar 22, 2010 4:49 pm, edited 1 time in total.
___________________________________
1965 Alberg 30 #116
http://picasaweb.google.com/fongemie
User avatar
Rachel
Master of the Arcane
Posts: 3044
Joined: Tue Dec 07, 2004 7:59 pm

Re: Replacing Cutlass Bearing on an Alberg 30

Post by Rachel »

Hi Jeff,

My Alberg 30 had the exact same stern tube, and I did replace the cutless bearing.

However one difference is that I had the shaft out in addition to removing the prop, so I did not have the clearance issue.

I did not remove the stern tube fitting (which is part of the "Moffitt" bronze part). From what I can tell this is installed by Whitby in a (massive) bed of "Thiokol" (which I believe to be polysulfide). Even though I (in a separate project) removed acres of Thiokol from the inside of the boat, it still would have been tough, I think, to get the stern tube fitting out. I did not "un-seal" it, nor did I remove it.

So, unless yours is leaking, or you want to replace it for some reason (it's going pink or etc.), I don't think I would take it out (unless there is something I'm missing?). I would take the cutless bearing out of the fitting and then put a new one in with a new set screw (what I did).

Oh, one other thing I did do while I had things apart was to machine down the stuffing box (there was plenty of excess bronze in a rough-outside casting) so that it matched the stern tube and so that both of them matched a commonly available hose size. In the Whitby set-up, the stern tube is an odd size (not a known hose size) and is also smaller then the stuffing box by a good bit. If I remember correctly, I machined the stuffing box down to 1-3/8" which left the stern tube just 1/16" smaller, and so 1-3/8" hose was able to decently fit on both pieces (previously the stuffing box took larger hose and it was all puckered and gathered on the stern tube.... ugh.

I have a number of photos -- I'll add them later when I'm at home.

Rachel

PS: If memory serves, my shaft was 7/8" and I used either an "Acid" or "Apex" sized cutless bearing -- shoot, I can't remember which one it was right now (Cutless/Duramax brand). Of course your shaft could be different but the stern tube looks exactly the same.
User avatar
preserved_killick
Skilled Systems Installer
Posts: 220
Joined: Wed Oct 24, 2007 8:01 am
Boat Name: Seagrass
Boat Type: Alberg 30
Location: NH
Contact:

Re: Replacing Cutlass Bearing on an Alberg 30

Post by preserved_killick »

Thanks Rachel,

My reasoning for removing the housing is that I don't think the shaft will come out completely without removing part of the coupling on the inboard side of the shaft. That coupling part is drilled/pinned and not coming off until it fails. The only way to get the shaft out is to pull it out from the inside if I can. If I can clear the transmission on the inside, that may be the easiest way to deal with this. Did you need to hack saw out the old bearing?

If you'd be kind enough to send some pics of your stuffing box/stern tube setup I'd appreciate it. I can't picture what you are talking about.

-jeff
___________________________________
1965 Alberg 30 #116
http://picasaweb.google.com/fongemie
User avatar
Tim
Shipwright Extraordinaire
Posts: 5708
Joined: Tue Apr 01, 2003 6:39 pm
Boat Name: Glissando
Boat Type: Pearson Triton
Location: Whitefield, ME
Contact:

Re: Replacing Cutlass Bearing on an Alberg 30

Post by Tim »

Those external bearing housings are usually just bedded and screwed (or lagged) into the deadwood from outside. Removal ought to be straightforward, but I don't know the ins and outs of your particular boat.

I remember your coupling from some questions you posted last year, and agree that you should avoid dealing with that nightmare unless you absolutely have to. I doubt you'll be able to pull the shaft out from the inside while the engine is in place--I've never seen a situation where this would work, as the transmission, engine, and other obstructions prevent a clean line for removal.

If you do remove the housing, and the bearing is not willing to come out on its own, you can easily press it out with the housing removed--one good reason to consider removing it. Since there's no protruding section of the old bearing to grab, removal might be hard depending on how the previous installer secured the bearing in there. For future reference, it's nice to leave about 1/2" - 1/4" of the new Cutless bearing proud of the stern tube or housing, which makes future removal much easier--whether for you, or for the next poor soul to try it.

Image
---------------------------------------------------
Forum Founder--No Longer Participating
User avatar
Rachel
Master of the Arcane
Posts: 3044
Joined: Tue Dec 07, 2004 7:59 pm

Re: Replacing Cutlass Bearing on an Alberg 30

Post by Rachel »

Here is a bit of photo-description of work I did on my A-30 (1967 vintage).

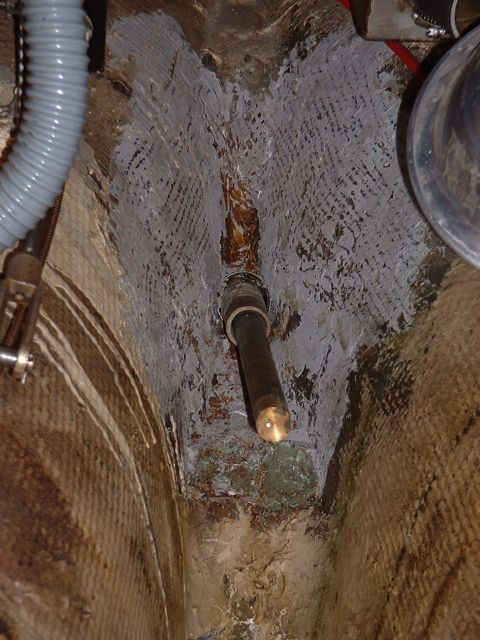
This is inside the boat, looking back into the stern tube area of the boat when I first owned it.

Image

The grey caulk is Thiokol (polysulfide I believe), which was put in by Whitby at build, from what I have read/heard from other owners. You can see it was hacked away slightly at some point in time, probably when a stuffing box hose was replaced in the past. I decided to explore (the hose was not far from failure, btw, and there was extra pressure put on the hose due to the size mismatch of the stuffing box and the stern tube - you can see where it is slightly "gathered" at the left side of the stern tube).

After scraping out a lot of Thiokol...

Image

I had this:

Image

Image

Image

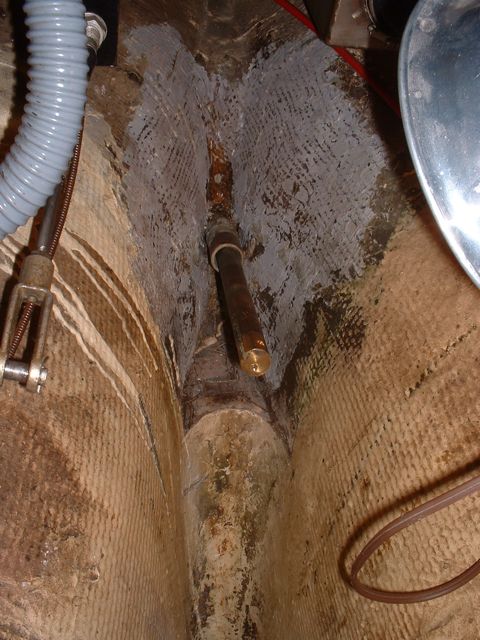
If I'm remembering this correctly, there is a partial tube that is part of the "Moffitt" part, and then the rest of the stern tube threads into that, and is the hollow tube you see (the longer, solid item is the shaft, which was still in the tube when I took the photos).

As you can see, there are no visible nuts even with the caulking removed, so I suppose the stern tube fitting is probably lagged/screwed in, without nuts on the inside. I didn't mean to sound quite so negative on you removing it; I meant to imply that unless you had to remove it for some reason, well... maybe don't. But as Tim pointed out, it would probably not be a major issue to remove it (and maybe then you'd want to put in a fiberglass tube that wouldn't even have bedding?)

I remember reading a few posts wherein A-30 owners had started to remove the fitting, pulling it out and then (when it didn't come easily) describing how it kind of "snapped back" onto the deadwood. So it's probably bedded with something a bit elastic (at least on those boats).

At any rate, I had no reason to remove mine, as it was in good shape and there were no signs of corrosion or leaking, so I never tried. I had the engine and shaft out on the other side, so "plenty" of working room there (as long as your definition of "plenty" includes working hunched over and sitting on a short plank that straddles the engine beds).

That "shelf" you see below the tube is (or seemed to be) a big resin-and-some-glass pour that essentially just fills in the small triangular area at the after end of the keel. It extended down to the top of the "false" bilge filler. There were a few crazing type cracks on the top of it, so I covered it with thickened epoxy. After that I re-caulked it with polysulfide, although I did not extend the caulk out quite as far as Whitby did (I couldn't determine any reason for such a large area of filler). I cleaned off and painted the areas where I did not go back with caulk.

Image

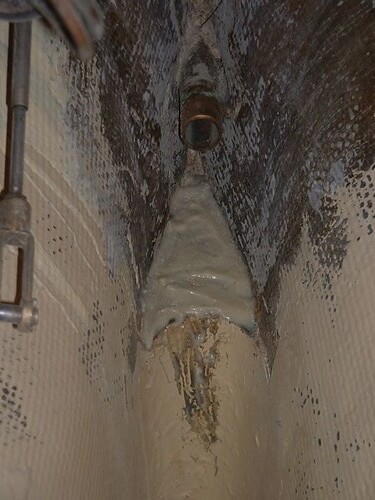
I don't have any photos of it after I re-caulked, but this one from during the painting process gives more of the overall picture of the "deadwood" area. The bottom 6" or so of what you see is normally buried in the "false" bilge - I got rid of that, and smoothed out the area where the deadwood "filler" ended about 6" shy of the bottom of the boat so that it would be smooth and paintable/cleanable.

Image

Oh, and I think maybe we had a past thread wherein the subject of the original A-4 engine beds came up? You can see them in the above photo. I have read that they are not adequate for a diesel engine (due to the increased movement) and I would believe that. I could see them flexing under additional load (although they seemed fine for the A-4, and the obviously-old cutless bearing that came in the boat was not worn in an irregular fashion).

Okay, the stuffing box. From what I have read this is a standard Whitby feature: The diameter of the stern tube (at least the part that comes into the boat) does not match the stuffing box, and to top it off is an odd size (I think it was about 1-5/16" OD). The stuffing box, again if I recall correctly, was about 1-1/2" (maybe 1-7/16" - it was a slightly rough casting). So a piece of hose that would fit over the stuffing box was rather baggy on the stern tube.

Since there was plenty of extra material on the stuffing box barb (indeed, it was a bit irregular), I machined it down to 1-3/8". I chose that size as it was an available hose size, and would get it to within about 1/16" of the stern tube.

One note is that I could not find that size in "official," 5-ply stuffing box hose, such as that made by Buck Algonquin. Instead I went with a premium, heavy duty, wet-exhaust hose. In my case it was quite short anyway, so seemed more than adequate. I think I remember reading the fine print later and discovering the the smallest sizes of "real" 5-ply stuffing box hose were actually only 3-ply anyway -- I'll have to check on that. As you can tell, a few of the details are a bit fuzzy.

Here is the stuffing box post-machining:

Image

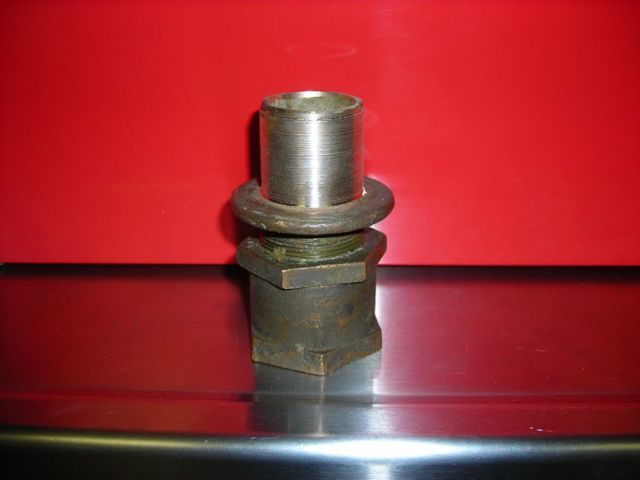
As you can see in this photo, there was still plenty of meat on it:

Image

Changing gears, here is the stern tube fitting on the outside. This is with the new cutless bearing in place:

Image

Image

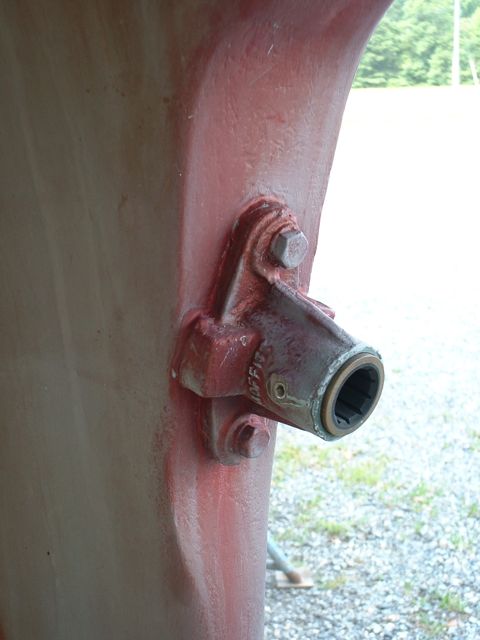
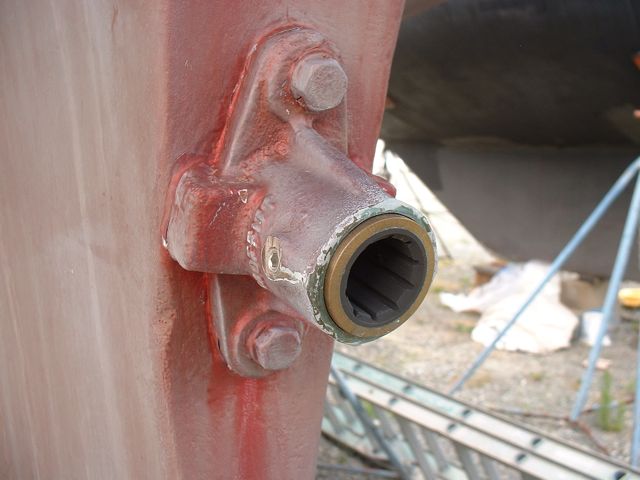
As I mentioned, I think it was an "Apex" size (Duramax/cutless brand), although there is the chance it was an "Acid." (The brand with the fish names is easier to remember - Acid and Apex are too similar!)

Just let me know if I can (try to) answer any other questions or provide more detail.

Rachel
User avatar
preserved_killick
Skilled Systems Installer
Posts: 220
Joined: Wed Oct 24, 2007 8:01 am
Boat Name: Seagrass
Boat Type: Alberg 30
Location: NH
Contact:

Re: Replacing Cutlass Bearing on an Alberg 30

Post by preserved_killick »

Thanks Tim & Rachel.

Those pics are a big help Rachel, now I have an idea of what I'm dealing with. I'll tear into this in a few days, with the plan of removing that bearing housing. I recall reading on the Alberg list that someone did just this, and it worked out ok. I'll also try to pull the shaft from the inside. I doubt it will work, but I'd like to remove the stuffing box to see what's going on in there. I'm also realizing that my wonderful flexible coupling will make replacing the stuffing box hose very difficult. Grrr.
___________________________________
1965 Alberg 30 #116
http://picasaweb.google.com/fongemie
User avatar
preserved_killick
Skilled Systems Installer
Posts: 220
Joined: Wed Oct 24, 2007 8:01 am
Boat Name: Seagrass
Boat Type: Alberg 30
Location: NH
Contact:

Re: Replacing Cutlass Bearing on an Alberg 30

Post by preserved_killick »

Prop is now off, and "Moffit" external stern tube bearing holder is not simply unscrewing from the internal tube, it is turning the whole thing on the inside.

No I'm faced with removing all that gunk around the inside part of the stern tube. Rachel, look familiar?
Image

At this point, replacing a $40 cutlass bearing has turned into a much bigger project. I'll dig out the gunk, but I can see that the stuffing box hose needs replacement, which means my prop shaft will need to come out. Which means I'll likely need to remove my pinned Vetus coupling (3 inch long 7ml pin driven into a 6 mil hole). I'm dreading this.

Rachel, I've just gone through your photos again, and it is not clear if you re-caulked everything when done. Why all this caulk in the first place? Is it to backup the poor fitting hose on the stern tube? I'm sure some sealant around the stern tube is necessary, but it looks like there's a couple of tubes in there. Also, if you were to do this again, would you opt for the machining on the stuffing box barb? Anything you would do differently?

On the other hand, I'm happy with the way my galley table is coming along.
Image

jeff
___________________________________
1965 Alberg 30 #116
http://picasaweb.google.com/fongemie
User avatar
Rachel
Master of the Arcane
Posts: 3044
Joined: Tue Dec 07, 2004 7:59 pm

Re: Replacing Cutlass Bearing on an Alberg 30

Post by Rachel »

Hi Jeff,

Why yes, that *does* look familiar! I can see where I was lucky that my engine basically popped right out and so I was able to do most of my work with the shaft removed.

Looking at it again.... is the red thing the stuffing box hose? Or....?

I, too, wondered why that mass of caulking was there (and I did not see any explanation after searching). So I basically had to dig it all out ;) My guesses as to why it is there:

1) The top of the "deadwood" is flat, and so water would sit on it. The caulk gives it all a nice rounded sloped shape.

2) It does provide some support for the stern tube extension (sorry, I don't know the real name of this part).

3) Also maybe the few small cracks in the top of the deadwood pour/glass/whatever made themselves known right at the factory and it was a way to "seal" them (?)

4) I'm not real confident that it would stop any leaks around the "Moffit" part (if there were any), but... maybe?

I thought about going back in with something more permanent feeling, such as thickened epoxy and fiberglass for at least part of the build up of that area, but then I decided not to. For one thing, there really was no way to get the area "clean" enough to glass without completely removing the stern tube (that did not seem necessary in my case). Also of course I didn't want to make the stern tube un-removable in future so I could not just "glass it all up").

So what I did in the end was remove basically all of the old stuff, and then clean up the area as well as I could (wire wheel, bristle disc, solvents, putty knives and I forget what all else). Then I prepped and covered the "shelf" with some thickened epoxy. I wanted to seal the small cracks and also to eliminate the total flatness (it may even have had a slight aftward tilt) of the "shelf." Later I went back and filled in with polysulfide similar to the original set-up (Life-Calk in my case), but with less caulk (I did not extend it as far forward except on the very bottom edge on the shelf). I shaped it to shed water and be smooth. I think I used 2 tubes of caulk. I bet there were 3 or 4 tubes' worth in there to begin with. As you could see from my original photos, that amount of caulk made it impossible to change the stuffing box hose/clamps (mine had already been carved away slightly to facilitate that in the past).

On the stuffing box: Unless I were changing the whole set up ( such as replacing the whole stern tube fitting with a fiberglass tube) I would do the exact same thing again where I machined the stuffing box to within 1/16" of the OD of the stern tube (I stopped 1/16" shy because I was at a standard hose size). It was not difficult and the results worked very well. I repacked the box while it was out of the boat - that was nice!

OTOH, had I known exactly what was under/behind "Caulk Mountain" (and considering I had no leaks or other signs of trouble), I might not have removed all the caulk and done that side of the project. But since I didn't have any photos or other information to go on (from other A-30s), I just had to know. I felt I put it back somewhat improved, but I don't think it was crying for attention like the mismatched stuffing box/stern tube do.

Rachel
Post Reply