Fuel Tank Placement & Engine Room Organization

Ask a question...get an answer (or two).
Post Reply
AJ
Almost a Finish Carpenter
Posts: 88
Joined: Thu Sep 14, 2006 6:06 pm

Fuel Tank Placement & Engine Room Organization

Post by AJ »

Hi gang,

I?ve finished gutting out and scrubbing down the once-and-future engine compartment of my boat and have started to give some more thought as to the general layout of where various equipment should be installed. However, a satisfactory arrangement with a new fuel tank installed (18 to 20 gallons) that would allow for improved stuffing box access continues to elude me, so I thought I?d try sounding the board for input.

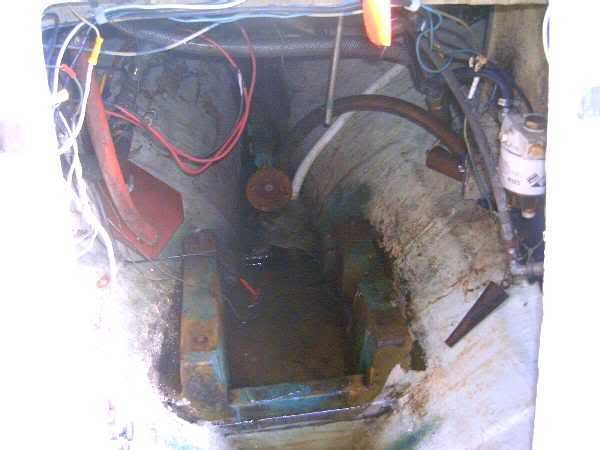
Here?s a shot looking aft into the newly cleaned, but not yet painted, engine compartment and cockpit lockers to give you some idea of the space:
Image

At the top of the photo you can see the metal scuppers protruding from the front corners of the cockpit, and behind each scupper you can see 2 fiberglass legs onto which the original fuel tank (25 gallons) mounted. In order to try to give you some three dimensional sense of the space, the fiberglass slab from which you see the stuffing box protruding is directly below the front edge of the cockpit sole. This diagram from the Tripp 30 brochure might also help:

Image

My fundamental problem with the standard factory arrangement is that there does not seem much in the way of practical access to the stuffing box. With the engine installed, access from the front is considerably impeded and you would have to go-go gadget arms in order to try to reach over and behind it. If the new fuel tank occupies the same location as the old one, then that would rule out installing an access hatch in the cockpit sole because it would just open onto the top of the tank. Mounting the new tank in a locker area would result in the loss of that space and would also have a detrimental effect on the boat?s trim. And trying to mount a long narrow tank farther back along the centerline, so that it would only protrude partly into the lockers, would run afoul of the rudder post raking back.

Another option would be to install a considerably smaller fuel tank, but that option is not particularly appealing to me. So, at the moment, I?m reluctantly leaning toward the standard factory arrangement and hoping that access won?t be as bad as I envision, but I?d still like to hear what others think.

Other items under consideration that I wouldn?t mind hearing some opinions about:

(1) Ditching the fin. Underneath the after end of the cockpit, you can see the backing plate and 8 bolts that hold the fin modification in place. If I were ever going to get rid of the fin, this would seem to be the time to do it, while everything is emptied out and access is optimum. I also have to strip the bottom paint in the spring anyway so bottom work is on the horizon. On the other hand, I?m still not sure why it was installed and thus I don?t know if there is actually a very good reason for the appendage.

(2) Seacock replacement. I had planned to simply service those factory original bronze seacocks you seen in the top photo. However, closer inspection of them reveals that there are no bolts in the seacock flanges leading me to believe they?re just screwed onto the through-hull fitting. The through-hull itself appears to have its flange glassed over into the hull so that only the pipe protrudes. On the one hand this arrangement has apparently been solid enough to see the boat through the 43 years since its building, but on the other hand I?d feel more secure with a seacock that?s firmly bolted to the hull.

(3) Starter battery placement. I?ve been considering mounting the engine starting battery on the flat fiberglass platform located on the starboard side of the boat (you can see its square shape protruding on the left side of the photo). I suspect a blower for the A4 might have originally been mounted there. However, in order to prevent heat damage to the battery, I was wondering if this would be too close to the new diesel and pondering just how far away the battery should be from the engine in order to negate this concern.

(4) Engine compartment/locker bulkheads. Should I build wooden bulkheads on either side of the engine compartment to further divide the area from the lockers and provide surfaces onto which soundproofing insulation could be attached?

(5) My bilge situation, proper drainage, and electric pump placement but that?s probably a topic for another thread!

AJ
User avatar
Tim
Shipwright Extraordinaire
Posts: 5708
Joined: Tue Apr 01, 2003 6:39 pm
Boat Name: Glissando
Boat Type: Pearson Triton
Location: Whitefield, ME
Contact:

Re: Fuel Tank Placement & Engine Room Organization

Post by Tim »

AJ wrote:My fundamental problem with the standard factory arrangement is that there does not seem much in the way of practical access to the stuffing box. With the engine installed, access from the front is considerably impeded and you would have to go-go gadget arms in order to try to reach over and behind it. If the new fuel tank occupies the same location as the old one, then that would rule out installing an access hatch in the cockpit sole because it would just open onto the top of the tank. Mounting the new tank in a locker area would result in the loss of that space and would also have a detrimental effect on the boat?s trim. And trying to mount a long narrow tank farther back along the centerline, so that it would only protrude partly into the lockers, would run afoul of the rudder post raking back.

Another option would be to install a considerably smaller fuel tank, but that option is not particularly appealing to me. So, at the moment, I?m reluctantly leaning toward the standard factory arrangement and hoping that access won?t be as bad as I envision, but I?d still like to hear what others think.
For an auxiliary sailboat like this, fuel tank size comes down to convenience (fewer fillups) rather than a true need for the capacity. Now, convenience is a significant reason to install as large a tank as practicable, so your reasons for not wishing to diminish your capacity are sound.

Could you have a new tank built that was somewhat shorter in its longitudinal dimension, but otherwise fit in the same space as the original? This might give more access to the stuffing box from directly above and just behind. Of course you would lose some capacity, but given the large-ish size of the original tank (over 20 gallons), you would still end up with a workable and convenient capacity.

Now, this doesn't take into account the true difficulties of accessing your space; without seeing the space in three dimensions (i.e. in person), I can't quite determine what you have to work with, and where, if anywhere, additional access ports might be installed. Could you put a large access hatch in the forward end of the cockpit well, where that ugly instrument panel was? Would a hatch there give you enough room to get your head and arms in for stuffing box and shaft service?

How large are your cockpit lockers? Can you climb in to either or both sides and reasonably access the stuffing box area? If so, this can be an acceptable way to go, if less than ideal. But "ideal" is a concept that typically eludes those of us with small sailboats.

AJ wrote:(1) Ditching the fin. Underneath the after end of the cockpit, you can see the backing plate and 8 bolts that hold the fin modification in place. If I were ever going to get rid of the fin, this would seem to be the time to do it, while everything is emptied out and access is optimum. I also have to strip the bottom paint in the spring anyway so bottom work is on the horizon. On the other hand, I?m still not sure why it was installed and thus I don?t know if there is actually a very good reason for the appendage.
I suspect a former owner felt the boat must have been just a bit squirrely under certain conditions, most likely sailing well off the wind and in a large seaway. Narrow, full keel boats tend to yaw in these conditions, and can sometimes take a lot of concentration and effort to control. With a short keel and rudder set well forward of the stern of the boat, thanks to that nice counter overhang, the fin could have been designed to help the boat track better and hold course in these conditions.

It's likely that the fin was added at the same time, or after, the engine and related gear was removed. Possibly the fin was designed to help compensate the handling of the boat for the removal of this designed-in weight. I could easily see the handling of the boat being changed by removing the engine and not replacing the weight to keep the boat in her as-designed balance.

Whether or not the fin is worth keeping is impossible to know without being able to directly compare the characteristics of your boat with another, fin-less, sistership. My gut feeling is that the fin seemed like a good idea, and may provide some benefit, but that you probably wouldn't terribly miss it either. I don't think it probably addresses a true shortcoming of the design, but rather that it was one owner's concept that, at least on paper, made enough sense to execute.

You've never sailed the boat with or without the fin. It's very hard to say what to do, but if the fin isn't bothering you specifically, and you don't mind constantly answering questions from passers-by, then I don't see any immediate reason why you should remove it. On the other hand, since you'd never know to miss it if you removed it, it wouldn't hurt to get rid of it now if that's your inclination.

If the only reason you're contemplating removing it is because of the access right now, then I wouldn't go forward...you can always gain access later, even if less convenient.
AJ wrote:(2) Seacock replacement. I had planned to simply service those factory original bronze seacocks you seen in the top photo. However, closer inspection of them reveals that there are no bolts in the seacock flanges leading me to believe they?re just screwed onto the through-hull fitting. The through-hull itself appears to have its flange glassed over into the hull so that only the pipe protrudes. On the one hand this arrangement has apparently been solid enough to see the boat through the 43 years since its building, but on the other hand I?d feel more secure with a seacock that?s firmly bolted to the hull.
If you would feel better with bolts, then bolt them in. It's undeniably more secure to have bolts securing your seacock flanges.

If you feel OK the way they are, then leave them. The bolts really only hold the seacock in place more securely when you're operating it, which applies torque to the fitting; the bolts allow this to be better transferred to a wider area.

The threads alone, coupled with the sealant, of course, are adequate to hold your arrangement together. I believe in bolting seacock flanges, but from a practical standpoint it's clear that what's already there is working fine. Now, it becomes your personal choice how to proceed.
AJ wrote:(3) Starter battery placement. I?ve been considering mounting the engine starting battery on the flat fiberglass platform located on the starboard side of the boat (you can see its square shape protruding on the left side of the photo). I suspect a blower for the A4 might have originally been mounted there. However, in order to prevent heat damage to the battery, I was wondering if this would be too close to the new diesel and pondering just how far away the battery should be from the engine in order to negate this concern.
That platform looks like at least a foot, and possibly a bit more, away from where the engine would be. You won't have any problems mounting your battery here.
AJ wrote:4) Engine compartment/locker bulkheads. Should I build wooden bulkheads on either side of the engine compartment to further divide the area from the lockers and provide surfaces onto which soundproofing insulation could be attached?
Having some means of preventing your locker contents from falling into the bilge--and, more importantly, onto your shaft or engine--is important. Anything you install, however, must be easily removable, and should incorporate plenty of openings to allow for engine ventilation and combustion air.

You will see a lot of common pegboard used in this application. This is a horrible way to do it, as pegboard is weak, flimsy, and absorbs moisture. Use some decent plywood, add soundproofing if you desire, and add some nice, large air vents. And be sure you can easily remove the panels for access, particularly if this also ends up being the way into your stuffing box.
AJ wrote:5) My bilge situation, proper drainage, and electric pump placement but that?s probably a topic for another thread!
Then we'll leave that one for another topic later.
---------------------------------------------------
Forum Founder--No Longer Participating
JetStream
Skilled Systems Installer
Posts: 169
Joined: Sat Apr 26, 2003 8:53 pm
Boat Name: Sojourn
Boat Type: Pearson 27
Location: Jamestown, RI

Post by JetStream »

(2) Seacock replacement. I had planned to simply service those factory original bronze seacocks you seen in the top photo. However, closer inspection of them reveals that there are no bolts in the seacock flanges leading me to believe they?re just screwed onto the through-hull fitting. The through-hull itself appears to have its flange glassed over into the hull so that only the pipe protrudes. On the one hand this arrangement has apparently been solid enough to see the boat through the 43 years since its building, but on the other hand I?d feel more secure with a seacock that?s firmly bolted to the hull.
If you are thinking of seacock replacement, perhaps I can offer my experience on a very similar Tripp design (Javelin 38). I found that the seacocks used were slightly different than what is available today. The bronze seacocks had protruding male threads that went through the hull. On the other side, the hull was molded with cavities to form fit the seacock nuts. The seacock nuts fit the molded recesses in the hull. The excess threads of the seacock were apparently cut off after the nut was assembled. The nuts have "spanner" type notches in them to allow tightening. I can get you a picture of the valves and nuts if you want. In the meantime, here are a few photos that I have of the installation.
Image
Image
To replace them, you might be in for a little more epoxywork than you originally thought. These seacocks are not bolted through the hull but are pretty strong, nevertheless. I know that I wouldn't worry about their strength in my boat. Interestingly, on the one picture, you can see a hole in the galvanized pipe fitting that was worn through by a vibrating exhaust pipe (not visible before I removed the exhaust pipe) leading to a serious leak that may have been part of Jet Stream's demise.
Bruce
Quetzalsailor
Master of the Arcane
Posts: 1100
Joined: Fri Aug 26, 2005 9:53 am
Boat Name: Quetzal
Boat Type: LeComte North East 38
Location: Philadelphia, PA

Post by Quetzalsailor »

RE: fuel tank. You might consider two, up and outboard. You would not change the trim much.

RE: access to stuffing box. Consider going to to the PWI shaft seal and kiss the problem good bye. In our NE 38, the problem is all the other stuff that's in the way: exhaust riser, hoses, muffler. Inspector Gadget, indeed!

RE: clearances. On a Morgan 27, I sawed the casework with great abandon, reconstituted some of it as a removable panel, recycled more of it as fire wood, built a companionway stair/cover to close the A4 in.

Sawzalls and angle grinders!
Duncan
Candidate for Boat-Obsession Medal
Posts: 388
Joined: Fri Mar 03, 2006 7:28 am
Boat Name: Coquine
Boat Type: Cape Dory 27
Location: Montréal
Contact:

Post by Duncan »

AJ, I'm going to be watching this one closely, since I have a similar situation.
I have even less space (25 footer, 20' waterline).

Image

I am just at the planning stage before re-installing the engine:

1. Engine Access
Everything important is aft, and going around the engine/in through the cockpit lockers just seems wrong. I met a guy this summer who had a very nice stainless or aluminum hatch in the cockpit sole of his Friendship Sloop (sorry, no photo). It was gasketed and dogged, and roughly two feet square. (I can't find Anchor Supply or Anchor Marine in New Brunswick, where I think he said it came from, but it was basically commercial fishing boat equipment.)

I couldn't believe he was complaining that it cost him $300, since it was custom-made to his dimensions, and looked excellent. These are the same sort of idea, but not exactly - http://www.baierhatch.com/ourhatches.html

I'm also modelling off the Contessa 26, which has "proper" access, as you can see:

Image

Since this will facilitate installation of the engine, as well as access to everything, I am pretty well sold on it.

2. Fuel Tank
I get 3.5 hours from a gallon, so 5 gallons gives me two full days of motoring. You will probably use a more power (my calculations are based on about 5 hp at the "sweet spot"), but it's linear - figure about 0.06 gal/hp/hr, 17 hp = ~ a gallon an hour (conservatively).

If I wanted more, I don't think I'd put a big tank on top of the engine, though! A five gallon day tank off to one side, and fifteen gallons somewhere else low down and amidships might make sense?

I'm also leery of keeping too much diesel on hand, since it doesn't improve with age, but it's better to keep the tank full. A solution a friend of mine had was to build jerry can holders in a cockpit locker. They're modular and transportable (saves paying a fortune at the marina), and sometimes simple is best? (That way, you can carry more fuel when you want to, but aren't locked into a bigger tank all the time)

3. Cockpit Lockers

Like you, I just have lids going into the open space. Since that's lousy, but cutting off access/airflow is not good either, I have been trying to think through removeable partitions. I don't want them to rattle or move around, though, so I am still trying to puzzle this out. Maybe slide-in frames would work?
Last edited by Duncan on Wed Nov 22, 2006 12:45 pm, edited 1 time in total.
Image
Cape Dory 10 & 27
Quetzalsailor
Master of the Arcane
Posts: 1100
Joined: Fri Aug 26, 2005 9:53 am
Boat Name: Quetzal
Boat Type: LeComte North East 38
Location: Philadelphia, PA

Post by Quetzalsailor »

Re: Seacocks. I've taken to replacing the old plug types with new ball type bronze seacocks. Before I knew better, I simply switched 'em out, using the old through-hull fitting and no bolts. Bad idea, particularly on the Morgan 27 which had only enough through-hull to give about two turns of engagement. Also bad since you're depending upon a 40 year old piece of bronze which does not have to loose much metal in the root of the threads.

Now, I make a 3/8" or 1/2" layup of polyester-fiberglass, drill for the bolts, recess the nuts from the back, epoxy the assembly to the hull, bolt the seacock in to the concealed nuts, thread the through-hull in with pipe dope on the threads and 5200 to the hull.

Only three more to go...
FloatingMoneyPit
Topside Painter
Posts: 135
Joined: Wed May 04, 2005 12:27 pm

How 'bout flexible tanks?

Post by FloatingMoneyPit »

AJ -
I know a lot of people prefer solid tanks, but you might consider a flexible tank. All chafe, longevity, etc. issues momentarily aside, you could contrive some sort of removable box or platform to hold the bladder in the same place as the original tank. Then you could still install a hatch in the cockpit. Squash the (obviously empty) fuel bladder out of the way, remove the platform, and you have full access to the stuffing box and engine. You'd need an empty tank and have to spend some time deconstructing when you want access, precluding emergency situations, but it's far better than nothing. I'm just riffing here and probably missing something, but it seems like a good idea to me. Wish I considered it when I redid my boat! I recently replaced my water tank with 2 Vetus bladders and love the idea that I can easily remove, clean, or replace them, and they create extra storage space when empty. Ideal for dirty laundry.
Tartan 27
Brooklyn, NY
AJ
Almost a Finish Carpenter
Posts: 88
Joined: Thu Sep 14, 2006 6:06 pm

Re: Fuel Tank Placement & Engine Room Organization

Post by AJ »

Tim wrote:Could you have a new tank built that was somewhat shorter in its longitudinal dimension, but otherwise fit in the same space as the original? This might give more access to the stuffing box from directly above and just behind. Of course you would lose some capacity, but given the large-ish size of the original tank (over 20 gallons), you would still end up with a workable and convenient capacity.
I've been toying with that idea, but it seems the forward portion of the tank must have provided a considerable amount of the total capacity. The back area is relatively small as the floor rises rather sharply and then you hit the rudder post which creates an even steeper rise.
Could you put a large access hatch in the forward end of the cockpit well, where that ugly instrument panel was? Would a hatch there give you enough room to get your head and arms in for stuffing box and shaft service?
I don't think so, it's pretty narrow behind there because of the way the galley area protrudes under the bridge deck from the inside.
How large are your cockpit lockers? Can you climb in to either or both sides and reasonably access the stuffing box area? If so, this can be an acceptable way to go, if less than ideal.
I can climb into the lockers and (currently) can access the stuffing box from that area. However, that access will be significantly restricted with a fuel tank installed under the cockpit. In the water, the seacock would have to be closed and the hoses disconencted in order for me to move forward enough to get at the area. I wonder how hard you can knee a seacock while wiggling about before it springs a leak?
If the only reason you're contemplating removing it is because of the access right now, then I wouldn't go forward...
That pretty much is the main reason I'm considering getting rid of it right now, combined with my doubts about its utility and a desire to avoid unnecessary drag.
The threads alone, coupled with the sealant, of course, are adequate to hold your arrangement together. I believe in bolting seacock flanges, but from a practical standpoint it's clear that what's already there is working fine. Now, it becomes your personal choice how to proceed.
Thanks for the explanation of the purpose of the bolts. There's a number of question marks I have about the current seacocks that can't really be answered until the boat is actually in the water. Such as whether they leak or not, or if you have to tighten the nut to such an extent to stop a leak that you can't turn the handles, etc. Those were other reasons why I was thinking about just pulling them and putting in new ones.
That platform looks like at least a foot, and possibly a bit more, away from where the engine would be. You won't have any problems mounting your battery here.
Excellent!
Having some means of preventing your locker contents from falling into the bilge--and, more importantly, onto your shaft or engine--is important. Anything you install, however, must be easily removable, and should incorporate plenty of openings to allow for engine ventilation and combustion air.

You will see a lot of common pegboard used in this application. This is a horrible way to do it, as pegboard is weak, flimsy, and absorbs moisture. Use some decent plywood, add soundproofing if you desire, and add some nice, large air vents. And be sure you can easily remove the panels for access, particularly if this also ends up being the way into your stuffing box.
Thanks for the tips. When it comes to the air vents, do you mean simple cutouts or do you mean metal vents or something else?

AJ
AJ
Almost a Finish Carpenter
Posts: 88
Joined: Thu Sep 14, 2006 6:06 pm

Post by AJ »

JetStream wrote:I can get you a picture of the valves and nuts if you want.
Thanks, Jet Stream. I'd appreciate it if you would post those photos. Hopefully Mechans was using the same style fittings as the dutch yards had used when they built my boat.

AJ
AJ
Almost a Finish Carpenter
Posts: 88
Joined: Thu Sep 14, 2006 6:06 pm

Post by AJ »

Quetzalsailor wrote:RE: access to stuffing box. Consider going to to the PWI shaft seal and kiss the problem good bye. In our NE 38, the problem is all the other stuff that's in the way: exhaust riser, hoses, muffler. Inspector Gadget, indeed!
I've been seriously considering going the dripless route and looking at the PSS shaft seal. Is the PWI shaft seal a different brand? The shorter the seal, the better on my boat.

From the shaft support to the back of the existing staircase I have about 33 inches. The PSS seal compressed is 6.25" (apparently 7" uncompressed) and I'm not sure how much exposed shaft (if any) I need to leave in front of it before reaching the coupling. If I figure leaving 1.25" of exposed shaft (with the PSS seal compressed) and then estimate 1.5" as the width of the flex coupling (which I could be wrong about) and then an engine length of 24 and 9/16" that would total 33 9/16"

It's probably wishful thinking to hope I can get the total installation under 33" so I'll probably have to build new companionway steps as you did on your Morgan 27.

AJ
AJ
Almost a Finish Carpenter
Posts: 88
Joined: Thu Sep 14, 2006 6:06 pm

Post by AJ »

Duncan wrote:AJ, I'm going to be watching this one closely, since I have a similar situation.
I hope I don't test your patience since this installantion is going to move rather slowly! Actual installation won't be done until the spring since I want to paint everything with bilgekote first and the year seems to be fast running out of 50 degree days. So I'm going to spend most of the winter just fiddling and planning.
Since this will facilitate installation of the engine, as well as access to everything, I am pretty well sold on it.
Sounds like a sound plan to me.
I'm also leery of keeping too much diesel on hand, since it doesn't improve with age, but it's better to keep the tank full. A solution a friend of mine had was to build jerry can holders in a cockpit locker. They're modular and transportable (saves paying a fortune at the marina), and sometimes simple is best? (That way, you can carry more fuel when you want to, but aren't locked into a bigger tank all the time)
That's an interesting solution and maybe that would be the best route to go in my case.
Like you, I just have lids going into the open space. Since that's lousy, but cutting off access/airflow is not good either, I have been trying to think through removeable partitions. I don't want them to rattle or move around, though, so I am still trying to puzzle this out. Maybe slide-in frames would work?
I've been puzzling about that as well, if inspiration strikes I'll be sure to let you know!

AJ
AJ
Almost a Finish Carpenter
Posts: 88
Joined: Thu Sep 14, 2006 6:06 pm

Re: How 'bout flexible tanks?

Post by AJ »

FloatingMoneyPit wrote:AJ -
I know a lot of people prefer solid tanks, but you might consider a flexible tank. All chafe, longevity, etc. issues momentarily aside, you could contrive some sort of removable box or platform to hold the bladder in the same place as the original tank. Then you could still install a hatch in the cockpit. Squash the (obviously empty) fuel bladder out of the way, remove the platform, and you have full access to the stuffing box and engine.
That's definitely a creative solution. I think I'll spend some time surfing the web to see if anyone has tried anything similar and what results they might have had.

AJ
Post Reply