Repairing Deck Core

Post photos and descriptions of your ongoing projects here. No project is too big or too small.
Post Reply
Scout

Repairing Deck Core

Post by Scout »

As with most projects, we start out with a plan, and after we start it, the plan grows to twice the size then was originally thought out.

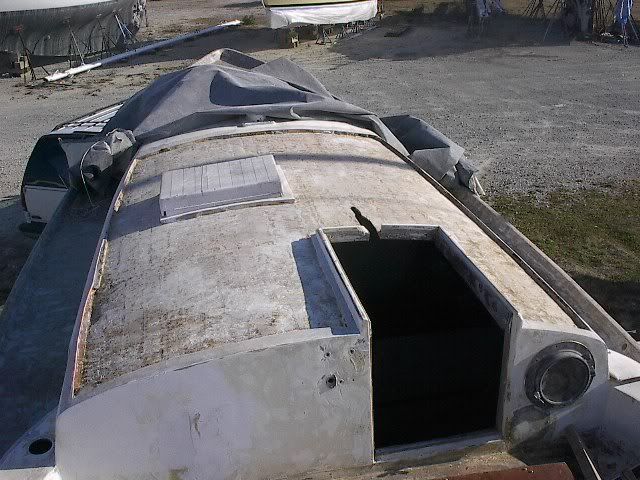
We are in the process of removing all the deck hardware, painting new nonskid and then re-bedding all the hardware. Easy enough. But after we removed the hardware we found two problem spots. One was were the bow pulpit attaches to the deck, thru it's tube runs the wires for the nav lights and then under the deck. This area of wet core runs about a half inch pass the pulpit round base of about three inches. The second problem was the big, set back the launch schedule type of setback. The head vent deck plate had rotted balsa leading up as far as we could reach to, leading toward to the forward hatch dorade boxes. Stress cracks around the base of the boxes confirmed we had delaminated wet core around them. After a dozen drill holes we cut confirmed our thoughts, we cut opened the deck (painful) and luckily cut out were almost all the wet core was located and not much of the good stuff.

Image

The pulpit hole we think can be grond inside the cavidty and be filled with epoxy filler.

Image

This we are not sure about? Recore it with all balsa again? or fill the the 3 inch gap between dorade boxs and deck skins with all epoxy and core the rest with balsa? or fill whole area with colth and epoxy?

Image

Any thoughts? Never did this before.
Jason K
Boat Obsession Medal Finalist
Posts: 741
Joined: Fri Mar 18, 2005 10:41 pm
Boat Name: Rambunctious
Boat Type: J/30
Location: Mandeville, LA
Contact:

Post by Jason K »

I think you should be able to get away with just thickened epoxy in the area around the pulpit. For the larger spots, I would recommend replacing with balsa. This is a sound construction method, so long as proper care is taken during the installation and the core is protected around fasteners and hardware.

The balsa will come in sheets of balsa blocks attached to a thin scrim that holds the sheets together. Seal the balsa well with lightly thickened epoxy - including between the kerfs - and set into place with a generous layer of thickened epoxy. Weigh the new core down so you have uniform adhesion.

If your top skin is salvageable, you can simply epoxy it back into place - again weigh it down for proper adhesion. You may be able to get away with installing the core and the skin in one step.

Once the new skin is bonded, grind a bevel around the seam formed by your cuts and repair with fiberglass tape.

Prime and paint.


- By the way, I have enough end grain balsa for your project. It's yours for the shipping if you would like it.
- Jason King (formerly #218)
J/30 Rambunctious
http://www.rambunctiousracing.com
User avatar
Tim
Shipwright Extraordinaire
Posts: 5708
Joined: Tue Apr 01, 2003 6:39 pm
Boat Name: Glissando
Boat Type: Pearson Triton
Location: Whitefield, ME
Contact:

Post by Tim »

I'd put some epoxy filler in under at least part of your flange around the dorade boxes, since clearly your water infiltration came from there. Then recore the rest with balsa. The epoxy fller, if consistent and installed well, should protect the new core from the same event occuring again.

The real question, though, is how did that water get in there? There's obviously a pretty clear, significant, and direct route for the infiltration around that whole hatch area. I would encourage you to seek out how this happened, and then do what is necessary to prevent that from continuing.

On a somewhat unrelated note, I'd like to add that I doubt I am alone in my desire to see more general pictures of your boat. The Invicta continues to fascinate and interest me, and you're not showing her off enough! (Never mind that good pictures of Invictas and their details are few and far between on the Internet.)

Yes, it's a bit of a selfish request, but for the greater good of all Invicta and Bill Tripp fans! :<)
---------------------------------------------------
Forum Founder--No Longer Participating
Scout

Post by Scout »

Edited due to misinformation regarding source of leak.

Thank you for the responses. Jason, you are very kind. Would love to take you up on your offer.

What was removed was saved to re use. All this advice is very very helpful, keep it coming.

Tim, we do know how the water came in but not sure how to fix it. It comes from the built in dorade boxes on the forward hatch. The dorade drain holes are flush with the deck, the problem is that the "floor" or bottom of the box is lower then the deck. I think the forward hatch and dorade boxes were installed in a cut-out after the deck was laid out. The whole config is hard to desribe, will take more pictures this weekend to give you all a better understanding.

As for pictures, in general, what would you like to see?

I hear you about the availablility of info and pictures on the internet or anywhere else on Invictas but I hear that Tripp the 3rd is becoming more willing to share. I'm on it!
Last edited by Scout on Fri Feb 16, 2007 11:16 am, edited 2 times in total.
User avatar
Tim
Shipwright Extraordinaire
Posts: 5708
Joined: Tue Apr 01, 2003 6:39 pm
Boat Name: Glissando
Boat Type: Pearson Triton
Location: Whitefield, ME
Contact:

Post by Tim »

SCOUT wrote:Tim, we do know how the water came in but not sure how to fix it. It comes from the built in dorade boxes on the forward hatch. The drain holes are not flush with the deck. Making them flush is not clearly the answer to us, we are worried about the integrity (strength) at that location if we grind those holes down further. The whole config is hard to desribe, will take more pictures this weekend to give you all a better understanding.
OK. Does this mean that the drain holes allow water to sit inside the Dorade boxes? I think some more pictures would help understand the whole situation, and probably get some recommendations for good ways to address it.
SCOUT wrote:As for pictures, in general, what would you like to see?
Anything and everything. Deck, cockpit, interior, engine room, in the water, out of the water...does that cover it? :<)

These boats are so rare that I've never had a chance to inspect one up close, though I have seen one or two on the water. So I would love the chance to see more through photos.
---------------------------------------------------
Forum Founder--No Longer Participating
Scout

Post by Scout »

My better half has informed me that I had it wrong (the source of the leak) so I have edited that post above. We will try to enlighten you all better this weekend.

Tim, you might just want to give me an email address, we have tons of pics, don't want to bore everyone else. Some good before and afters from two years ago when we first got her and spent the winter making the belows a bit brighter.


PS We have this lofty goal of sailing to ME this July, would love to have you on board.
dasein668
Boateg
Posts: 1637
Joined: Thu Apr 03, 2003 9:09 am
Boat Name: Dasein
Boat Type: Pearson Triton 668
Location: Portland, Maine
Contact:

Post by dasein668 »

SCOUT wrote:Tim, you might just want to give me an email address, we have tons of pics, don't want to bore everyone else. Some good before and afters from two years ago when we first got her and spent the winter making the belows a bit brighter.
Post them. No one here will be bored! (That's why we come here, after all...)
User avatar
Tim
Shipwright Extraordinaire
Posts: 5708
Joined: Tue Apr 01, 2003 6:39 pm
Boat Name: Glissando
Boat Type: Pearson Triton
Location: Whitefield, ME
Contact:

Post by Tim »

I also doubt anyone here will be bored, but depending on your photo hosting situation you are more than welcome to send them to me. I'm happy to provide hosting and a bit of effort to make it happen if it helps make it easier for you to post them. I have frequently done (and continue to do) this for others.

I refuse to let Spammers ruin my life, so I don't care if they steal my address from the forum. tim@lackeysailing.com

I know everyone says you shouldn't just post it, but whatever. They get around all the silly "tricks" anyway. We have to live.
---------------------------------------------------
Forum Founder--No Longer Participating
Case
Skilled Systems Installer
Posts: 277
Joined: Sun Jun 05, 2005 9:59 pm

Post by Case »

Tim... delete your email address once Scout replies, hopefully with photographs. I paid the price myself a couple of times so...

Perhaps you've seen this one before. Its rather new, showed up about two weeks ago in Yachtworld. Even though its possible that you may have seen it before, I will post the link to the Pearson Invicta Mark II.

Its not flush decked like the Mark I version so its not as unique but still... rare though.

Pearson Invicta Mark II http://www.yachtworld.com/core/listing/ ... 13544&url=


Not sure how in the hell I can do to hide the rest of the messy url... any pointers on this?

Case
User avatar
Rachel
Master of the Arcane
Posts: 3044
Joined: Tue Dec 07, 2004 7:59 pm

Post by Rachel »

Case,

There may be another way, but what I do is go to www.tinyurl.com You can simply paste the long address in the box and hit "enter" and it will return a tiny url for you to use in the post.

One thing I've never known is whether these expire. Of course if you reference the source in the post, someone else could duplicate the search later on if they wanted to.

Rachel
User avatar
catamount
Candidate for Boat-Obsession Medal
Posts: 378
Joined: Sun Jun 19, 2005 7:30 am
Boat Name: GREYHAWK
Boat Type: Peterson 34
Location: Boothbay Harbor, ME
Contact:

Post by catamount »

Use "code" to embed the long url in a link with short "anchor text" like this:

Pearson Invicta Mark II

Code: Select all

[url=http://www.yachtworld.com/core/listing/boatFullDetails.jsp?boat_id=1659997]Pearson Invicta Mark II[/url]
Also, with yacthworld links, you can usually delete everything after the "boat_id=######" parameter.

Regards,
Tim Allen -- 1980 Peterson 34 GREYHAWK
Harborfields Housekeeping Cottages, West Boothbay Harbor, Maine
Sailors for the Sea, a new voice for ocean conservation
User avatar
Rachel
Master of the Arcane
Posts: 3044
Joined: Tue Dec 07, 2004 7:59 pm

Post by Rachel »

Oh, a much cooler method, Catamount, thanks!

--- R.
Scout

Post by Scout »

Pictures have been duly sent via email. Tim, feel free to post whatever you thing is worthy.

I have spoken with that man that owns that Invicta II. Very sad, his wife can no longer sail due to health. He has done a lot of work on her. It's an end of an era for them.
Scout

Post by Scout »

Here are some pictures of our dorade box drainage problem. Even though the picture taken looking threw the vent hole makes the drain hole seem at the bottom, it is not. It is 3/4 of an inch below the deck.

Our first thought is to "build up the bottom of the dorade box with cloth and epoxy. The drian hole is cut at the lowest point in the box.

I added some pictures of the rest of the project.

Image
Image
Image
Image
Scout

Post by Scout »

Was wondering if building up the inside bottom of dorade baxs was a good ideal, and if so, would mat and epoxy be good for materal? I think sealing the corners with 5200 would solve the problem, except when trapped water freezes in the winter.
Jason K
Boat Obsession Medal Finalist
Posts: 741
Joined: Fri Mar 18, 2005 10:41 pm
Boat Name: Rambunctious
Boat Type: J/30
Location: Mandeville, LA
Contact:

Post by Jason K »

SCOUT wrote:Here are some pictures of our dorade box drainage problem. Even though the picture taken looking threw the vent hole makes the drain hole seem at the bottom, it is not. It is 3/4 of an inch below the deck
I'm not sure I understand. Do you mean that the bottom of the dorade is 3/4" below the deck?
SCOUT wrote:The drian hole is cut at the lowest point in the box.
From the photo below, it looks like the drain hole is not at the lowest point, as the crown of the deck would make the lowest point the outboard edges of the dorade. Is the photo misleading?

Image
- Jason King (formerly #218)
J/30 Rambunctious
http://www.rambunctiousracing.com
Scout

Post by Scout »

Sorry Jason, that the picture does not show the port and starboard facing drain holes. There are two drain holes per dorade. Two on each are facing aft (the ones higher in the box, and what you see in the pictures) and two port and starboard, at the most aft part of the box and level with the deck.

Yes, the bottom of the dorade box is lower then the deck, and at it's lowest level to the drain, about 3/4 of an inch.
User avatar
Tim
Shipwright Extraordinaire
Posts: 5708
Joined: Tue Apr 01, 2003 6:39 pm
Boat Name: Glissando
Boat Type: Pearson Triton
Location: Whitefield, ME
Contact:

Post by Tim »

SCOUT wrote:Was wondering if building up the inside bottom of dorade baxs was a good ideal, and if so, would mat and epoxy be good for materal? I think sealing the corners with 5200 would solve the problem, except when trapped water freezes in the winter.
I think that if you can gain decent access to the inside of the box, building up the bottom so that it's smooth and flush with the drains would be the best approach to truly eliminate the potential for this leakage problem. Several layers of fiberglass and epoxy would be easy enough to do, perhaps with a basic fill and fairing afterwards to make the surface generally smooth and contoured cleanly into the drain locations.

To begin, remove any and all fo that old gunky sealant and other stuff that has been stuck inside the box over the years, and fill all around the edges with thickened epoxy to fill any voids and create a nice barrier. Even if you have to cut the top of the box off, it's probably worth it to do the repair correctly; reglassing and repairing the boxes afterwards won't be too difficult, or you could even cap them with teak or mahogany instead if you preferred.
---------------------------------------------------
Forum Founder--No Longer Participating
Scout

Post by Scout »

Thanks Tim,
I agree that it would best to cut open the top of the dorade box, as you suggested, to gain better access into the box to make a repair job more secure. Most likely the best way to do this job Our problem is that we do not have the experience to re-glass the cut out and we would not want to add more wood and varnish to the maintenance schedule. I also would not want to make more work for the project if I can avoid it without compromising seaworthiness.

That said, doing our best to grind the inside of the box with a Dremel and building up glass cloth in those corners are going to be our best option. I may have to find one to do the work with smaller hands, mine will not fit thru the vent hole.
Scout

Post by Scout »

Well here is were my ignorance shows, I thought end cut balsa came in sheets. When I got my 2X4 sheet of balsa all rolled up, I thought they mistakenly sent me some Japanese blinds all rolled up!

Here is a pic... I am assuming the cloth side goes down. Does anyone here know the best way to cut the stuff?

Image

Jason, thanks for the offer of the balsa, but for the amount I needed, I had to just get some quick and have all my ducks in a row, for when I can start putting this whole thing back together. Thanks again.

I can feel the pull on the sails, until I go down to the boat yard:(

Image
Jason K
Boat Obsession Medal Finalist
Posts: 741
Joined: Fri Mar 18, 2005 10:41 pm
Boat Name: Rambunctious
Boat Type: J/30
Location: Mandeville, LA
Contact:

Post by Jason K »

Just use a utility knife to cut the scrim. Also, you are correct - the scrim side goes on the bottom.

When you install it, be sure you wet it out well with epoxy. That will mean getting it between the blocks as well.

Good luck with the project!
- Jason King (formerly #218)
J/30 Rambunctious
http://www.rambunctiousracing.com
User avatar
Tim
Shipwright Extraordinaire
Posts: 5708
Joined: Tue Apr 01, 2003 6:39 pm
Boat Name: Glissando
Boat Type: Pearson Triton
Location: Whitefield, ME
Contact:

Post by Tim »

It doesn't really matter which side the scrim ends up on on a flat surface. The scrim is only there to hold the individually-cut blocks in place; it's only on one side because this allows the sheet to be applied over a contour, such as a hull surface. With the minor contours of the exposed surface of a finished deck, applying the scrim down will allow the core to flex to the contour if necessary. (In other words: for contours, the scrim needs to be on the concave side of the curve. Whether the scrim is exposed or on the "down" side will vary depending on the curves encountered, and the application.)

One way to ensure good epoxy coverage between the blocks is to drape the sheet over something curved so that the kerfs open up. Then slather some unthickened resin in all the kerfs before installing the core material in the deck with thickened epoxy.
---------------------------------------------------
Forum Founder--No Longer Participating
Scout

Post by Scout »

Update:

Well, we started with the edge of our cutout, the so called 'flange'. We shoved copious amounts of thick stuff in there and then pushed against it with a single strip of wetted balsa last weekend. Brian seems to think we still have some voids on one side based on 'pinging'. So far the discussion has led to drilling some holes and injecting as opposed to starting all over (not knowing how to even attempt to do that without ruining the flange). Any pearls on injecting techniques?

We are going to address the rest of the cavity this weekend...What are the chances of us wetting the balsa, putting it in, putting the skin back on (either in one step or two) and finding the skin is not flush with the rest of the deck? We were talking about potentially sanding down the balsa if needed.

Thoughts? Ideas?
grampianman
Master Varnisher
Posts: 108
Joined: Tue Apr 15, 2003 2:21 pm
Location: South West Florida
Contact:

Post by grampianman »

I did this to my Grampian and by dry fitting as much as possible I was able to keep all surfaces aligned.
I used many different kinds of weights to hold the skin down as it was curing and any excess was squeezed out.

Cheers,
Ian
Grampian-23, Wing & a Prayer
stone
Rough Carpentry Apprentice
Posts: 55
Joined: Tue Dec 13, 2005 6:18 pm
Location: Wilmington,NC

Post by stone »

Do you have to reuse the skins? Why not just lay in new glass? I just threw out all of my old skins and will just lay in new glass on my coach roof.

Image
Post Reply