Aluminum Chainplates

Post photos and descriptions of your ongoing projects here. No project is too big or too small.
Post Reply
User avatar
catamount
Candidate for Boat-Obsession Medal
Posts: 378
Joined: Sun Jun 19, 2005 7:30 am
Boat Name: GREYHAWK
Boat Type: Peterson 34
Location: Boothbay Harbor, ME
Contact:

Aluminum Chainplates

Post by catamount »

A week ago I had my mast pulled for a thorough rig survey by Chesapeake Rigging. I'm now waiting for their report and recommendations, and I have my own list of things I would like to do with the mast and rig now that it is on the ground. I just hope we can get it put back in the boat for less than what I paid for the boat in the first place!

With the mast out, I extracted my shroud chainplates. Here's how they are installed in the boat:

Image

The longitudinal bulkhead (setee back) is a cored-fiberglass structure strongly tabbed to the hull -- it is an integral part of the boat's structure. The chainplate is secured with sixteen 3/8" stainless steel machine screws through the cored-fiberglass bulkhead and an aluminum backing plate.

And here are the chainplates extracted from the boat. They are 45.5" long by 10" wide by 3/8" thick:

Image

And the backing plates:

Image

Here's what it looks like where the chainplates pass through the deck:

Image

The deck in this area is cored with plywood.


Despite a little bit of corrosion here and there, there's still plenty of metal. My main concern has to do with the elongation of the pin holes (mainly for the cap shrouds and the lowers):

Port:
Image

Starboard:
Image

What do you guys think?
Last edited by catamount on Thu Apr 30, 2009 7:36 pm, edited 1 time in total.
Tim Allen -- 1980 Peterson 34 GREYHAWK
Harborfields Housekeeping Cottages, West Boothbay Harbor, Maine
Sailors for the Sea, a new voice for ocean conservation
User avatar
Tim
Shipwright Extraordinaire
Posts: 5708
Joined: Tue Apr 01, 2003 6:39 pm
Boat Name: Glissando
Boat Type: Pearson Triton
Location: Whitefield, ME
Contact:

Post by Tim »

My gut feeling is that the elongated holes are less than a good thing; it's sort of a self-fulfilling prophecy. Once the holes elongate, it allows the potential for more movement of the clevis pins, which tends to elongate the holes further.

Otherwise, those chainplates seem to be in decent shape--a little cleaning, etching, and new paint and they're probably good to go.

That's one major long slot in the deck to seal, though!
---------------------------------------------------
Forum Founder--No Longer Participating
User avatar
catamount
Candidate for Boat-Obsession Medal
Posts: 378
Joined: Sun Jun 19, 2005 7:30 am
Boat Name: GREYHAWK
Boat Type: Peterson 34
Location: Boothbay Harbor, ME
Contact:

Post by catamount »

On another forum, someone suggested inserting bushings for the clevis pins to ride in (i.e. after drilling out the pin holes oversize). Sounds like a good idea to me!

Thanks,
Tim Allen -- 1980 Peterson 34 GREYHAWK
Harborfields Housekeeping Cottages, West Boothbay Harbor, Maine
Sailors for the Sea, a new voice for ocean conservation
User avatar
Tim
Shipwright Extraordinaire
Posts: 5708
Joined: Tue Apr 01, 2003 6:39 pm
Boat Name: Glissando
Boat Type: Pearson Triton
Location: Whitefield, ME
Contact:

Post by Tim »

That is a fine idea. The other thought would be to drill for the next-larger clevis size, if you could modify your chainplates or toggles to match.
---------------------------------------------------
Forum Founder--No Longer Participating
User avatar
catamount
Candidate for Boat-Obsession Medal
Posts: 378
Joined: Sun Jun 19, 2005 7:30 am
Boat Name: GREYHAWK
Boat Type: Peterson 34
Location: Boothbay Harbor, ME
Contact:

Post by catamount »

Hmm .... here are some "back of the envelope" engineering calculations:

My boat has -10 rod rigging, with an ultimate tensile strength of 10300 lbs. If loaded to 50% (e.g. racing margins) that's about 5000 lbs of force being exerted on the clevis pins. A 1/2" diameter pin in a 3/8" thick chainplate presents an effective cross sectional area at the hole of about 0.1875 square inches. That works out to an elongating pressure on the pin hole of about 26,667 pounds per square inch!

With the mushrooming, the width of the chainplates in the area of the hole has increased, let's say to 1/2", so the effective cross sectional area is maybe .25 square inches, and the elongating pressure has dropped to 20,000 psi.

If I drill the pin holes out to 3/4" (and thus bring the chainplates back to 3/8" thick), and put an 1/8" thick bushing around my 1/2" clevis pins, then the effective cross-sectional area at the hole in the aluminum goes to about 0.28 square inches, and the elongating pressure on the pin hole decreases to about 17,778 psi (assuming 5000 lbs tension in the rigging).

Ted Brewer wrote an article in Good Old Boat about metal boats that had some data on the ultimate tensile strength and yield strengths of several metals, including the Aluminum alloys 5086 (hull plating) and 6061 (mast extrusion). The yield strength of 6061 alloy was given as 35,000 psi, but that reduces to only 19,000 psi if welded. (Ultimate tensile strengths were 42,000 psi or 30,000 psi if welded.) The 5086 alloy does a bit better.

Regards,

Tim
Tim Allen -- 1980 Peterson 34 GREYHAWK
Harborfields Housekeeping Cottages, West Boothbay Harbor, Maine
Sailors for the Sea, a new voice for ocean conservation
User avatar
Tim
Shipwright Extraordinaire
Posts: 5708
Joined: Tue Apr 01, 2003 6:39 pm
Boat Name: Glissando
Boat Type: Pearson Triton
Location: Whitefield, ME
Contact:

Post by Tim »

catamount wrote:Hmm .... here are some "back of the envelope" engineering calculations:

My boat has -10 rod rigging, with an ultimate tensile strength of 10300 lbs. If loaded to 50% (e.g. racing margins) that's about 5000 lbs of force being exerted on the clevis pins. A 1/2" diameter pin in a 3/8" thick chainplate presents an effective cross sectional area at the hole of about 0.1875 square inches. That works out to an elongating pressure on the pin hole of about 26,667 pounds per square inch!

With the mushrooming, the width of the chainplates in the area of the hole has increased, let's say to 1/2", so the effective cross sectional area is maybe .25 square inches, and the elongating pressure has dropped to 20,000 psi.

If I drill the pin holes out to 3/4" (and thus bring the chainplates back to 3/8" thick), and put an 1/8" thick bushing around my 1/2" clevis pins, then the effective cross-sectional area at the hole in the aluminum goes to about 0.28 square inches, and the elongating pressure on the pin hole decreases to about 17,778 psi (assuming 5000 lbs tension in the rigging).

Ted Brewer wrote an article in Good Old Boat about metal boats that had some data on the ultimate tensile strength and yield strengths of several metals, including the Aluminum alloys 5086 (hull plating) and 6061 (mast extrusion). The yield strength of 6061 alloy was given as 35,000 psi, but that reduces to only 19,000 psi if welded. (Ultimate tensile strengths were 42,000 psi or 30,000 psi if welded.) The 5086 alloy does a bit better.

Regards,

Tim
Ow.

If this keeps up, I'll have to move this to "Boat Nerdery"! hehe
---------------------------------------------------
Forum Founder--No Longer Participating
dkall
Rough Carpentry Apprentice
Posts: 71
Joined: Fri Dec 30, 2005 8:56 pm
Location: West Central Florida

Just wondering....

Post by dkall »

what a plate of bronze would cost for replacing the chainplates. then out of either bronze or SS create a cutout for the cover piece. You would then if you ever needed to recaulk; not need to remove the chainplate, just the cover, recaulk and then put back in place.

Obviously with the elongation you have another issue and IMHO what has been mentioned will not solve the problem, only cover it up temp. It will still be there. And that would always scare me.
Dave-Westsail 42-Elysium
Summersdawn
Skilled Systems Installer
Posts: 279
Joined: Fri Nov 04, 2005 6:34 pm

Post by Summersdawn »

I would show the chainplates to Chesapeake Rigging before I decided what course of action to take. They may have some good ideas, esp. if they are doing an anlysis on your rigging, they probably have a pretty good idea about the strengths and weaknesses of your rig.
Rick
Summer's Dawn
24 San Juan #380
CharlieJ
Wood Whisperer
Posts: 649
Joined: Fri Aug 19, 2005 7:42 pm
Location: South coast of Texas, Matagorda Bay

Post by CharlieJ »

I don't really know what the fix should be on YOUR boat, but I can tell you this- I sure as hell wouldn't put chain plates back in my boat that had elongated clevis holes in them. Someway or another I'd fix 'em- probably by getting new material and replacing the things. New chain plates are a WHOLE lot cheaper than dumping a mast, I guarantee you!!

Changing up to larger clevis pins opens up an whole chain of problems too- you need a larger turnbuckle because drilling out the hole to fit the larger pin most likely won't leave enough meat in the tangs. If you increase the turnbuckle, then you need to change the lower ends of the shrouds, ad nauseum.

Personally I'd just make new ones and I'd use a separate plate around them, fastened to the deck so they could be caulked under easily.
Jason K
Boat Obsession Medal Finalist
Posts: 741
Joined: Fri Mar 18, 2005 10:41 pm
Boat Name: Rambunctious
Boat Type: J/30
Location: Mandeville, LA
Contact:

Post by Jason K »

My understanding is that such an elongation of the hole can come from an undersized pin. The smaller pin (even one slightly undersized) can create a point load that elongates the hole in the chainplate. Assuming there are no deficiencies in the chainplate itself, that may be something to look for.

Also, I agree with Charlie and dkall - if those were mine, I'd look to replace it. Just the piece of mind factor would be enough for me.

And if you do replace those chainplates, hang on to them: they could make a pretty good emergency rudder :).
- Jason King (formerly #218)
J/30 Rambunctious
http://www.rambunctiousracing.com
User avatar
catamount
Candidate for Boat-Obsession Medal
Posts: 378
Joined: Sun Jun 19, 2005 7:30 am
Boat Name: GREYHAWK
Boat Type: Peterson 34
Location: Boothbay Harbor, ME
Contact:

Post by catamount »

#218 wrote:My understanding is that such an elongation of the hole can come from an undersized pin. The smaller pin (even one slightly undersized) can create a point load that elongates the hole in the chainplate. Assuming there are no deficiencies in the chainplate itself, that may be something to look for.
Well, pins and holes were likely appropriately matched 25 years ago, but stainless pins in aluminum chainplates exposed to abundant salt spray has probably resulted in some loss of the aluminum as aluminum oxide dust, ever-so-slightly enlarging the holes over time and allowing the pins to start working.
#218 wrote:And if you do replace those chainplates, hang on to them: they could make a pretty good emergency rudder :).
Now that's an idea I hadn't thought of! No, I was thinking I would cut them up for deck hardware backing plates.... ;-)

Thanks,
Tim Allen -- 1980 Peterson 34 GREYHAWK
Harborfields Housekeeping Cottages, West Boothbay Harbor, Maine
Sailors for the Sea, a new voice for ocean conservation
Jason K
Boat Obsession Medal Finalist
Posts: 741
Joined: Fri Mar 18, 2005 10:41 pm
Boat Name: Rambunctious
Boat Type: J/30
Location: Mandeville, LA
Contact:

Post by Jason K »

I saw this earlier today and it reminded of this topic and also of the importance of good, strong chainplates:

Image
- Jason King (formerly #218)
J/30 Rambunctious
http://www.rambunctiousracing.com
User avatar
Tim
Shipwright Extraordinaire
Posts: 5708
Joined: Tue Apr 01, 2003 6:39 pm
Boat Name: Glissando
Boat Type: Pearson Triton
Location: Whitefield, ME
Contact:

Post by Tim »

Ow, I hate when that happens!
---------------------------------------------------
Forum Founder--No Longer Participating
CharlieJ
Wood Whisperer
Posts: 649
Joined: Fri Aug 19, 2005 7:42 pm
Location: South coast of Texas, Matagorda Bay

Post by CharlieJ »

Yeah Tim- but the last one I saw like that wound up making us about 5 grand, time I got the boat all repaired for him and Laura painted all new graphics on it!!


Turned out it was a rotted bulkhead, from a leaking chain plate, which had also rotted the deck coring. Of course the other side was almost as bad- by the time I got all the rot cut out, the ENTIRE interior of the boat was laying on the ground outside.

This was on a 22 footer by the way and it most likely wasn't worth over 2 grand, even after being totally overhauled.

Strange part about it was he sailed it four times, then let the boat sit at the dock for 3 years untouched, where it went to hell again.

Sometimes I don't understand people with more money than brains.
MikeD
Candidate for Boat-Obsession Medal
Posts: 375
Joined: Wed Aug 24, 2005 1:42 pm
Boat Name: Totoro
Boat Type: Sea Sprite 23 (#626)
Location: Scarborough, Maine

Post by MikeD »

Sounds like a good opportuntiy for some recurring revenue! See if he wants you to recondition it again. Get a few more "clients" like that, and you're golden. :)
Mike
Totoro (SS23 #626)
CharlieJ
Wood Whisperer
Posts: 649
Joined: Fri Aug 19, 2005 7:42 pm
Location: South coast of Texas, Matagorda Bay

Post by CharlieJ »

ah- no. Made us sick to see the boat sitting there going to ruin. Laura redid all the cushions inside, did a curtain that closed off the Vee berth, and did graphics on the sail cover. In addition to all my work.

We got to where we didn't even want to walk down that section of dock. I love working on and building boats and love having my customers happy with the work I do. Just was discouraged every time I saw the boat. He did finally remove it from the marina. I don't even know if he sold it or if it's sitting at his house- don't want to know either.
Shark
Skilled Systems Installer
Posts: 178
Joined: Thu Apr 17, 2003 4:27 pm
Boat Name: Scoot
Boat Type: Shark 24
Location: Burlington, Ontario
Contact:

Post by Shark »

Year after year I see the same group of what used to be good boats sitting in the back corners of my marina. The owners go on paying hundreds of dollars in storage fees but never use their boats. They also don't sell the boats. I don't get it. I just don't get it.

Lyman
Jason K
Boat Obsession Medal Finalist
Posts: 741
Joined: Fri Mar 18, 2005 10:41 pm
Boat Name: Rambunctious
Boat Type: J/30
Location: Mandeville, LA
Contact:

Post by Jason K »

Agreed - some of these are literally worthless, but they are presumably paying the same slip lease I am. I don't get it either. In some cases, the harbor master pumps out the same sunken eye sore every time there's a hard rain.

Sailboats are an aesthetic. We don't use them because they are fast or economical; they're, of course, not. We use them and devote our time and resources to them because they are things of beauty. Which is probably why it ticks me off so much to see boats rot. I understand that sometimes circumstances lead to, um, deferred maintenance. If that's the case, just give the boat away. I'm sure it'll see much better use as a gift or a donation to, say, a junior sailing program.

Or, worst case scenario, cart the boat off to a dump. Boats aren't meant to be immortal and sometimes, when they are neglected long enough, they die. When that happens, it is time to remove them to keep our harbors looking good and making room for new boat owners. I know our harbor had a 3 year waiting list while hulks rotted in their slips. Stupid, ugly, and wasteful.
- Jason King (formerly #218)
J/30 Rambunctious
http://www.rambunctiousracing.com
Eric
Almost a Finish Carpenter
Posts: 79
Joined: Fri May 27, 2005 2:14 pm
Boat Name: Sophia
Boat Type: Pearson Triton
Location: Sou'west Haba, ME

Post by Eric »

CharlieJ wrote:We got to where we didn't even want to walk down that section of dock.
The ethic expressed here is one of the chief attractions to the Plastic Classic community (if I can be so bold as to suggest that such a thing exists) for me. Waste is rampant in our culture and I often feel like I become invisible whenever I point this out--few are prepared to hear it!

I like to imagine (fantasize?) that caretakers of the Triton and similar classically designed and honestly built boats are attracted to the work at least partly due to the desire to contribute to insuring the continued appreciation of the inherent value in these objects. Such practice seems to spill out into the rest of life and suggests a desire to live lightly and rightly on the land as well as the water. An overgeneralization, purhaps, but to the extent that it applies--thank you!
Sophia, Triton #635
CharlieJ
Wood Whisperer
Posts: 649
Joined: Fri Aug 19, 2005 7:42 pm
Location: South coast of Texas, Matagorda Bay

Post by CharlieJ »

Jason- sadly in our marina here, there is a Triton doing just that. Several years ago I enquired about it, before we got our Meridian, and was told he was "gonna redo it soon" It's still sitting. It isn't in really bad shape- yet- just needs some rerigging and some TLC, but it's soon gonna be in worse shape, and it'll only go down hill.

HATE to see pretty boats go to waste. If it was one of the newer style dime a dozen clorox bottles it wouldn't be so bad.

Oh well- can't save 'em all. We DID salvage Tehani, so that's something.
User avatar
Tim
Shipwright Extraordinaire
Posts: 5708
Joined: Tue Apr 01, 2003 6:39 pm
Boat Name: Glissando
Boat Type: Pearson Triton
Location: Whitefield, ME
Contact:

Post by Tim »

CharlieJ wrote:...he was "gonna redo it soon"...
There are so many good intentions out there. Unfortunately, no boat was ever saved on good intentions alone.
CharlieJ wrote:Oh well- can't save 'em all.
We'll try, though!
Eric wrote:I like to imagine (fantasize?) that caretakers of the Triton and similar classically designed and honestly built boats are attracted to the work at least partly due to the desire to contribute to insuring the continued appreciation of the inherent value in these objects.
Absolutely. Were it not for the inherent value in these designs, no one would bother (which is why you'll never see Hunter 270s being lovingly restored 20 years from now). I think most people who take the not-insubstantial effort to rebuild one of these old classics choose the boat they do for these reasons exactly, among others.
---------------------------------------------------
Forum Founder--No Longer Participating
User avatar
catamount
Candidate for Boat-Obsession Medal
Posts: 378
Joined: Sun Jun 19, 2005 7:30 am
Boat Name: GREYHAWK
Boat Type: Peterson 34
Location: Boothbay Harbor, ME
Contact:

Post by catamount »

OK, my boat ain't no derelict.

Back to my chain plates! My rigger has quoted $1600 to supply and fabricate new chainplates. Given the overall bill to get my mast put back in the boat, I'm somewhat inclined to try getting some Dye Penetrant Testing done on my old ones first, and if there are no cracks, drill them out and bush the pins. (At my suggestion, the rigger would bush the pins on the new chain plates from the get go).

Do you think the typical small town machine shop would be able to do the DPT? Or is this a job that one can DIY?

Thanks,
Tim Allen -- 1980 Peterson 34 GREYHAWK
Harborfields Housekeeping Cottages, West Boothbay Harbor, Maine
Sailors for the Sea, a new voice for ocean conservation
User avatar
Tim
Shipwright Extraordinaire
Posts: 5708
Joined: Tue Apr 01, 2003 6:39 pm
Boat Name: Glissando
Boat Type: Pearson Triton
Location: Whitefield, ME
Contact:

Post by Tim »

They make dye test kits. I've never done it. I guess in the end, whether or not this is a DIY project depends on your own comfort level with the results. Are you getting the full story from the dye test or not? How do you know if you are?

Everything is a DIY project, as long as you are confident in the results. Second-guessing one's own work is an undesirable side effect of self-projects, so be sure you feel comfortable with whatever aspects of any job you undertake. If not, the self doubt will ruin the fun!
---------------------------------------------------
Forum Founder--No Longer Participating
Eric
Almost a Finish Carpenter
Posts: 79
Joined: Fri May 27, 2005 2:14 pm
Boat Name: Sophia
Boat Type: Pearson Triton
Location: Sou'west Haba, ME

Post by Eric »

One local rigger (experienced and successful) told me that the dye just makes a mess and that you can get the same results with patience and a careful eye aided with an inexpensive loupe (I found one at the local darkroom supplier--I think it cost $8).

Beyond this, I think I'd do the strength calculations to reassure myself that the structure was sufficiently overbuilt to compensate for the loss of strength caused by the reduction of material necessary to make room for the bushings and any local work-hardening that may have occured.

You are probably going to spend that $1,600 on the boat--just make sure that you invest it where it is going give you the best return. Good luck!

-- Eric
______________________
Sophia, Pearson Triton #635
windrose
Candidate for Boat-Obsession Medal
Posts: 302
Joined: Mon Nov 24, 2003 8:50 am
Location: Shady Side, MD

Post by windrose »

That quote borderlines on the absurd, IMHO. Do you have a money tree, I need a cutting from it. :-)

My brother in law owns a machine shop and makes all sorts of aluminum and SS parts for boats on Lake Lanier. His work is top notch and he has the ability and equipment to make anything.... his name is Roger Fielden and his phone number is 770 831 9331.
User avatar
Tim
Shipwright Extraordinaire
Posts: 5708
Joined: Tue Apr 01, 2003 6:39 pm
Boat Name: Glissando
Boat Type: Pearson Triton
Location: Whitefield, ME
Contact:

Post by Tim »

Eric wrote:...an inexpensive loupe...
Could you expound upon what that is, exactly?
---------------------------------------------------
Forum Founder--No Longer Participating
User avatar
catamount
Candidate for Boat-Obsession Medal
Posts: 378
Joined: Sun Jun 19, 2005 7:30 am
Boat Name: GREYHAWK
Boat Type: Peterson 34
Location: Boothbay Harbor, ME
Contact:

Post by catamount »

A loupe is a type of magnifying glass, typically used by printers and such. Geologists like myself have our 10x hand lenses. Basically the same thing.
Tim Allen -- 1980 Peterson 34 GREYHAWK
Harborfields Housekeeping Cottages, West Boothbay Harbor, Maine
Sailors for the Sea, a new voice for ocean conservation
User avatar
catamount
Candidate for Boat-Obsession Medal
Posts: 378
Joined: Sun Jun 19, 2005 7:30 am
Boat Name: GREYHAWK
Boat Type: Peterson 34
Location: Boothbay Harbor, ME
Contact:

Post by catamount »

windrose wrote:That quote borderlines on the absurd, IMHO. Do you have a money tree, I need a cutting from it. :-)

My brother in law owns a machine shop and makes all sorts of aluminum and SS parts for boats...
I went to McMaster-Carr to look up pricing for 3/8" thick Aluminum plate, just as a starting point to evaluate the pricing of the materials. My chainplates are 45.5" long by 10" wide; the largest Aluminum plates in the MC catalog are 12" x 24" -- which for "general purpose" 6061 alloy are listed at $264 (or figure $132 per square foot). Between the two of them, my chainplates represent about 8 square feet of material, or figure $800 (at a discounted price of say $100/sq.ft.) for the materials. There's probably at least a day's worth, if not two, of labor for cutting, machining slots, bending, welding, drilling, counter-sinking, pressing bushings in, and then maybe priming and painting, too (not sure if that was included).

(Does your brother-in-law use e-mail? Maybe I could send him PDF drawings, and some photos, if he'ld like to put in a bid.)

Regards,
Tim Allen -- 1980 Peterson 34 GREYHAWK
Harborfields Housekeeping Cottages, West Boothbay Harbor, Maine
Sailors for the Sea, a new voice for ocean conservation
Eric
Almost a Finish Carpenter
Posts: 79
Joined: Fri May 27, 2005 2:14 pm
Boat Name: Sophia
Boat Type: Pearson Triton
Location: Sou'west Haba, ME

Post by Eric »

Tim wrote:
Eric wrote:...an inexpensive loupe...
Could you expound upon what that is, exactly?
Here is a picture of one like mine...

Image

More pictures here. Please don't send me to Boat Nerdery, Tim. I'm really not qualified. Plain Nerdery on the other hand...

-- E
JonnyBoats
Candidate for Boat-Obsession Medal
Posts: 372
Joined: Fri Feb 04, 2005 4:54 pm
Location: Wiscasset, ME
Contact:

Cost of materials

Post by JonnyBoats »

I must be spoiled. The other day I purchased a piece of 18 gague 316L stainless steel that was about 4 x 5 feet. It weighed just under 40 lbs. and at $0.50/lb cost me just under $20. They price all such "scrap" at $0.50/lb including SS plate. Aluminum plate is cheaper.

Unfortunately I haven't yet found a way to get it cut down cleanly into smaller pieces cheaply.
John Tarbox
S/V Altair, a LeComte NorthEast 38
http://www.boatmaine.us
Summersdawn
Skilled Systems Installer
Posts: 279
Joined: Fri Nov 04, 2005 6:34 pm

Post by Summersdawn »

JonnyBoats wrote:Unfortunately I haven't yet found a way to get it cut down cleanly into smaller pieces cheaply.
I use a special blade that fits on a table saw. It is some sort of tough, hard fiber. Stainless is a little slow, and needs some cleaning up afterwards (flashing), but makes beautiful straight cuts. I'll see if I can find a brand name for the blades.
Rick
Summer's Dawn
24 San Juan #380
bcooke
Master of the Arcane
Posts: 2272
Joined: Sat Oct 04, 2003 10:55 pm
Boat Name: Jenny
Boat Type: 1966 Pearson Triton
Location: Rowley, MA
Contact:

Post by bcooke »

Do you think the typical small town machine shop would be able to do the DPT? Or is this a job that one can DIY?
Using a dye penetrant is definitely DIY. Just follow the instructions. Briefly, you clean the material, spray the dye on the area to be tested, wait five minutes for the dye to penetrate the material, wash the dye off with water and do a good job here because this is the part that frustrates most users, then when the surface is pretty clean (hard to get 100% clean but try) spray on the developer. The theory is that the dye will penetrate into cracks that the thicker water can't penetrate and wash out. When the developer is applied it dries to a white powder and wicks the dye out of the crack showing up as a bright stain. If you don't wash the dye off well before you spray the developer, then when you spray the developer you get a big blotch of color instead of fine line where the cracks (if present) are.

The bigger question is how useful the stuff is. If you take your time and do a good job you can get results better than your eye can see alone but the argument is often how much better. Some better stuff is a flourescent that needs a black light to illuminate. It is easier to clean up and shines really brightly if there is a crack present. I think it is called Zyglo or something like that but I might be confusing the name with something else. It has been awhile since I used it. Some shops will have a magnaflux machine which is similar but only works on materials that can be magnetized so no luck with your aluminum chainplates.

Other tests that you could try would be eddy current or ultrasonic. I am not sure where you could have this done. Perhaps a machine shop would have some leads. Those tests are pretty easy too but the machinery is a bit pricey to obtain.
One local rigger (experienced and successful) told me that the dye just makes a mess and that you can get the same results with patience and a careful eye aided with an inexpensive loupe (I found one at the local darkroom supplier--I think it cost $8).
This rigger might be right but it can also be difficult to tell the difference between a surface defect and a crack. This is where the penetrant is useful. You might see something but you won't know if it is a crack or a scratch on the surface but the dye will tell you.

Oddly, I found a magnifying glass/flashlight combination at Radio Shack years ago that works great. You set the unit flat against the material, look through the lens and the internal light illuminates the suface really well. It was a fluke find though and I don't know if you could find something like that there again.
...which for "general purpose" 6061 alloy...
I am getting out of my league here but in my field I generally try to avoid 6061 whenever possible. It is quite strong but is very susceptible to corrosion. If I am thinking correctly 6061 is an aluminum alloy with high levels of magnesium. This stuff is highly corrosive and needs to be very well protected. Unlike pure aluminum, 6061 can easily develop intergranular corrosion or a pitting from the inside which will spread outward and along the length of the material. I use a lot of 2024 or the softer 2017 which is an aluminum/copper alloy and while not quite as strong is a lot less prone to corrosion. I would check with somebody in the marine industry about using 6061. It might be fine but my experience tells me to be cautious.

8 square feet of material sounds like a huge amount of material but I guess if that is what came out then that is what should go in. My little Triton rig uses maybe 1/4 of a square foot of steel for its chainplates. They look puny but I have never heard of a design failure. Corrosion or poor maintenance maybe but not a healthy chainplate failure.

-Britton
bcooke
Master of the Arcane
Posts: 2272
Joined: Sat Oct 04, 2003 10:55 pm
Boat Name: Jenny
Boat Type: 1966 Pearson Triton
Location: Rowley, MA
Contact:

Post by bcooke »

I am getting out of my league here...
I caught myself. I was thinking 7075 aluminum alloy. Disregard that paragraph.

-B.
User avatar
Tim
Shipwright Extraordinaire
Posts: 5708
Joined: Tue Apr 01, 2003 6:39 pm
Boat Name: Glissando
Boat Type: Pearson Triton
Location: Whitefield, ME
Contact:

Post by Tim »

I know virtually nothing about alloys, but do know that 5052 is the alloy used in marine tankage. I don't know about structural work.
bcooke wrote:8 square feet of material sounds like a huge amount of material...
The difference in Tim's Peterson 34 is that the chainplates do not attach to a transverse bulkhead, and pass all the way from the deck, through the cabin (in the open), and to an attachment point lower in the boat. Therefore, the arrangement needs to be more massive since it is essentially a stand-alone component that is not supported over much of its length, and the large size is required to transfer the rig loads successfully to the eventual mounting point. Think of Tim's chainplates as being in essence their own supporting bulkhead, and I think the reason for the overall size becomes more clear.

Small chainplates are strong only when they are completely supported; the puny chainplates on a Triton would never survive without being fully bolted to the bulkhead the way they are.

Also, different rigs are loaded in different ways. A lot depends on the mast section, the type of rigging (rod vs. wire), and the designed intention of the boat. A masthead rig with continuous rod rigging designed for highly-loaded racing, often with the additional strains caused by hydraulic backstays and such (the Peterson 34 fits into this category, at least as originally designed and conceived), requires a much more substantial support arrangement than the lightly loaded, heavy section cruising rig on a Triton, for example.

I think an appropriate footnote to all the good advice given so far in this thread is that in the end, the rig is not a place to mess around. Dye tests and self-inspection are only as effective as the person doing the tests, and if one has any misgivings about their ability to properly diagnose the results, or to repair or modify the existing structures, it is best to play it safe and replace. Of course, most professional riggers are also going to play it safe and recommend replacement over repair or modification, especially if their name and responsibility is on it.

True structural failures are rare in rigging. Most failures, as Britton pointed out, occur because of inappropriate maintenance. Occasionally, a latent defect in one metal part or another causes a failure, but this a much less common cause than inattention or lack of maintenance and repair.
---------------------------------------------------
Forum Founder--No Longer Participating
User avatar
Tim
Shipwright Extraordinaire
Posts: 5708
Joined: Tue Apr 01, 2003 6:39 pm
Boat Name: Glissando
Boat Type: Pearson Triton
Location: Whitefield, ME
Contact:

Post by Tim »

Eric wrote:
Tim wrote:
Eric wrote:...an inexpensive loupe...
Could you expound upon what that is, exactly?
Here is a picture of one like mine...

Image

More pictures here. Please don't send me to Boat Nerdery, Tim. I'm really not qualified. Plain Nerdery on the other hand...

-- E
Ah...so it's one of those magnification things that photographers use to look at slides on a light table. My stepfather uses these. Fancy-dancy name for a simple device!
---------------------------------------------------
Forum Founder--No Longer Participating
dasein668
Boateg
Posts: 1637
Joined: Thu Apr 03, 2003 9:09 am
Boat Name: Dasein
Boat Type: Pearson Triton 668
Location: Portland, Maine
Contact:

Post by dasein668 »

Tim wrote: Ah...so it's one of those magnification things that photographers use to look at slides on a light table. My stepfather uses these. Fancy-dancy name for a simple device!
Fancy perhaps, but much less cumbersome than "one of those magnification things"!
User avatar
catamount
Candidate for Boat-Obsession Medal
Posts: 378
Joined: Sun Jun 19, 2005 7:30 am
Boat Name: GREYHAWK
Boat Type: Peterson 34
Location: Boothbay Harbor, ME
Contact:

Post by catamount »

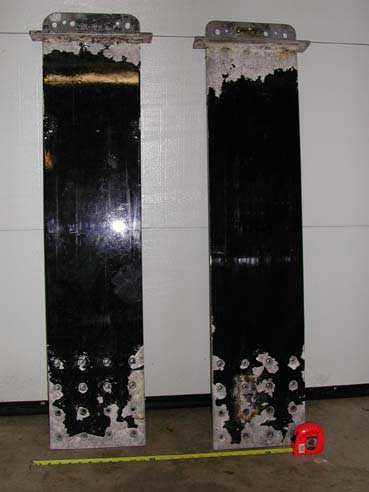
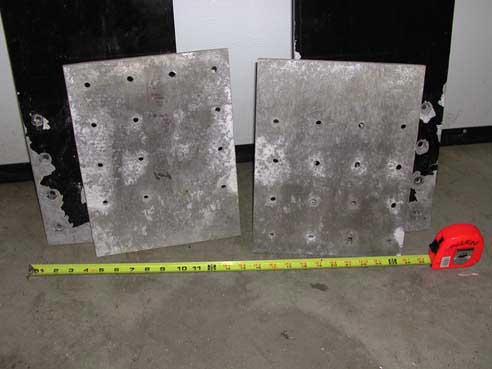
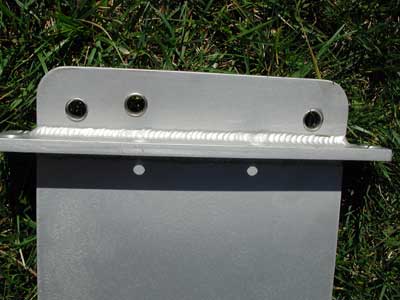
Regarding my estimates for the pricing of the materials for the chainplates, my initial investigation (the McMaster Carr catalog) led to a gross over-estimate. The 4 or so square feet of 3/8 material in each chainplate works out to approximately 20 pounds of Aluminum per chainplate. I found another source selling aluminum plate for $3.65 per pound, so that's about $75 of materials per chainplate (although I can't vouch for the quality this particular source's materials).

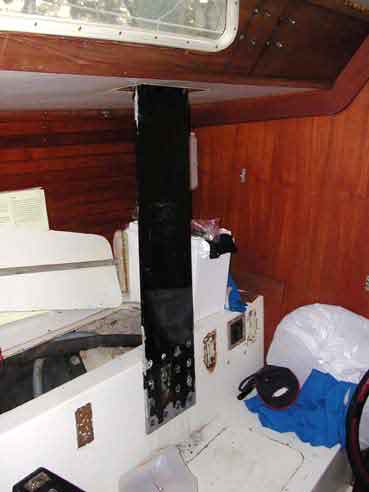
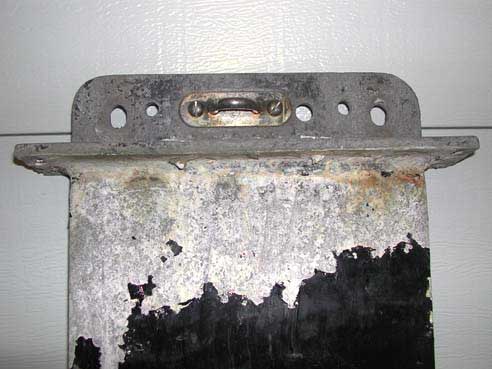
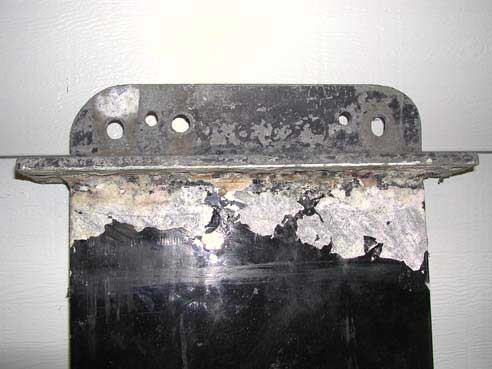
I would really like to thank everyone for their comments and advice. Tim was right on in describing the role of these chainplates in the overall structure of the rig of my boat, and the loading my rig has to support
Tim wrote:I think an appropriate footnote to all the good advice given so far in this thread is that in the end, the rig is not a place to mess around..
Even before reading this, I had decided to go with the "complete package" in the Rigger's proposal. This will include new chainplates, as well as repairing the crack in my mast, replacing all of my rod-rigging (including turnbuckles), servicing the hydraulic cylinders for both backstay and vang, replacing the hydraulic system pressure gauge, adding a shiv-box to the front of the boom for single-line reefing, adding tangs and halyard blocks for a removable inner fore-stay and running back stays, fixing the check stays, installing a Shaefer System 2100 roller furler, replacing two halyards, installing lazy jacks, replacing all of the electrical wiring and installing a new masthead tricolor/anchor light, and prep and painting (Awlgrip) of both spars. Oh, and they're going to put the mast back into the boat and set it all up, too.

(In case you're wondering, although wire is less expensive than rod, and making up wire stays and shrouds is a DIY proposition, switching my rig from rod to wire would have required re-doing all the spreader bases, among other things, which meant that wire rigging would have cost more than new rods. Rod rigging does have the advantages of less weight and windage aloft, less stretch, and the potential for longer life than wire.)

All of this adds up to quite a few pretty pennies (several more than I paid for the boat itself, in fact) -- I'm really going to be scraping the bottom of the barrel to pay for this now (anyone want to buy some sails?). But it is all work that I anticipated would need to be done sooner or later -- I just didn't anticipate doing it all at once! Much of it is work that I could not (and/or would not want to) do myself: welding aluminum, cold-heading the rod rigging, rebuilding hydraulic cylinders... Certainly some of the work I could do myself, including the painting and prep, electical wiring, etc..., but I don't have the mast sitting at home -- it's 450 miles away! Plus, I do have a full-time job, and as my wife points out, she's the one who does all the painting around our house. That, and I really do want to go sailing this summer !-)

Thanks again,
Tim Allen -- 1980 Peterson 34 GREYHAWK
Harborfields Housekeeping Cottages, West Boothbay Harbor, Maine
Sailors for the Sea, a new voice for ocean conservation
User avatar
Tim
Shipwright Extraordinaire
Posts: 5708
Joined: Tue Apr 01, 2003 6:39 pm
Boat Name: Glissando
Boat Type: Pearson Triton
Location: Whitefield, ME
Contact:

Post by Tim »

Well, you'll have a nice, safe, excellent package when all is said and done. Worrying over the rig is not something that makes for relaxing sailing, so I'm sure you'll quickly forget the pain of this expenditure, substantial though it surely is.

Is this going to be done by Chesapeake Rigging? After a fire in a storage building at a local boatyard here some years ago, in which my father lost his stored mast, Chesapeake Rigging supplied the new spars and rigging for his C&C 40--first class stuff, for sure. And my brother used to live in some condos nearly across the street from Chesapeake Rigging in Annapolis, too.
---------------------------------------------------
Forum Founder--No Longer Participating
User avatar
catamount
Candidate for Boat-Obsession Medal
Posts: 378
Joined: Sun Jun 19, 2005 7:30 am
Boat Name: GREYHAWK
Boat Type: Peterson 34
Location: Boothbay Harbor, ME
Contact:

Post by catamount »

Tim wrote:Is this going to be done by Chesapeake Rigging?
Yes.

Although pricey, they apparently have a good reputation. And they're also the only outfit in Maryland listed on Navtec's site as authorized to service Navtec hydraulics.

To think it all started when I approached their booth at the Annapolis Boat Show last fall to inquire about a cheap replacement plastic lens for the hydraulic system pressure gauge..... ;-)
Tim Allen -- 1980 Peterson 34 GREYHAWK
Harborfields Housekeeping Cottages, West Boothbay Harbor, Maine
Sailors for the Sea, a new voice for ocean conservation
kendall
Master Varnisher
Posts: 121
Joined: Thu Nov 17, 2005 9:58 pm
Location: grand rapids mi

Re: Cost of materials

Post by kendall »

JonnyBoats wrote:Unfortunately I haven't yet found a way to get it cut down cleanly into smaller pieces cheaply.
If you or friends expect to be doing that type of work often, pick up an h/v bandsaw, I used to make knives, and with the first stainless blade I started out chaindrilling snapping and grinding, got the metal band saw,(stainless blades are useless though) and it has saved enough time and money that it can sit in the garage forever now, it's paid for.
User avatar
catamount
Candidate for Boat-Obsession Medal
Posts: 378
Joined: Sun Jun 19, 2005 7:30 am
Boat Name: GREYHAWK
Boat Type: Peterson 34
Location: Boothbay Harbor, ME
Contact:

Post by catamount »

catamount wrote:
Tim wrote:Is this going to be done by Chesapeake Rigging?
Yes.

Although pricey, they apparently have a good reputation.
I should probably amend this to say that my rigging consultant at CR really sharpened his pencil quite a lot, and a lot of stuff has been "thrown into" the package. (I suppose one could even say he's paying me to take these new chainplates!)

So here's a plug for Chesapeake Rigging Ltd./Annapolis Spars located at Bert Jabin's Yacht Yard in Annapolis, Maryland.

Regards,
Tim Allen -- 1980 Peterson 34 GREYHAWK
Harborfields Housekeeping Cottages, West Boothbay Harbor, Maine
Sailors for the Sea, a new voice for ocean conservation
windrose
Candidate for Boat-Obsession Medal
Posts: 302
Joined: Mon Nov 24, 2003 8:50 am
Location: Shady Side, MD

Post by windrose »

Tim A

Enjoyed your site on Greyhawk. I noticed you want to make her into a family cruiser.

My old boat was once a race horse too. I eliminated the running backs because it took two folks to jibe the boat. I kept the hydraulic back stay tensioner as it reduces the strain on the rig when not sailing. Ever had running backs? You either love them or hate them. Just a thought.

I'm installing lazyjacks from the openings on the mast that once had the running backs.

Good luck.
Ang
User avatar
catamount
Candidate for Boat-Obsession Medal
Posts: 378
Joined: Sun Jun 19, 2005 7:30 am
Boat Name: GREYHAWK
Boat Type: Peterson 34
Location: Boothbay Harbor, ME
Contact:

Post by catamount »

Ang,

My thought on the running backstays is that under normal conditions they will not be in use, and I will arrange things so that they are out of the way. The running backs would likely only be put into use when I pull out the removalble inner forestay for a heavy weather jib. In which case, I'm likely to have a reefed mainsail, and may well be able to tack or jibe without interference from the running backstays (my boom is relatively short).

I decided to go with an inner forestay supported by runners, rather than a solent stay, because my mast is the "bendy" type and could use the extra support, and also becasue in heavy weather I want to bring the sail area down and in, for which the inner forestay will be slightly more effective than a solent stay.

I hear what you're saying about managing all the lines with a shorthanded cruising crew when performing sailing maneuvers, but I also know that single-handed racers do it all the time. To me it's a matter of designing the cockpit and layout of sail controls to make them all convenient, developing an appropriate sequence of procedures, and then practicing the manuevers so that the procedures become routine.

Regards,
Tim Allen -- 1980 Peterson 34 GREYHAWK
Harborfields Housekeeping Cottages, West Boothbay Harbor, Maine
Sailors for the Sea, a new voice for ocean conservation
windrose
Candidate for Boat-Obsession Medal
Posts: 302
Joined: Mon Nov 24, 2003 8:50 am
Location: Shady Side, MD

Post by windrose »

Sounds like you have thought it through, you can always take them off later on.
User avatar
catamount
Candidate for Boat-Obsession Medal
Posts: 378
Joined: Sun Jun 19, 2005 7:30 am
Boat Name: GREYHAWK
Boat Type: Peterson 34
Location: Boothbay Harbor, ME
Contact:

New Chainplates and the mast is back in the boat!

Post by catamount »

The latest "before and after" photo illustrated report on my Boat Project, involving a rebuild of my mast and rig, is now posted at http://sailing.thorpeallen.net/Greyhawk ... eport.html

For a teaser, here is a picture of the vang attachment point on the "old" mast:

Image

and here is the head end of one of my new chainplates:

Image

Regards,
Tim Allen -- 1980 Peterson 34 GREYHAWK
Harborfields Housekeeping Cottages, West Boothbay Harbor, Maine
Sailors for the Sea, a new voice for ocean conservation
Post Reply