Hi guys.
I was day dreaming earlier, and had an idea. I'm going to be coring my cockpit sole next week and got to thinking that fiberglassing a large flat sheet the same size as the sole to be laminated on a waxed counter, or other flat/true surface. Trim to fit and pre-grind/bevel the edges would allow the panel to be epoxied in place, the corner fillets done and glassed in. 90% of the sole could be dead flat and level from the start, leaving only the hand sanding.
Cut down the glassing, fairing and sanding while standing on ones head down to a minimum.
Something like that would also have been neat glassing in the icebox hatch. Cut it ought, back it up... grind both and glue it in. (Instead of watching it sag down in the middle while rolling out air bubbles...) Small enough radius it'd make a polygon, but a little dab of fairing goo makes that stuff go away. Thin enough sheet of fiberglass, and it'd bend to the contour too. Hmm.
Thoughts? I continue to be plagued by being 4 hours away from the boat and attempting to harness the weekend time slot. Even if I have to work 2 hours thinking and 2 hours working to gain one hours speed there it makes the progress happen faster!
P.S. Any ideas on how to regain the curve of the cockpit sole's corners? Most of the stuff I've done so far hasn't required much symmetry!
Flat fiberglass surfaces...
-
Zach
- Boat Obsession Medal Finalist
- Posts: 684
- Joined: Wed Jan 25, 2006 6:28 pm
- Location: Beaufort, North Carolina
- Contact:
Flat fiberglass surfaces...
1961 Pearson Triton
http://pylasteki.blogspot.com/
1942 Coast Guard Cutter - Rebuild
http://83footernoel.blogspot.com/
http://pylasteki.blogspot.com/
1942 Coast Guard Cutter - Rebuild
http://83footernoel.blogspot.com/

-
Quetzalsailor
- Master of the Arcane
- Posts: 1100
- Joined: Fri Aug 26, 2005 9:53 am
- Boat Name: Quetzal
- Boat Type: LeComte North East 38
- Location: Philadelphia, PA
You can certainly do a layup on a prepared surface. It can be complete, gelcoated and perfect. I have not gone that far but I routinely do core layups where the finished surface is something else, not important, or (only once) ground and finished after the initial layup.
It's an awful business, having done it on our previous boat, but you might consider adding your pre-prepared layup from underneath the cockpit floor; all the tabbing occurs out of sight, you care much less about how it looks, and there's no cleanup.
Having done a perfect layup and decided to install it from the top, you might think of how you could accept not tabbing it in and not having to make the transitions perfect after the installation. I would find it tiresome and uncomfortable, scrunched up and on my knees cleaning up the corners in our relatively small cockpit. You'd have to be confident of the original floor edges doing their job. You'd probably have to accept seeing the thickness of your new floor around the perimeter; it could be seen as a gutter (it would collect dirt); it could be a design feature and look like it was done on purpose.
Rachel's suggestion about checking McMaster Carr is right on target. I don't recall that they have gel-coated sheets or even that the sheets they sell are cast to a perfect finish; certainly the piece I bought was 'globally' flat, but not 'locally' flat. There are sources for finished fiberglass sheets sold for commercial kitchen and toilet room walls; they're under 1/8" thick; some are patterned; some are flat; probably none are gel-coated to exterior use quality.
-
jollyboat
- Candidate for Boat-Obsession Medal
- Posts: 338
- Joined: Wed Mar 29, 2006 11:51 am
- Boat Name: Jollyboat
- Boat Type: Pearson Triton
- Location: Fairfield County, CT
- Contact:
Zach,
The cockpit sole on 466 and that on 346 were not cored. My deck is solid glass that has several lateral stringers that span the width of the deck on the underside. I do not know what you are dealing with on your end, but the radius corners are also solid glass layup. Have you already cut the sole out?
The cockpit sole on 466 and that on 346 were not cored. My deck is solid glass that has several lateral stringers that span the width of the deck on the underside. I do not know what you are dealing with on your end, but the radius corners are also solid glass layup. Have you already cut the sole out?
Last edited by jollyboat on Thu Aug 07, 2008 12:50 pm, edited 1 time in total.
Brian
Jollyboat, Triton #466
Sepi,Triton #346 (1st, Triton)
No Quarter
Jollyboat, Triton #466
Sepi,Triton #346 (1st, Triton)
No Quarter
-
MikeD
- Candidate for Boat-Obsession Medal
- Posts: 375
- Joined: Wed Aug 24, 2005 1:42 pm
- Boat Name: Totoro
- Boat Type: Sea Sprite 23 (#626)
- Location: Scarborough, Maine
If you're going to all that trouble, maybe you should consider making a removable cockpit sole like the Albin Vega or Flickas? Or at least install a hatch...
Mike
Totoro (SS23 #626)
Totoro (SS23 #626)
-
Zach
- Boat Obsession Medal Finalist
- Posts: 684
- Joined: Wed Jan 25, 2006 6:28 pm
- Location: Beaufort, North Carolina
- Contact:
Oops.
I re-read what I wrote and was not clear at all!
What I was trying to say was:
Keep the original cockpit in place, goo in core on top of the sole, goo on pre-finished flat panel and tab in around the perimeter. Then go around to remake the corner fillet with thickened epoxy and hand sand it all to perfection.
The thought being that variations in core thickness and fairness of 90% of the sole would be insignificant in the quality and flatness of the finished product.
Thinking it might speed up the process, rather than having to get the core flat and then glassing over it in place, and finally fairing it out... All working below "floor level."
I'm not brave enough to cut the cockpit out and start from scratch, and to lanky to wedge myself in and work from the underside!
Brian, the underside has stringers on mine as well.
Quetzal, I like the thoughts of a drain. I think I'll put a drain slot across the front so the scuppers are lower than the rest of the sole. Might keep the feet dry too.
The problem that I'm fixing is the flexing of the cockpit. I've been grinding and chasing cracks that squeek and crunch when stepped on. I like quiet as it inspires confidence and feelings of strength. I want it to be solid. (And learn a little about working with balsa prior to ripping into the decks!)
Thanks for your thoughts guys (and Gal... Grin!)
Zach
1961 Pearson Triton
http://pylasteki.blogspot.com/
1942 Coast Guard Cutter - Rebuild
http://83footernoel.blogspot.com/
http://pylasteki.blogspot.com/
1942 Coast Guard Cutter - Rebuild
http://83footernoel.blogspot.com/
-
jollyboat
- Candidate for Boat-Obsession Medal
- Posts: 338
- Joined: Wed Mar 29, 2006 11:51 am
- Boat Name: Jollyboat
- Boat Type: Pearson Triton
- Location: Fairfield County, CT
- Contact:
Zach,
OK - why are you doing this? Again, without pictures it is difficult to be "in the know" with what you are working with. I assume that you have a stock cockpit sole in place now. If this is the case- what has prompted your wanting to modify this.
OK - why are you doing this? Again, without pictures it is difficult to be "in the know" with what you are working with. I assume that you have a stock cockpit sole in place now. If this is the case- what has prompted your wanting to modify this.
Brian
Jollyboat, Triton #466
Sepi,Triton #346 (1st, Triton)
No Quarter
Jollyboat, Triton #466
Sepi,Triton #346 (1st, Triton)
No Quarter
-
Zach
- Boat Obsession Medal Finalist
- Posts: 684
- Joined: Wed Jan 25, 2006 6:28 pm
- Location: Beaufort, North Carolina
- Contact:
Brian,
The cockpit sole flexes under foot, making a lot of squeaking noises. It has cracked in places.
I'm grinding out the cracks, repairing them... and then coring the cockpit sole so it doesn't flex in the future.
Added benefit of being able to easily recess the cockpit scuppers, and make the boat a little bit stiffer in the process.
Lastly, its a fairly symmetrical space of limited size that will give me some time to make things perfect, that will end up under non-skid in the end. (A little bit of practice prior to ripping into the cabin top!)
1961 Pearson Triton
http://pylasteki.blogspot.com/
1942 Coast Guard Cutter - Rebuild
http://83footernoel.blogspot.com/
http://pylasteki.blogspot.com/
1942 Coast Guard Cutter - Rebuild
http://83footernoel.blogspot.com/
-
jollyboat
- Candidate for Boat-Obsession Medal
- Posts: 338
- Joined: Wed Mar 29, 2006 11:51 am
- Boat Name: Jollyboat
- Boat Type: Pearson Triton
- Location: Fairfield County, CT
- Contact:
Well allrighty then. Sounds like you have a plan. The squeaking never really got to me - lots of boats squeak underfoot. I understand your position on this. Sounds like a lot of work. After four years of working my own Triton - with no end in sight and less time now than ever - I am very gun shy about big boat projects. I am very happy with 466 but there have been many times where I wished I bought a Triton that was "done" or I had enough money to pay a proffessional (TIM L.) to just do the job from the start. Having done a restoration on 346 I am at the "lets go sailing" stage of my boating days.
Brian
Jollyboat, Triton #466
Sepi,Triton #346 (1st, Triton)
No Quarter
Jollyboat, Triton #466
Sepi,Triton #346 (1st, Triton)
No Quarter
-
Zach
- Boat Obsession Medal Finalist
- Posts: 684
- Joined: Wed Jan 25, 2006 6:28 pm
- Location: Beaufort, North Carolina
- Contact:
Figured I'd give you guys an update on this one...
Decided to postpone until I figure out if I'm going to put a life raft where the engine used to be or where/if one will go.
Thanks again for your thoughts on the topic!
Zach
Decided to postpone until I figure out if I'm going to put a life raft where the engine used to be or where/if one will go.
Thanks again for your thoughts on the topic!
Zach
1961 Pearson Triton
http://pylasteki.blogspot.com/
1942 Coast Guard Cutter - Rebuild
http://83footernoel.blogspot.com/
http://pylasteki.blogspot.com/
1942 Coast Guard Cutter - Rebuild
http://83footernoel.blogspot.com/
-
triton318
- Master Varnisher
- Posts: 108
- Joined: Mon Oct 08, 2007 3:34 pm
- Boat Name: Dove
- Boat Type: Pearson Triton
- Location: Hayes, VA
I also didn't like the flexing cockpit sole; I thought it was a little too thin. My solution didn't result in a perfect, finished look, but it was relatively easy and not too time consuming. I just epoxied a sheet of plywood to the top of the cockpit sole (I can't remember the thickness--probably 3/8" or 1/2". Then I used fiberglass tape around the edges, fiberglassing the plywood to the sides, coated the top of the wood with epoxy and painted.
But then...I'm sure you've already thought about this solution! :)
But then...I'm sure you've already thought about this solution! :)
Jay
Dove, Pearson Triton #318
Hayes, VA
Dove, Pearson Triton #318
Hayes, VA
-
bcooke
- Master of the Arcane
- Posts: 2272
- Joined: Sat Oct 04, 2003 10:55 pm
- Boat Name: Jenny
- Boat Type: 1966 Pearson Triton
- Location: Rowley, MA
- Contact:
I have the late model Triton with the cored sole but I had to cut out the top skin and recore the whole thing early in the project.
I re-used my skin - I would not do that again- which is basically the same process as using the 'pre-made' sheets. I am not sure you save any time by the time your grind around the edges and add a couple of layers of tape.
As far as being an awkward repair I didn't find it to be a big deal. Use lots of thickened epoxy for the coring. Put a lot of thickened epoxy on top of the core if you are using pre fabricated sheets, lay it in and add the tabbing along the edges afterwards. Then schmear lots of fairing filler along the taped edges and sand carefully. In case you didn't get it, you need lots of epoxy for this project :-)
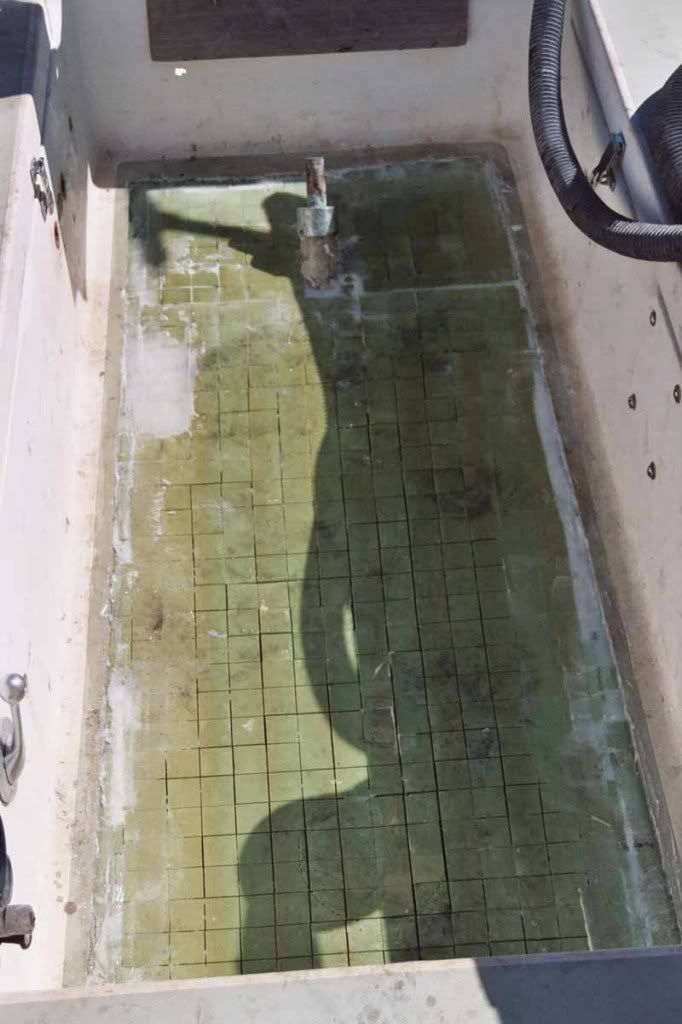
One thing I forgot to do is to support the lower skin when I glued in my core and top skin. I now have a little concave-ness in my sole where the weights I used to push down the coring also pushed the single bottom skin down. Not a big deal by a little annoying knowing that I should have done better.
My understanding is that most of the un-cored cockpit soles flex and make horrible noises. I think adding the coring is a good idea. Its hard to feel confident about your boat when it bends and squeaks under foot.
I just went back and uploaded these photos...
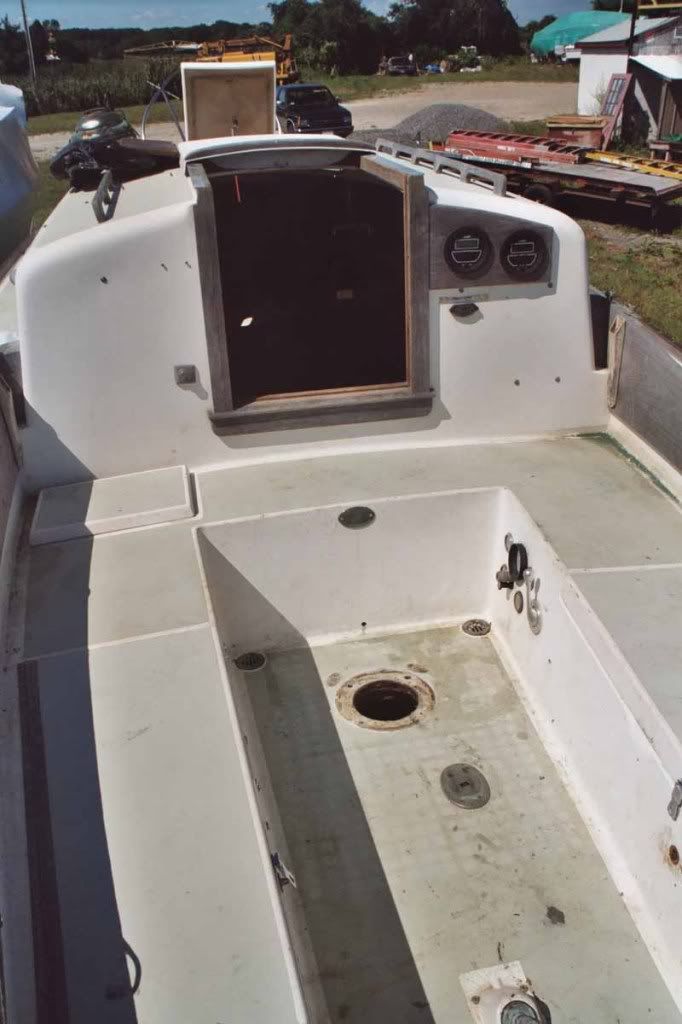
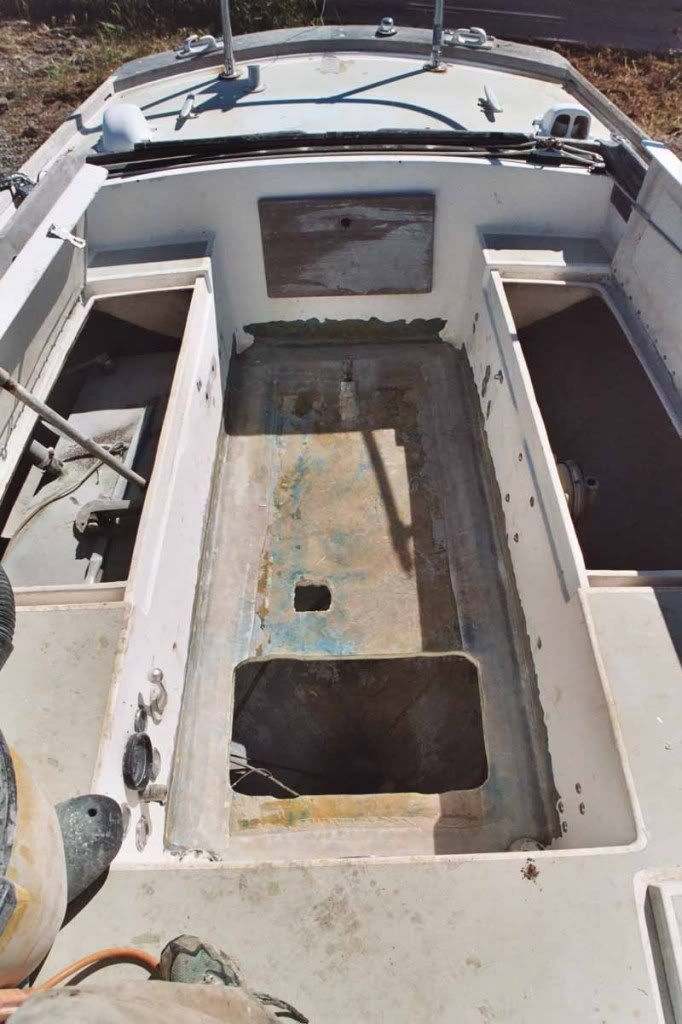
The cockpit before
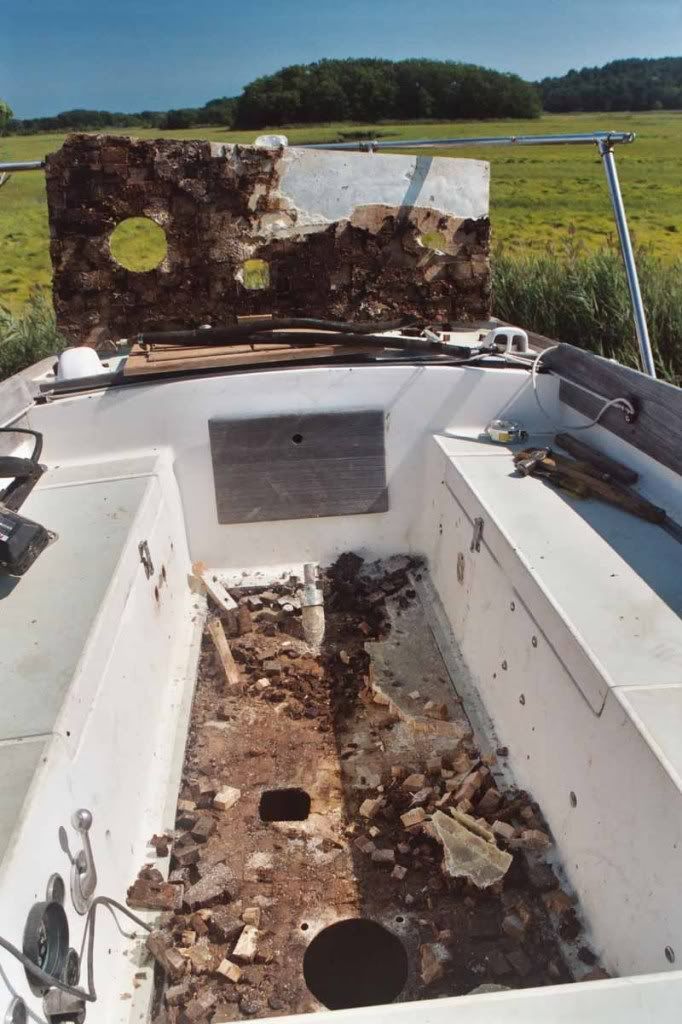
Exposing the rotten core. It really smelled.
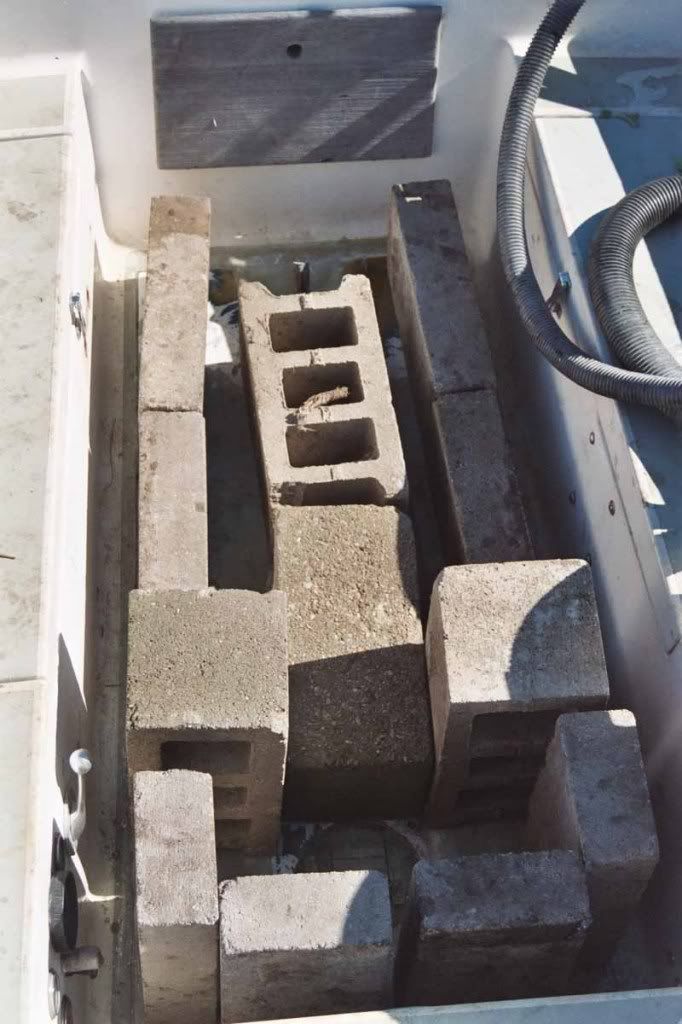
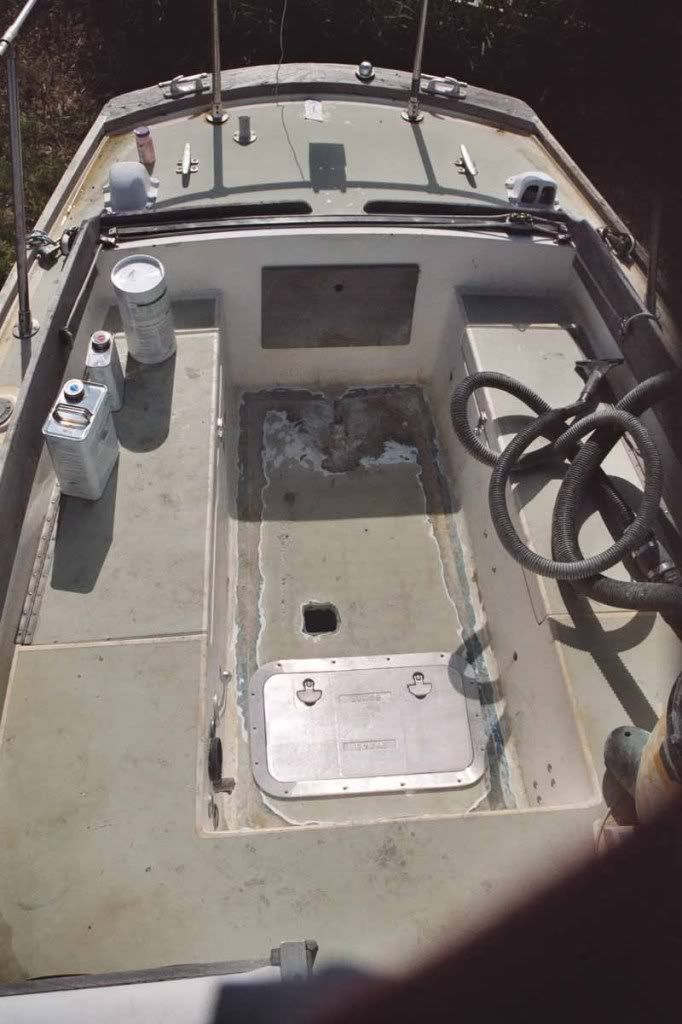
The core glued down. note: it takes a lot of epoxy to fill all those slots in the coring.
Maybe I had too much weight on the top skin and that is why the sole warped?...
Attaching the tabbing. 3 layers of tape.
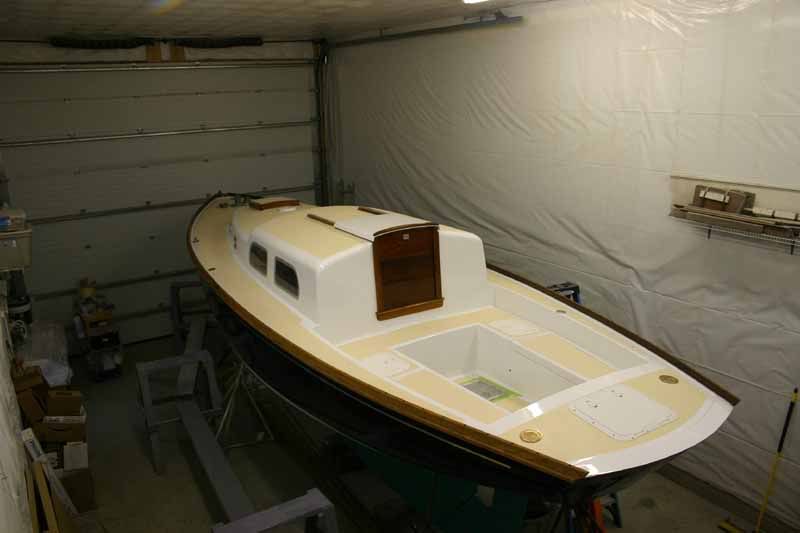
Finished.. for now.
oh, and it looks a little better now.
I re-used my skin - I would not do that again- which is basically the same process as using the 'pre-made' sheets. I am not sure you save any time by the time your grind around the edges and add a couple of layers of tape.
As far as being an awkward repair I didn't find it to be a big deal. Use lots of thickened epoxy for the coring. Put a lot of thickened epoxy on top of the core if you are using pre fabricated sheets, lay it in and add the tabbing along the edges afterwards. Then schmear lots of fairing filler along the taped edges and sand carefully. In case you didn't get it, you need lots of epoxy for this project :-)
One thing I forgot to do is to support the lower skin when I glued in my core and top skin. I now have a little concave-ness in my sole where the weights I used to push down the coring also pushed the single bottom skin down. Not a big deal by a little annoying knowing that I should have done better.
My understanding is that most of the un-cored cockpit soles flex and make horrible noises. I think adding the coring is a good idea. Its hard to feel confident about your boat when it bends and squeaks under foot.
I just went back and uploaded these photos...
The cockpit before
Exposing the rotten core. It really smelled.
The core glued down. note: it takes a lot of epoxy to fill all those slots in the coring.
Maybe I had too much weight on the top skin and that is why the sole warped?...
Attaching the tabbing. 3 layers of tape.
Finished.. for now.
oh, and it looks a little better now.
-
Zach
- Boat Obsession Medal Finalist
- Posts: 684
- Joined: Wed Jan 25, 2006 6:28 pm
- Location: Beaufort, North Carolina
- Contact:
Hey Britton,
Thanks for the pictures and stuff... been a while since I checked this section, and just now saw them!
Zach
Thanks for the pictures and stuff... been a while since I checked this section, and just now saw them!
Zach
1961 Pearson Triton
http://pylasteki.blogspot.com/
1942 Coast Guard Cutter - Rebuild
http://83footernoel.blogspot.com/
http://pylasteki.blogspot.com/
1942 Coast Guard Cutter - Rebuild
http://83footernoel.blogspot.com/