Unless I am mistaken, the original site listed the repairs in a chronological order, but now it seems to be imposible to determine what you did first after hauling her home.
I am interested in seeing how you went about things. I had assumed, for instance, that thru-hulls would be the first thing I did, but it seems you added yours after painting the hull because the bronze ones on the transom are still bronze (not painted).
I am trying to throw together a rough plan for my boat, and had planned to use your work as a guide, though hopefully I will not have to get quite as hardcore!
Right now my boat has NO HARDWARE on it, which I think is a good thing.
My tentative plan is:
1) rebed thru-hulls (there are 5). the existing ones are all bronze balls.
2) replace deck core in 5 areas, only one being very large (2' square). the surveyor said the others could be "injected with epoxy" though I prefer to do it right. Is that considered a "cheap fix?"
3) grind/sand hull imperfections and reputty/sand the hull to prepare for paint.
4) prepare the deck for paint.
5) reattach hardware.
This is a tyro's attempt at organization.
Chronological order of Glissando's restoration?
-
Tim

- Shipwright Extraordinaire
- Posts: 5708
- Joined: Tue Apr 01, 2003 6:39 pm
- Boat Name: Glissando
- Boat Type: Pearson Triton
- Location: Whitefield, ME
- Contact:
There's no real chronological order to the various projects on my site. In general (VERY general), here is how I attacked it:
1. Demolition (interior)
2. Recore/cockpit structural work/fairing/hull fairing and prep
3. Through hulls and engine
4. Interior structure (minimal needed) and rough interior woodwork
5. Toerail
6. Prime/paint hull and deck
7. Interior trim and ports
8. Electrical/Fuel/Plumbing
9. Deck hardware and wooden deck trim
I did install the transom through hulls after painting, but all the others were done long before.
This little list is deceptively innocent. That's nearly 2 years of rather steady work represented there. (minus maybe 3 months total where it was too cold for much of anything).
---------------------------------------------------
Forum Founder--No Longer Participating
Forum Founder--No Longer Participating
-
Jason K
- Boat Obsession Medal Finalist
- Posts: 741
- Joined: Fri Mar 18, 2005 10:41 pm
- Boat Name: Rambunctious
- Boat Type: J/30
- Location: Mandeville, LA
- Contact:
George,
I have recently taken the "short cut" of injecting my deck with epoxy in two areas that needed firming. In fact I haven't finished the job yet as Ijust finished "drilling and filling" on Sunday. The immediate results are fantastic - rock solid. The longevity remains to be seen. I do feel like I took the cheap way out, though I'm OK with that - given my budget, skill set, and intentions for the boat. I'll post another reply in a day or two with my thoughts on the best way to go about the process and some photos if I can figure out how to post them.
I have recently taken the "short cut" of injecting my deck with epoxy in two areas that needed firming. In fact I haven't finished the job yet as Ijust finished "drilling and filling" on Sunday. The immediate results are fantastic - rock solid. The longevity remains to be seen. I do feel like I took the cheap way out, though I'm OK with that - given my budget, skill set, and intentions for the boat. I'll post another reply in a day or two with my thoughts on the best way to go about the process and some photos if I can figure out how to post them.
-
Tim
- Shipwright Extraordinaire
- Posts: 5708
- Joined: Tue Apr 01, 2003 6:39 pm
- Boat Name: Glissando
- Boat Type: Pearson Triton
- Location: Whitefield, ME
- Contact:
Injecting can work fine in small, isloated areas. Numerous small areas or larger areas are indicative of a greater problem at hand, and the spot repair process could quickly get out of hand. It's not a substitute for when recoring is required, but is a good solution to those annoying small areas that crop up from time to time.
But if you are looking to firm up a smaller area, injection is a good way to go in many cases. Ideally, you need to drill a minimum of two holes, about opposite each other, to allow the area to completely fill with epoxy; inject until the epoxy exits the other hole. More holes may be required depending on the size of the area.
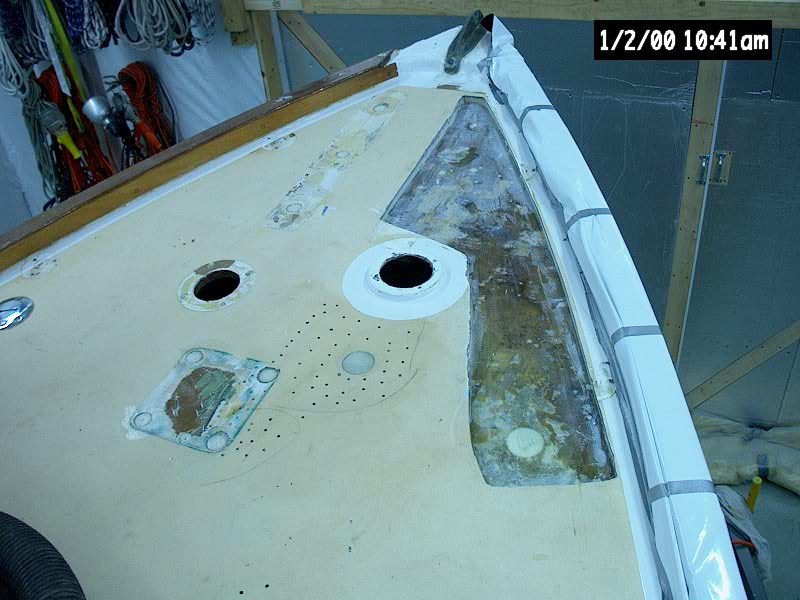
I injected a couple areas on my foredeck last winter. I used multiple holes to ensure that I filled the whole area. Obviously, this many holes requires a new paint job (which I was planning). These areas I filled were not bad enough to require recoring, like the adjacent area in the photo, but needed addressing nonetheless. (Ignore the date stamp on the photo...it's not accurate.)
But if you are looking to firm up a smaller area, injection is a good way to go in many cases. Ideally, you need to drill a minimum of two holes, about opposite each other, to allow the area to completely fill with epoxy; inject until the epoxy exits the other hole. More holes may be required depending on the size of the area.
I injected a couple areas on my foredeck last winter. I used multiple holes to ensure that I filled the whole area. Obviously, this many holes requires a new paint job (which I was planning). These areas I filled were not bad enough to require recoring, like the adjacent area in the photo, but needed addressing nonetheless. (Ignore the date stamp on the photo...it's not accurate.)
---------------------------------------------------
Forum Founder--No Longer Participating
Forum Founder--No Longer Participating
-
Jason K
- Boat Obsession Medal Finalist
- Posts: 741
- Joined: Fri Mar 18, 2005 10:41 pm
- Boat Name: Rambunctious
- Boat Type: J/30
- Location: Mandeville, LA
- Contact:
Mine needed firming in two places - the portside bow section in an area about 2' X 2'. I also needed it portside midships on the deck from about the aft end of the main cabin to the large portlight in the forward part of the main cabin. It took me months to decide on the best route - my concern was that if the epoxy didn't work, then the repair would turn from a really tough job into a nightmare. However, I knew at some level that a recore was really not what I wanted and decided to proceed with the "drill and fill" method. Tim I can almost hear you shudder right now; I know that would not be up to your standards. However, the ?drill and fill? fell within my budget and skill parameters, whereas an actual recore did not.
Here are the steps:
1. I thoroughly cleaned the work surfaces with soap and water followed by acetone.
2. I sanded the area just as if I was prepping for paint (I am, by the way)
3. I drilled a series of 5 mm holes, spaced about an inch apart, trying not to punch through the inner skin. I also cut a series of grooves about six inches long when I got tired of all those little holes. My suspicion was that the grooves would be easier to cut and allow greater access to the rotten core than the small holes ? they do.
4. I then dried the area thoroughly. I accomplished this through a variety of methods. First I used a hair dryer. A heat gun would also work, so long as you?re careful not to overheat the deck. I then attach several lengths of small plastic tubing to a wet/dry vac ? this was met with limited success. Finally, I flushed the area with acetone. The acetone will push the water out and then quickly evaporate (be careful with acetone and heat sources). Time is also a good way to dry it out. However, very frequent rain and high humidity are hallmarks of the New Orleans climate and so I didn?t have a great deal of time to dry the core area before the weather undermined my progress. The more core you can remove first, the easier the drying will be.
5. In order to remove the core I ground it up as best I could with an allen wrench. This is where the grooves were most useful. The grooves afforded plenty of room to access the rotten core. I put the allen wrench into a variable-speed drill and went at it at a lower speed. It brought the core (a lot of it) right out. I was stunned at how well that worked, particularly relative to the holes. I had to the fit the allen wrench into the smaller holes by hand and work it around as best I could. The grooves were much easier.
6. After the holes and grooves were cleaned and dried I prepared the epoxy. I used West System 105 resin and 209 Extra Slow Hardener (it?s fairly hot here). I thickened it with colloidal silica ? filler 406 ? to the consistency of ketchup. I then donned rubber gloves (this is a very messy job) and cut the tips of off several West System syringes.
7. Application: The application is straightforward. Simply fill the syringes with the thickened epoxy and inject it into the holes. The syringes will not suck up the epoxy by placing the tip into the epoxy and pulling the plunger. Rather (this is the messy part), I propped the syringe up into one of the holes and removed the plunger. I then poured the epoxy into the syringe, replaced the plunger, and injected the mixture. When you inject it, move the tip around the hole at as sharp an angle as you can get ? remember, you are filling the core, not just the holes. If you do it right, you?ll see epoxy bubble up from neighboring holes.
8. Finishing: I haven?t done this part yet, but is seems straightforward enough ? just fill, fair, prime and paint.
I hope this helps. I did find the job to be much easier than I anticipated. Actually, that seems to be the case with most of the jobs thus far into the restoration. I do have a couple of pictures; I can email them if you want, though they basically show a bunch of holes in the deck (they look like the photo Tim provided).
If I did the job again, I would use a router and make a series of 6? grooves into the top skin in lieu of a lot of little holes. It is just much easier to remove the core and to fill via the grooves. It also should reduce the likelihood of punching through the bottom skin with your drill. By the way, if one of your holes takes A LOT of resin, you may be filling through one of the inevitable mistake holes through the whole deck. If resin comes through your deck hatches before it comes through the nearest holes, you should stop. ;)