Plywood trim around deadlights

This is the place to post your ideas, thoughts, questions and comments as relates to general boatbuilding and reconstruction techniques and procedures (i.e. recoring, epoxy, fiberglass, wood, etc.)
Post Reply
jhenson
Candidate for Boat-Obsession Medal
Posts: 393
Joined: Mon Jan 17, 2005 9:59 am
Location: Marshall, Virginia

Plywood trim around deadlights

Post by jhenson »

I,m still below decks trying to refine the painted glass surfaces before repainting. I had several people advance some ideas about improving the bare fiberglass interior on Tritons built without interior liners. One idea I have been mulliing over is to apply a 1/4" meranti plywood skin over the doghouse sides around the deadlights and portlights. I guess the look I am shooting for would be something like this on a Cheoy Lee 27:

Image

and


Image


I'd plan on putting a molding above and below the each panel. Could you expect to need through fasteners for these moldings or could you just epoxy them to the sides of the cabin trunk?

The forward cabin trunk in the main salon seems to be the really hard part of this. It has a compound curve that would require steam bending the moldings to get them to conform to the shape of the deck. Still, I think it would look good and greatly reduce the uglyness of the raw glass.
I am planning on a wooden slat cabin sole in the v-berth (and possibly in the salon bookshelves), so the only remaining raw glass areas would be the underside of the decks.

I'd need thicker lexan in the deadlights, but that is probably a good thing. Does anyone have any thoughts on this? Again, I'm just in the planning stages of the interior.
Figment
Damned Because It's All Connected
Posts: 2846
Joined: Tue Apr 08, 2003 9:32 am
Boat Name: Triton
Boat Type: Grand Banks 42
Location: L.I. Sound

Post by Figment »

This actually is something I've considered as well. I've already begun the process (I've milled and cut the pieces) of adding the top and bottom "capture" trim for the purpose of mounting window shades, and applying wood in between seemed like a natural next step. I haven't installed them yet, so I may still get around to doing the ply applique' after all, but.....

I think the real challenge would come when one tried to turn the corner where the cabin side meets the first bump-down of the coachroof. That's a fairly generous radius, so the trim block would be rather substantial and would probably look somewhat clunky.

No immediate solution to the above challenge leapt to mind, so that's where I stopped.

No, I don't think that mechanical fastening would be necessary. Think of it as really really thick wallpaper.
jhenson
Candidate for Boat-Obsession Medal
Posts: 393
Joined: Mon Jan 17, 2005 9:59 am
Location: Marshall, Virginia

Plywood trim around deadlights

Post by jhenson »

Yeah!

That forward section of the coachroof is a real carpentry quandry. I think it can be done, but the angles are very difficult to manage. The plywood isn't the problem, but fitting trim pieces that flow gracefully around these compound curves seems like the real challenge. I am considering leaving the forward sections alone, but that might not look to right. Before I can proceed with this, I have to figure out a way to repair the cut-out for the port aft deadlight which was installed about 2-3 degrees from level at the factory. It will really look bad when the trim pieces are installed above and below it.

Joe
User avatar
Tim
Shipwright Extraordinaire
Posts: 5708
Joined: Tue Apr 01, 2003 6:39 pm
Boat Name: Glissando
Boat Type: Pearson Triton
Location: Whitefield, ME
Contact:

Post by Tim »

jhenson wrote:One idea I have been mulliing over is to apply a 1/4" meranti plywood skin over the doghouse sides around the deadlights and portlights.
I'd go with thinner ply if you can. 1/4" can still be pretty stubborn, and why use more weight than necessary? It you can find a 1/8" or 3/32" ply, that would be better, but 1/4" would be fine in the end too.

I'd recommend using something with a finished surface. Meranti is a structural plywood that can be pretty knarly sometimes, while other sheets look almost finish quality, though the grain tends to be a bit coarse no matter what. I suppose you could pick through the sheets, but why not choose a veneer plywood in the species of your choice? Frankly, there's little need for a special marine ply in this application. An interior grade would be fine for a non-structural installation like this. Just be sure your ports are well-sealed, and well-maintained.

The radiused corners and arched/curved forward portion of the trunk would certainly be a challenge to handle nicely. Offhand, I don't know how you'd handle that--it's definitely a figure-it-out-as-you-go issue once you had the plywood in place and could see how much of a seam you had to cover.

Also, I agree: no need for mechanical fasteners.
---------------------------------------------------
Forum Founder--No Longer Participating
jhenson
Candidate for Boat-Obsession Medal
Posts: 393
Joined: Mon Jan 17, 2005 9:59 am
Location: Marshall, Virginia

Plywood trim around deadlights

Post by jhenson »

Tim,

My preference would be furniture grade mahogany plywood. I was concerned that the deadlights might start to leak (like mine were before I removed them). I know that my soarce for mahogany plywood in this area carries nothing thinner than 1/4". It would be nice to find it in 1/8" for non-structural areas like lining bulkheads.

The transition moldings around the cabin trunk radius might be accomplished by making a curved profile with hand planes (hollows and rounds) and a cabinet scraper out of 10/4 stock. I might try to work these out before hand and rabbet the insides to the thickness of the plywood (if that makes sense). The plywood would then be held in by the rabbets (in addition to being glued to the trunk sides. If I applied some of the moldings before the plywood, would I do so with thickned epoxy?

Thanks again,

Joe
Figment
Damned Because It's All Connected
Posts: 2846
Joined: Tue Apr 08, 2003 9:32 am
Boat Name: Triton
Boat Type: Grand Banks 42
Location: L.I. Sound

Post by Figment »

I don't think there's any need for epoxy in this application. Remember, you're just decorating. Low-grade construction adhesive seems more appropriate. Something that will yield to a prybar, preferably.

We never know when we might want to undo some of our "upgrades". Just ask the people who installed a green toilet in their downstairs bath in 1982.
jhenson
Candidate for Boat-Obsession Medal
Posts: 393
Joined: Mon Jan 17, 2005 9:59 am
Location: Marshall, Virginia

Plywood trim around deadlights

Post by jhenson »

Are you thinking something like "liquid nails"? Moldings that have to take a bend will have enough spring tension on them to require a fairly good bond.

Joe
dasein668
Boateg
Posts: 1637
Joined: Thu Apr 03, 2003 9:09 am
Boat Name: Dasein
Boat Type: Pearson Triton 668
Location: Portland, Maine
Contact:

Post by dasein668 »

How about nice quality veneer. Nice and thin, should conform to the curves pretty well. Install with a quality contact cement.

Just a thought.
User avatar
Tim
Shipwright Extraordinaire
Posts: 5708
Joined: Tue Apr 01, 2003 6:39 pm
Boat Name: Glissando
Boat Type: Pearson Triton
Location: Whitefield, ME
Contact:

Post by Tim »

A good construction adhesive is fine for interior marine use. I would go with the best exterior, premium grade you can find (which will cost you all of $2/tube). You will need to brace the pieces firmly in place while the adhesive cures, but I don't see why it would have any problem holding your moldings in place. I use this stuff regularly now, on interior pieces. It is very strong when cured. Since my nearest and favorite local hardware store is an Ace, I get the Ace brand premium exterior construction adhesive.

That said, if you have the ready supply of epoxy and want the assurance of a firm connection, there's no reason not to use epoxy to secure the moldings. Fortunately, wood glued to fiberglass with epoxy can be removed by splintering away the wood and then removing the remaining epoxy by sanding. Not fun, but do-able. If you were really removing this material at some point in the future, you wouldn't be worried about trashing it in the process. Frankly, any adhesive that actually worked well enough to secure these pieces successfully would not be a treat to remove down the road.

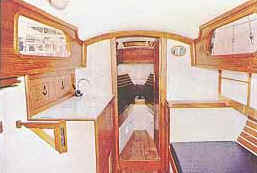
Don't epoxy the plywood to the cabin sides, though. This is most certainly a place for construction adhesive, and then just enough to secure the plywood well around the port openings and to prevent creaking and movement inside the capturing moldings.
dasein668 wrote:How about nice quality veneer. Nice and thin, should conform to the curves pretty well. Install with a quality contact cement.
The problem here is that the cabin sides are rough and uneven (Joe's boat is an early one), so veneer would never work over that sort of surface. If one wanted to veneer over one of the later boats' smooth liner, that would certainly be possible.
jhenson wrote:My preference would be furniture grade mahogany plywood. I was concerned that the deadlights might start to leak (like mine were before I removed them). I know that my soarce for mahogany plywood in this area carries nothing thinner than 1/4". It would be nice to find it in 1/8" for non-structural areas like lining bulkheads.
There is no reason to believe that your well-installed and well-maintained ports are going to leak without your noticing. Note that "well-maintained" means that the ports woudl be rebedded on a regular basis, or certainly at the first sign of the most minor leak. I think people tend to take far too much for granted that everything is going to leak. There is no "install and never look again" possible in any boat, ever. All installations require monitoring and rebedding at some point down the road. Always. There is no forever.

Moisture is a fact of life in the marine environment, but destruction of boat components by moisture is not a guarantee...if proper maintenance and inspection procedures are followed. Boats fall into ruin because of neglect, whether intended or not. Therefore, with a modicum of forethought, careful installation, and vigilent inspection and maintenance going forward, there is no reason to expect that your plywood veneers would be ruined.

1/4" plywood would be fine in this application. I myself don't know of an easy source for anything thinner, but it sounds good to recommend it nonetheless. If thinner could be obtained, it would be the ideal choice, but convenience would take precedence for sure.

One thing you could consider doing around your ports would be to cut the plywood openings a bit larger than the ports, leaving a space that you could fill with a thickened epoxy mixture to seal the plywood. This way, even leaks from the ports couldn't get directly into the plywood laminates. This wouldn't be a huge amount more work in the scheme of things, and would make for a higher-quality installation.

Again, future removal, if desired, would still be possible...but not without some work. I don't think anything that is easily removable (other than with only mechanical fasteners) would hold up under the constant movement of all parts of a boat in relation to one another. Failures of cheap adhesives are commonplace.
---------------------------------------------------
Forum Founder--No Longer Participating
User avatar
Rachel
Master of the Arcane
Posts: 3044
Joined: Tue Dec 07, 2004 7:59 pm

Overhead idea.

Post by Rachel »

Joe,

When you mentioned your overhead dilemma - about how to get a panel or moldings to work on the compound curves of the forward main coach roof - I had a thought (look out!).

I looked at a boat once that had a panel overhead just on the flattest part of the main coachroof. I think it may even have been "suspended" slightly on spacers (1/8" or so). Might have been T & G something, or maybe just a nice piece of ply. The corners were rounded where they stopped just short of the coach-roof sides.

I'm kind of fussy about overheads, yet I thought it looked rather nice. Like it was just openly admitting it was only a panel; but a *really nice* panel :-)

Of course that's just my opinion - and it wasn't even a Triton. In your case, I'm not sure how the coach-roof sides would work into this; I'm trying to remember what that boat had in that area...

FWIW, Rachel
jhenson
Candidate for Boat-Obsession Medal
Posts: 393
Joined: Mon Jan 17, 2005 9:59 am
Location: Marshall, Virginia

Plywood trim around deadlights

Post by jhenson »

Rachael,

I had a recomendation from Nathan on the thread I started on interior paint. Here is the image he posted:

Image

I love the look! I have given this a lot of thought!!

However, my boat has a pronounced dip in the coachroof (just before it turns down) that would have to be leveled so you could torture the panel into shape (since plywood likes to bend in only one direction). Much labor would be involved in this step. It really is a pretty uneven surface.

My other passion in life is making colonial furniture with hand tools. However, I think the three dimensional carpentry with these moldings makes adding overhead panels a complex undertaking.

Incidently, I also love the looks of the bulkheads above. They are either shipslap or T & G. I think they would look great, but would be quite a bit more work.

Though, I love woodworking, I have a mountain of other work I have to consider when designing the interior. Right now, I am doing a little fairing of the undersides of the decks with the hope that I can improve them enough to be satisfied with a painted surface. I haven't ruled out headliners either, although I personally like paint for it's ease of cleaning and renewal. I am heavily leaning towards doing the coachroof sides though.

Thanks for your suggestions! Please keep them coming. These boats have a lot of room for improvement over the factory interior. It's the part of the job I look forward to the most.

Joe
bcooke
Master of the Arcane
Posts: 2272
Joined: Sat Oct 04, 2003 10:55 pm
Boat Name: Jenny
Boat Type: 1966 Pearson Triton
Location: Rowley, MA
Contact:

Post by bcooke »

You really shouldn't show images like that to Triton owners. I would give Nathan's right leg to have that much room on the inside of my boat (as long as the boat remained narrow on the outside).

I too am toying with the idea of tongue and groove on the bulkhead. I was talking yesterday with a plywood dealer about tongue and groove panels. He told me that although they look good when you buy them, after they have had a finish coat applied it is quite common to see where the cuts mimicking the groove go too deep and into the underlying ply, thereby spoiling the look. His recomendation was to to it the old fashioned way. It really is a striking look and if you can justify the effort I think it would look really great.

-Britton
User avatar
Tim
Shipwright Extraordinaire
Posts: 5708
Joined: Tue Apr 01, 2003 6:39 pm
Boat Name: Glissando
Boat Type: Pearson Triton
Location: Whitefield, ME
Contact:

Post by Tim »

Real tongue and groove, or V-match, has the added advantage of being easier to install in place than unwieldy sheets of plywood.

The plywood can look fine, but it takes quite a bit of effort (sanding, priming, painting, and sanding and painting till it's smooth) before it starts to look really good. If you don't need the panel quality of a sheet good, I would recommend sticking with solid wood.
---------------------------------------------------
Forum Founder--No Longer Participating
jhenson
Candidate for Boat-Obsession Medal
Posts: 393
Joined: Mon Jan 17, 2005 9:59 am
Location: Marshall, Virginia

Plywood trim around deadlights

Post by jhenson »

Real tongue and groove, or V-match, has the added advantage of being easier to install in place than unwieldy sheets of plywood.
What would you say the minimum thickness of the stock would be to use solid wood and not worry about stability issues. I don't want to add any wider material to the bulkheads than I have to. For one thing, I am 6'2" tall and every bit helps. It seems like 3/8" would be a minimum.

Once the material was milled, it would be very easy to measure, cut, and apply. Rather than T & G, I think a simple lap joint would make the milling easier on thin stock. The results are lovely when done properly. Here is an H-28 with this used on all the bulkheads.

Image

Image

Also, here is an idea of the vertical molding that would make the turn around the main salon cabin trunk (only it would have to be cut at an angle).

Image

I don't think that I want mahogany everywhere. Seems a little dark for a small boat. Some of the surfaces I plan to cover with luan plywood and paint. How thick is the T &G plywood that is used on the daysailor?

It's exciting to comtemplate the possibilities though, especially when I think about what it looked like when I bought the boat. I sure like what was done with Glissando.

Joe
User avatar
Tim
Shipwright Extraordinaire
Posts: 5708
Joined: Tue Apr 01, 2003 6:39 pm
Boat Name: Glissando
Boat Type: Pearson Triton
Location: Whitefield, ME
Contact:

Post by Tim »

I think 3/8" thickness would be fine, and a good compromise between what might be too thin (1/4") and what would be too thick (3/4"). Actually, whatever true width you could acheive by resawing a standard 3/4" board in half would probably be fine--it would end up around 5/16 or a little more, depending.

A simple lap joint would be fine--it would give you the coverage needed to allow for board expansion and shrinkage, and if you milled a nice bead or v-groove detail at the joints it would look very nice.

I like lots of wood below, but there is usually a stopping point. I think lots of dark wood, like mahogany or cherry (dark being a relative term) looks great on bulkheads, settees, and furniture-type joinerwork, but it's nice to have the light overhead and cabin trunk sides, much like that Hans Christian picture posted earlier.

The Triton cabin is light enough, with its small size and huge deadlights and hatch, that the amount of white, if you were to leave the entire overhead and trunk sides white, could still leave you with a cold feeling. Therefore, some additional wooden trim would be nice to tone these areas down. If you put white-painted ply on your cabinsides, held in with varnished moldings top and bottom, that would be sharp. On Glissando, the whiteness is toned down nicely by the addition of those cherry wood blinds that we installed, but without them installed it seems a bit too stark.

You could make that huge curved corner block easily enough out of a series of smaller pieces glued together in a rough arc (on the vertical access), if you didn't want to use a solid chunk of wood to carve from. Once the pieces were laminated together, it's be pretty easy to sand and chisel out the waste and acheive the pleasing curve you wanted. Something like this could be made with offcuts from other projects.

The interior work on a Triton is one of the funnest parts. The Triton makes an excellent "blank canvas" from which to work; the possibilities are endless. A warm, wood-filled interior sure makes all the difference, I think.

Oh, the beadboard plywood I have been using is 11/32" in thickness.
---------------------------------------------------
Forum Founder--No Longer Participating
kendall
Master Varnisher
Posts: 121
Joined: Thu Nov 17, 2005 9:58 pm
Location: grand rapids mi

I know it's an ancient post, but...

Post by kendall »

I do trim work all the time, and the best way I know of for trimming curves is to use raw stock ripped down as thin as you can go, I normally rip to 1/4 maybe 3/16 or so, then run them through a planer (mine only goes to 1/8 'as-is' , doublesticking a bit of formica to the bed lets you go thinner) wax the surface very heavily (johnsons paste wax, or stick some wax paper up there) glue the pieces together then press them in position while still wet, braced and clamped till they dry, for braces use a length of conduit with a bolt, nut and washer in the end, washer against the conduit, bolt and nut just stuck in the washer, place the conduit against a suitable rest (scrap block under it at both ends, these 'clamps' are handy in thousands of uses) adjust clamping force with the nut and bolt, let it dry then when it's ready use a router to make it match the rest of the trim (helps matching if you make all the trim with the same router bit, sometimes MUCH cheaper too)

you can't make heavy double curves this way, but you can make some that are sharp in one direction and gradual in the other, (double is one that transfers directly from one plane into another, as opposed to a compound that curves on multiple planes at once, which can -normally- be treated as a single curve.

Matching the glue used with the wood will make it almost impossible to see, and making the laminations run with the grain helps too, for dark wood/stain use dark glue, not an issue if you use stainable glue

you can use strips of wood and 'strip canoe' the field instead of using plywood, a very effective and fast, 'labor cheap' way of covering a large area Use wider strips on flatter areas, and thinner strips where the curves are heaviest, grain matching will give a very nice appearance with very little scrap. Needs solid wood not ply as you will have to sand it smooth afterwards to get rid of the rogh seams

veneer can be applied direct to the liner, but it's up to 4 times more expensive as using wood ripped to thinner sections and applied. You can practice with strips of card stock and cover a large plastic bowl (inside of a bathtub works great if you have the OK) to get the whole thing down pat. the only real tools you need for the installation are a hand plane, sanding blocks, and maybe a stapler if you follow the real strip built routine. get a rubber sanding block and put the paper in 'wrong' (over the curved back) for the inside curves

Did a few buildings (hospitals/churches) with heavily curved walls and ceilings in wood and that's the method I've used, one was a ten foot dome in wood with everything radiating from center, turned out very nice.

Ken.
Curmudgeon
Deck Grunge Scrubber
Posts: 48
Joined: Fri Apr 11, 2003 1:22 pm
Location: Land-locked Calgary, Alberta, Canada

Post by Curmudgeon »

I know that my soarce for mahogany plywood in this area carries nothing thinner than 1/4". It would be nice to find it in 1/8" for non-structural areas like lining bulkheads.
A good source of thinner mahogany ply can be had by buying door skins. They come in a size appropriate to cover one side of a door and a thickness of about 1/8". They're inexpensive and should be available at most decent lumber supplies. I suspect they come in other typical 'door' wood varieties like oak and cherry.
Allen
Candidate for Boat-Obsession Medal
Posts: 349
Joined: Tue Apr 05, 2005 5:26 pm
Location: On the move
Contact:

Post by Allen »

Tim wrote:
dasein668 wrote:How about nice quality veneer. Nice and thin, should conform to the curves pretty well. Install with a quality contact cement.
The problem here is that the cabin sides are rough and uneven (Joe's boat is an early one), so veneer would never work over that sort of surface. If one wanted to veneer over one of the later boats' smooth liner, that would certainly be possible.
Tim, if the rough surface is an issue, why couldn't you use a bondo like material to fill and finish it so you could use veneer and have the smooth surface you need?

Another thought relative to the compound curves is why not just eliminate them? Why couldn't you bring the laminate out to the point where you can make an angle connection then use some modified 1/4 round stock to seal the edges. You could add a few triangular supports behind this area which could be formed to fit the curve behind them. It would also offer a nice place to run wiring and you could put in some access points for getting at this wiring.
Allen
SV KAHOLEE
Triton #158

Click Here for Position

Image
dasein668
Boateg
Posts: 1637
Joined: Thu Apr 03, 2003 9:09 am
Boat Name: Dasein
Boat Type: Pearson Triton 668
Location: Portland, Maine
Contact:

Post by dasein668 »

Tim wrote:The interior work on a Triton is one of the funnest parts.
Penalty!
User avatar
Tim
Shipwright Extraordinaire
Posts: 5708
Joined: Tue Apr 01, 2003 6:39 pm
Boat Name: Glissando
Boat Type: Pearson Triton
Location: Whitefield, ME
Contact:

Post by Tim »

Allen wrote:...if the rough surface is an issue, why couldn't you use a bondo like material to fill and finish it so you could use veneer and have the smooth surface you need?

One certainly could do just that, but it would be a lot of work. The problem with veneer is that the substrate needs to be really fair and smooth to ensure proper adhesion, and to prevent voids (which will likely allow the veneer to crack or break upon impact or touching). So I guess one needs to evaluate the practicality of such extensive fairing to the substrate in order to apply veneer.
Allen wrote:Why couldn't you bring the laminate out to the point where you can make an angle connection then use some modified 1/4 round stock to seal the edges.
One absolutely could. In fact, it's been done on a Triton before. Somewhere I have some pictures of a Triton where the interior was finished in much this manner. I'll see if I can locate them.

I think it would be more time-effective to go with this sort of route in order to hide the unevenness of the raw laminate. The original question dealt more with hiding the flaws, rather than essentially needing to fix them. Certainly a 1/8" or 1/4" material might be the easiest way, if one wanted to sort of "square off" the corners and so forth.

All the fairing and such required for a smooth paint job or veneer application would be quite nasty, and very time consuming to do well.
---------------------------------------------------
Forum Founder--No Longer Participating
User avatar
Tim
Shipwright Extraordinaire
Posts: 5708
Joined: Tue Apr 01, 2003 6:39 pm
Boat Name: Glissando
Boat Type: Pearson Triton
Location: Whitefield, ME
Contact:

Post by Tim »

dasein668 wrote:
Tim wrote:The interior work on a Triton is one of the funnest parts.
Penalty!
OK, I'm missing something...?
---------------------------------------------------
Forum Founder--No Longer Participating
dasein668
Boateg
Posts: 1637
Joined: Thu Apr 03, 2003 9:09 am
Boat Name: Dasein
Boat Type: Pearson Triton 668
Location: Portland, Maine
Contact:

Post by dasein668 »

Tim wrote:
dasein668 wrote:
Tim wrote:The interior work on a Triton is one of the funnest parts.
Penalty!
OK, I'm missing something...?
My grammar school lessons say "funnest" t'aint a word, yo! hehe

Just ribbin' ya, as usual.
User avatar
Tim
Shipwright Extraordinaire
Posts: 5708
Joined: Tue Apr 01, 2003 6:39 pm
Boat Name: Glissando
Boat Type: Pearson Triton
Location: Whitefield, ME
Contact:

Post by Tim »

Boy, getting used for a 6 month-old post! No slack whatsoever...hehe
---------------------------------------------------
Forum Founder--No Longer Participating
Post Reply