Cockpit Sole Inspection Hatch
-
Bill Kane
Cockpit Sole Inspection Hatch
I have a 1971 Bristol 30. Access to the steering quadrant and rudder post stuffing box is almost impossible. I am thinking of installing a small aluminum inspection hatch in the cockpit sole, forward of the wheel pedestal. Looking for advice on whether this is a sound idea.
-
David
Hi Bill,
I have a 71 Bristol 29 and have considered installing a cockpit access hatch as well. I have searched for such an animal that would be unobtrusive, yet watertight and seaworthy and can only find plastic flush hatches. Have you found something in aluminum that would work?
Best regards,
David
I have a 71 Bristol 29 and have considered installing a cockpit access hatch as well. I have searched for such an animal that would be unobtrusive, yet watertight and seaworthy and can only find plastic flush hatches. Have you found something in aluminum that would work?
Best regards,
David
-
Bill Kane
Cockpit Sole Inspection Hatch
Hi David. Hamilton Marine in Maine has a good selection of heavy duty aluminum inspection hatches. They may be reached at www.hamiltonmarine.com or 1-800-639-2715.
Bill Kane[/b]
Bill Kane[/b]
-
David
I like the Hamilton hatches you reference. Looks like it would be all but flush and assuming it sealed properly would give great access to the rudder stuffing box, etc. I think the 14X18-inch model would work well for me.
Some zine chromate and some paint and you would hardly notice it. I use Dri-Deck panels in my cockpit so it would really be invisible under them. Thanks for the info...
Some zine chromate and some paint and you would hardly notice it. I use Dri-Deck panels in my cockpit so it would really be invisible under them. Thanks for the info...
-
Tim

- Shipwright Extraordinaire
- Posts: 5708
- Joined: Tue Apr 01, 2003 6:39 pm
- Boat Name: Glissando
- Boat Type: Pearson Triton
- Location: Whitefield, ME
- Contact:
Yup, those Bomar and/or Anchor Hatches from Hamilton are the way to go for cockpit hatches. They're pricey, but will really do the trick. The plastic ones are more or less worthless.
I recommend you choose one that is larger than you need. You'll never regret a large one, whereas you might wish for more room if you install a smaller one. The Tempress plastic hatch I have (which I intend to replace with one of those nice Anchor hatches) is 13x23, and is a good size for easy access. Something smaller would be just OK, but why not have as large as possible (within reason, of course)? The aluminum hatches are very strong and will not adversely affect your cockpit structure when installed.
I like the size availability of the Anchor Hatches versus the Bomar aluminum hatches--plus, they have the added benefit of being slightly less expensive.
Flush Hatches by Anchor Marine
---------------------------------------------------
Forum Founder--No Longer Participating
Forum Founder--No Longer Participating
-
Ray Henry
Plastic hatches
I was just about to put a plastic flush hatch in my cockpit sole. Now I am wondering...
What is so bad about the plastic ($40. vs. $300.) vs. the aluminum. I DID plan to reinforce the cockpit sole to make up for the loss in strength.
Help!
What is so bad about the plastic ($40. vs. $300.) vs. the aluminum. I DID plan to reinforce the cockpit sole to make up for the loss in strength.
Help!
-
Tim
- Shipwright Extraordinaire
- Posts: 5708
- Joined: Tue Apr 01, 2003 6:39 pm
- Boat Name: Glissando
- Boat Type: Pearson Triton
- Location: Whitefield, ME
- Contact:
Plastic hatches tend to seal poorly, which allows water in, and are also fimsy enough that they bend when stood upon. If ultimate watertightness isn't an issue, and you can live with some minor flexing underfoot, and are not planning on offshore voyages, then the Tempress hatch may fit the bill.
The only relatively decent plastic hatch I found was the Tempress model that I have in Glissando. It is much stronger than the terrible Bomar plastic hatches that some people use (which, by the way, are only intended for access into vertical storage areas).
The Tempress hatch is just OK, but is still pretty light duty. But it is much stronger than other plastic hatches, as it is designed for use on a cockpit sole. If the area in which it is installed is not abslutely flat, the supposedly watertight seal will not operate properly, and the hatch will leak, which can get aggravating. Of course, the area will have to be flat for an aluminum hatch to work properly also, but these commercial grade aluminum hatches are many steps above, and are truly watertight. Trust Hamilton Marine's claims on the performance of these hatches--they don't make claims unless they have been proven in their own use.
(Background: Wayne Hamilton, founder/owner of Hamilton Marine, is also in to just about any and everything up in Searsport, ME, not the least of which is being the Searsport Harbormaster and Penobscot Bay Pilot. His boat, which is prominently featured in a number of the Hamilton Marine catalog pages, is an impressive, overbuilt test platform for much of the gear sold in the catalog. Also note that Hamilton Marine began its existence 26 years ago catering to commercial and fishing accounts, and still cater strongly to these groups--people whose lives can depend on this equipment to preform as advertised.)

The Tempress hatch has served me adequately, but I look forward to upgrading. Whether or not it's this winter remains to be seen at the moment, but it will happen. I wrestled with the same cost issue several years ago, and decided on the plastic hatch. With 20/20 hindsight, I would not make the same move again.
The only relatively decent plastic hatch I found was the Tempress model that I have in Glissando. It is much stronger than the terrible Bomar plastic hatches that some people use (which, by the way, are only intended for access into vertical storage areas).
The Tempress hatch is just OK, but is still pretty light duty. But it is much stronger than other plastic hatches, as it is designed for use on a cockpit sole. If the area in which it is installed is not abslutely flat, the supposedly watertight seal will not operate properly, and the hatch will leak, which can get aggravating. Of course, the area will have to be flat for an aluminum hatch to work properly also, but these commercial grade aluminum hatches are many steps above, and are truly watertight. Trust Hamilton Marine's claims on the performance of these hatches--they don't make claims unless they have been proven in their own use.
(Background: Wayne Hamilton, founder/owner of Hamilton Marine, is also in to just about any and everything up in Searsport, ME, not the least of which is being the Searsport Harbormaster and Penobscot Bay Pilot. His boat, which is prominently featured in a number of the Hamilton Marine catalog pages, is an impressive, overbuilt test platform for much of the gear sold in the catalog. Also note that Hamilton Marine began its existence 26 years ago catering to commercial and fishing accounts, and still cater strongly to these groups--people whose lives can depend on this equipment to preform as advertised.)
The Tempress hatch has served me adequately, but I look forward to upgrading. Whether or not it's this winter remains to be seen at the moment, but it will happen. I wrestled with the same cost issue several years ago, and decided on the plastic hatch. With 20/20 hindsight, I would not make the same move again.
---------------------------------------------------
Forum Founder--No Longer Participating
Forum Founder--No Longer Participating
-
Brian
I've been looking into this as well. The Bomar hatches were recommended to me, and I am going to go with one. Here's two installations of them on Ericson E31's.
They can be found at Pompanette.
Brian
Camelot E31
Monroe Harbor - Chicago


They can be found at Pompanette.
Brian
Camelot E31
Monroe Harbor - Chicago
-
Brian
-
Figment
- Damned Because It's All Connected
- Posts: 2846
- Joined: Tue Apr 08, 2003 9:32 am
- Boat Name: Triton
- Boat Type: Grand Banks 42
- Location: L.I. Sound
A buddy of mine built himself a new lobsterboat last year, and used a few of those metal bomar hatches in the deck. I admiringly commented on their bulletproof appearance once over the summer. His response was something to the effect of "those things F#&*ing suck! I'm constantly stumbling over them, you can fry an egg in the sun, and there's no end to the crap that collects down in those pockets! I think maybe over the winter I'll build some recessed boxes in the deck for them so I can fit a cover and have a flush deck...."
and this is on a WORKING LOBSTERBOAT, folks.
I certainly see the utility of having one of those in the cockpit sole, but for me, building a teak cockpit grate would become a priority, both for aesthetics and for barefoot comfort.
and this is on a WORKING LOBSTERBOAT, folks.
I certainly see the utility of having one of those in the cockpit sole, but for me, building a teak cockpit grate would become a priority, both for aesthetics and for barefoot comfort.
-
David
I would hate to be in a seaway and have to open either of those hatches and have the tops whanging around in the cockpit. Seems to me you'd have to build some type of mechanism to hold it secure and out of the way. They do look solid and with a teak grating over them either might work just fine.
David
David
-
Tim
- Shipwright Extraordinaire
- Posts: 5708
- Joined: Tue Apr 01, 2003 6:39 pm
- Boat Name: Glissando
- Boat Type: Pearson Triton
- Location: Whitefield, ME
- Contact:
I just bit the bullet and finally bought a nice cast aluminum flush hatch by Bomar to replace my Tempress hatch of (approximately) the same size. I've been talking about this for years. The Bomar is a fine looking unit--industrial, but not as industrial as those serious commercial hatches seen a few posts up.

The hatch cover, while not hinged, is light and small enough that I don't think keeping it under control in severe conditions, if removal were warranted, would be too difficult.
Despite my thinking earlier in this thread about the Anchor Marine hatches, I discovered that there simply wasn't an Anchor Marine hatch that had dimensions close enough to the existing plastic hatch I had. The Bomar I bought is identical in one cutout dimention and one inch larger in the other, so modification of my opening in the sole will be easy.
I just received it, and installation is pending. Check out more details at this link.
Bomar Aluminum Hatch Installation
---------------------------------------------------
Forum Founder--No Longer Participating
Forum Founder--No Longer Participating
-
bcooke
- Master of the Arcane
- Posts: 2272
- Joined: Sat Oct 04, 2003 10:55 pm
- Boat Name: Jenny
- Boat Type: 1966 Pearson Triton
- Location: Rowley, MA
- Contact:
Just reviewing some old posts. I could have avoided posting several quesitons if I had only spent more time sifting through these.
Tim, did you paint your hatch cover or does the bare aluminum hold up pretty well? Paint would make it blend in better, bare metal just has that manly robust look to it.
-Britton
Tim, did you paint your hatch cover or does the bare aluminum hold up pretty well? Paint would make it blend in better, bare metal just has that manly robust look to it.
-Britton
-
Tim
- Shipwright Extraordinaire
- Posts: 5708
- Joined: Tue Apr 01, 2003 6:39 pm
- Boat Name: Glissando
- Boat Type: Pearson Triton
- Location: Whitefield, ME
- Contact:
I did not paint the hatch. Someday, I will build a nice teak cockpit grating to cover everything, but the hatch doesn't bother me as is. It's not as if anyone can see it down in the cockpit well. If it were on the foredeck, I would take pains to hide it. (But then, that would be weird having it on the foredeck anyway!) They do make a painted version (white). And of course you could paint it yourself, but I bet it would end up getting scarred through normal use and openings and closings, which might draw more attention to it than leaving it raw. All the painted hatches I saw in stock at Hamilton Marine were scratched and beat up, which calls into question not only Bomar's painting techniques and Hamilton's warehousing situation, but also whether or not it would be feasible to expect a painted finish to remain unscathed once in service.
Of course, the bare aluminum oxides some, so the hatch is no longer shiny like in the picture here. And it gets hot in direct sunlight, though rarely is there that much direct and constant sunlight on the hatch, particularly with a dodger. It also warms nicely when running the engine, which comes in handy on those cooler days to keep the driver's feet warm!
Everything is a compromise. But this thing is completely watertight and solid as a rock. A hinged cover might be more convenient, but none of the high-end commercial hatches meant for rough duty have hinges, which obviously points to the inadequacy of hinges at keeping the hatch absolutely watertight. I'm extremely pleased with the hatch and don't regret for a second the expenditure. I also doubt there's a better all-around solution for this location.
---------------------------------------------------
Forum Founder--No Longer Participating
Forum Founder--No Longer Participating
-
bcooke
- Master of the Arcane
- Posts: 2272
- Joined: Sat Oct 04, 2003 10:55 pm
- Boat Name: Jenny
- Boat Type: 1966 Pearson Triton
- Location: Rowley, MA
- Contact:
Another question about that hatch...
First of all, it was with great pleasure that I cut out that big square hole to accept the same hatch that you (Tim) installed. It was a good feeling to look down through the monsterous hole to the propeller shaft and back of the engine and have all that room to work with. No trying to squeeze two hands through a six inch hole for me, no sir!
Before I make the installation permanent I was wondering about recessing the outer ring to avoid toe stubbing. Doing that would mean cutting through the skin, routing out about 1/4 inch of below the level of the sole and attaching the ring directly to the thickened epoxy below. Do you think this would degrade the structural integrity? Am I being overly concerned? I like to run around bare footed on the boat and see the hatch as a possible ouch. Then again, I imagine the bare aluminum gets burning hot in the summer sun (ouch, ouch!) so maybe I am not gaining much from the flush mount and should just keep the installation simple. I could always add a fillet around the ring to smooth things out.
Any thoughts?
-Britton
-
Tim
- Shipwright Extraordinaire
- Posts: 5708
- Joined: Tue Apr 01, 2003 6:39 pm
- Boat Name: Glissando
- Boat Type: Pearson Triton
- Location: Whitefield, ME
- Contact:
Seems like a lot of work for little gain. The hatch only stands 3/16" or maybe 1/4" proud of the deck, and I can say that I have had no trouble with stumbling over the small lip during this season.
Plus, flush-mounting the hatch would require that you build a reinforced lip inside your flush area to accept the flange and fasteners. Possible, of course. But is it worth the effort? My inclination is no.
That said, a flush installation might be nice when all was said and done. I'm just not sure if that's where I would dedicate my time and efforts. I also see it as possibly being inclined towards more leakage potential, as the slight bit the hatch stands proud of the sole does help keep nuisance water away from the opening.
And even though the aluminum gets hot in direct sun, I found that it was rarely a true problem for me.
---------------------------------------------------
Forum Founder--No Longer Participating
Forum Founder--No Longer Participating
-
JonnyBoats
- Candidate for Boat-Obsession Medal
- Posts: 372
- Joined: Fri Feb 04, 2005 4:54 pm
- Location: Wiscasset, ME
- Contact:
Hatch vs scuttle
Looking at that first picture which is oval, that looks like a scuttle to me. Generally a good scuttle will be equiped with a quick-acting release and a hold-back device to hold it open. Often such scuttles are located in a weather deck with a ladder beneth, their purpose to allow someone to exit a compartment below by climbing the latter and passing through the scuttle.
Tim's hatch would appear to have more than one dog (thingie) which needs to be operated in order to open the hatch. This of corse is just fine in this application since it is not intended as an egress route for someone trapped below the cockpit sole ;-)
From my experience, I would not expect a properly installed scuttle to leak. The US Coast Guard has one on the fordeck of each of its 47 ft motor lifeboats which are designed to withstand a 360 degree rollover and continue operating, in fact while not designed to pitchpole, some 47s have in fact pitcpoled in the surf and survived.
Hopefully most of us will not subject our sailboats to the same extremes.
-
Tim
- Shipwright Extraordinaire
- Posts: 5708
- Joined: Tue Apr 01, 2003 6:39 pm
- Boat Name: Glissando
- Boat Type: Pearson Triton
- Location: Whitefield, ME
- Contact:
That's right: when I stuff someone beneath the cockpit sole, it's my intention that they never see the light of day again!JonnyBoats wrote:This of corse is just fine in this application since it is not intended as an egress route for someone trapped below the cockpit sole ;-)
Oops. Too candid, perhaps? Scratch that. I'm kidding. Yeah, that's it...kidding...
---------------------------------------------------
Forum Founder--No Longer Participating
Forum Founder--No Longer Participating
-
Guest
-
A30_John
- Candidate for Boat-Obsession Medal
- Posts: 318
- Joined: Mon Nov 01, 2004 3:46 pm
- Location: Maine
Tim, I'm getting ready to purchase a new hatch to install in the cockpit floor of my A30. I found a Bomar aluminum hatch at Hamilton Marine that I'm interested in buying, and it looks very similar to the one pictured earlier in this post that you installed in Glissando. The one I'm looking at has an inside opening of 15 3/4 x 13 9/16. The price is around $380. It came down to that hatch, or one of the Anchor hatches that require the special wrench to open and tighten. The Bomar seemed more practical and it appeared to seal well.
After using the Bomar hatch for a season or two, would you choose the same hatch again? Or would you suggest looking at other alternatives? With Spring just around the corner, I thought I'd buy the hatch and prepare for surgery.
After using the Bomar hatch for a season or two, would you choose the same hatch again? Or would you suggest looking at other alternatives? With Spring just around the corner, I thought I'd buy the hatch and prepare for surgery.
John
-
Tim
- Shipwright Extraordinaire
- Posts: 5708
- Joined: Tue Apr 01, 2003 6:39 pm
- Boat Name: Glissando
- Boat Type: Pearson Triton
- Location: Whitefield, ME
- Contact:
That sounds like the same thing as I have, only slightly less wide (mine is around 20"-21" on the long dimension).
I've been pleased with the Bomar. I found that it sealed very effectively. I would have no qualms using it again. I also have a small 10" round version that has been a Godsend for accessing my batteries in the cockpit locker. Both hatches are excellent and worth the price.
Spring? What's that?
I've been pleased with the Bomar. I found that it sealed very effectively. I would have no qualms using it again. I also have a small 10" round version that has been a Godsend for accessing my batteries in the cockpit locker. Both hatches are excellent and worth the price.
Spring? What's that?
---------------------------------------------------
Forum Founder--No Longer Participating
Forum Founder--No Longer Participating
-
A30_John
- Candidate for Boat-Obsession Medal
- Posts: 318
- Joined: Mon Nov 01, 2004 3:46 pm
- Location: Maine
Thanks for the report. I'm going to go ahead with it.
I checked and the hatch I'm looking at buying is a slightly different shape. The one I'm looking at is less wide but deeper. I thought those dimensions would assist access to the stuffing box while still allowing adequate access to the sides of the engine.
I checked and the hatch I'm looking at buying is a slightly different shape. The one I'm looking at is less wide but deeper. I thought those dimensions would assist access to the stuffing box while still allowing adequate access to the sides of the engine.
John
-
Tim
- Shipwright Extraordinaire
- Posts: 5708
- Joined: Tue Apr 01, 2003 6:39 pm
- Boat Name: Glissando
- Boat Type: Pearson Triton
- Location: Whitefield, ME
- Contact:
Nope...other than the caulk that naturally spills up and fills the countersinks in the hatch flange (which is rather plentiful, actually...)
This picture shows (if you look really hard) the rings of white caulk around the screwheads. I have to hope that it's sufficient to prevent the worst of whatever possible corrosion there might be; all it really needs to do is prevent the screwheads from seizing to the flange, and I think it will do that quite satisfactorily.
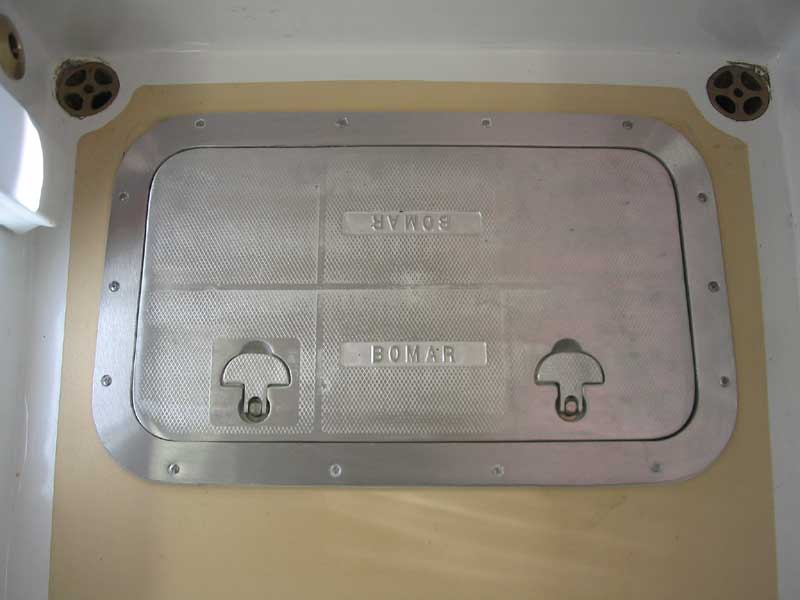
This picture shows (if you look really hard) the rings of white caulk around the screwheads. I have to hope that it's sufficient to prevent the worst of whatever possible corrosion there might be; all it really needs to do is prevent the screwheads from seizing to the flange, and I think it will do that quite satisfactorily.
---------------------------------------------------
Forum Founder--No Longer Participating
Forum Founder--No Longer Participating
-
A30_John
- Candidate for Boat-Obsession Medal
- Posts: 318
- Joined: Mon Nov 01, 2004 3:46 pm
- Location: Maine
Thanks, that seems like a good approach. I ordered the hatch and I'll be picking it up this weekend. I've studied your hatch installation and replacement pages carefully and I'm wondering what tool/s you used to remove the 1/2" of core from around the edge of the hatch before you sealed it with thickened epoxy.
John
-
A30_John
- Candidate for Boat-Obsession Medal
- Posts: 318
- Joined: Mon Nov 01, 2004 3:46 pm
- Location: Maine
Tim, I picked up my hatch yesterday. When the guy brought it out it wasn't packaged in a box and there wasn't any paperwork with it. When I asked if it came with any instructions or a template for cutting the hole, I was told there wasn't anything. Do you recall if there was any documentation with your hatch? I'm surprised there wasn't a parts list or anything with it. Or even a box.
John
-
A30_John
- Candidate for Boat-Obsession Medal
- Posts: 318
- Joined: Mon Nov 01, 2004 3:46 pm
- Location: Maine
Here are some photos of the beginnings of my cockpit hatch installation. Note the layers of glass and masonite in the last picture - it is a cross section of the piece of cockpit sole that was cut out. It took four jigsaw blades to make that cut. The other photos show the access gained to the rear of the engine, the stuffing box, and the seacocks to the cockpit drains... I feel better already.


John
-
A30_John
- Candidate for Boat-Obsession Medal
- Posts: 318
- Joined: Mon Nov 01, 2004 3:46 pm
- Location: Maine
Tim, I read your hatch installation page for Glissando. I'd like to try your technique of drilling to the bottom layer of glass, enlarging the hole, epoxy putty, etc. But I need a drill collar to ensure I don't exceed the depth of the bottom layer of glass. I've checked three places and couldn't find a drill collar to buy. Do you have any suggestions of where to look?
John
-
Tim
- Shipwright Extraordinaire
- Posts: 5708
- Joined: Tue Apr 01, 2003 6:39 pm
- Boat Name: Glissando
- Boat Type: Pearson Triton
- Location: Whitefield, ME
- Contact:
The tape works just fine, and is usually what I do also. I also have a set of simple drill stop collars.
However, here are some links to drill stops and stop collars:
Drill Stops at Jamestown
Adjustable Drill Stop at Woodcraft
Drill Stop Collars at Woodcraft
Drill Stop Collars at Hamilton
Drill Stops at Hamilton
However, here are some links to drill stops and stop collars:
Drill Stops at Jamestown
Adjustable Drill Stop at Woodcraft
Drill Stop Collars at Woodcraft
Drill Stop Collars at Hamilton
Drill Stops at Hamilton
---------------------------------------------------
Forum Founder--No Longer Participating
Forum Founder--No Longer Participating