My old speedo transducer thru hull is 2" OD and the new one is 1.75" OD. I need to do two things to make this work:
1. Remove the old thru hull
2. Reducing the opening size to 1.75"
The hull is solid glass
Any suggestions?
Thanks,
Will Museler
Downsizing an instrument thru hull
-
Figment
- Damned Because It's All Connected
- Posts: 2846
- Joined: Tue Apr 08, 2003 9:32 am
- Boat Name: Triton
- Boat Type: Grand Banks 42
- Location: L.I. Sound
Welcome, Will.
For my money, removal of the old thruhull starts with a big f'ing hammer. If the previous installer was a decent guy who didn't use polyurethane bedding, she'll be free in short order.
If it's bedded in polyurethane adhesive, a few relief cuts with a hacksaw (as though it were a cutless bearing), then it's time for the big fing hammer and a chisel.
Reducing the opening size could go a couple of different ways.
1) Do nothing. Any decent sealant should be able to bridge a 1/8" gap around the perimeter of the new thruhull. (assuming that the penetrated thickness of the hull is greater than 3/8", and that the original hole was not grossly oversized). This approach is the lazy way out, but you wouldn't be the first.
2) Wrap the new thruhull in clear packing tape, slather on some thickened epoxy, and shove it in the hole. After the epoxy has cured, the packing tape should allow the fitting to pop right out of the now perfectly-sized hole. Rough up the inside of the new hole a bit, chamfer the outer edge so the sealant has someplace to bead. Install.
I'm sure others will have other thoughts to add.
-
Mark.Wilme
- Candidate for Boat-Obsession Medal
- Posts: 340
- Joined: Tue Jun 20, 2006 8:35 pm
- Location: MA and RI
I would remove the old fitting (manner of your choosing), completely fill in the old hole using techniques you will find here regarding preparing the opening and then building up the epoxy and mat in layers and then finally drill a new hole of the correct size exactly where you want it and not be bound by the location of the current hole.
Just my 2c
Just my 2c
Mark.
S/V Calypso. 2001 Beneteau Oceanis 381

Not quite a plastic classic yet
S/V Calypso. 2001 Beneteau Oceanis 381
Not quite a plastic classic yet

-
Hirilondë
- Master of the Arcane
- Posts: 1317
- Joined: Thu Dec 28, 2006 8:50 am
- Boat Name: Hirilondë
- Boat Type: 1967 Pearson Renegade
- Location: Charlestown, RI
If the flange of the new through hull and the nut that secures it on the inside are:
1. sufficiently larger than the hole to create a secure physical/mechanical installation
2. are sufficiently large enough to create a secure and waterproof bedded seal
3. and the slop or gap between the old hole and the new fitting can be adequately filled to prevent any future movement
then maybe you can just swap out the fittings.
If not, then the only repair that can be guaranteed safe is a structural glass reinforced repair. Number 8 in Peter's link shows how to make such a repair. There are certainly grey areas between. The question then becomes: Do you feel knowledgable and sure enough to make such decision?
Step one is to remove the old through hull. Only then will you have the needed info to make any decision. Like the article depicts; there are different 'zones'. Below the waterline is certainly a high risk zone and great care should be taken.
A fiberglass reinforced repair is not overly difficult, though it is a bit messy during the grinding/prep phase.
Dave Finnegan
builder of Spindrift 9N #521 'Wingë'
--------------------------------------------------------------------------------------------------------------------------------------------------------------------
Gresham’s Law of information: Bad information drives out good. No matter how long ago a correction for a particular error may have appeared in print or online, it never seems to catch up with the ever-widening distribution of the error.
-
Tim

- Shipwright Extraordinaire
- Posts: 5708
- Joined: Tue Apr 01, 2003 6:39 pm
- Boat Name: Glissando
- Boat Type: Pearson Triton
- Location: Whitefield, ME
- Contact:
There's a big difference between repairing old holes, and simply making them a bit smaller for a new use.
Clean round holes through a hull are not structurally weakening (within reason, obviously). You want to put a new through hull in the same location, which means you're going to end up with a new hole right back in the same place. The only problem is that the new fitting is slightly smaller than the old.
Certainly below-waterline fittings and repair require great care; it's not a place to mess around, do shoddy work, or cut corners. But a clean round hole of this type is not a high-risk structural repair when you plan to reinstall a new through hull in the same location. If you were planning to fill the hole permanently, then a structural fiberglass repair would be called for. The West System guidelines for actual structural repair of holes is a good starting place. However, this doesn't apply in this case.
Since you're going to drill a new hole that's only 1/8"smaller on both sides than the old one, there are other ways to go about this. What I would do is completely fill the hole with thickened epoxy made from epoxy and cabosil. You could use chopped or milled fibers if you wanted too. Cabosil (fumed silica) makes a structural filler mix that is extremely strong. To fill the hole, tape it tightly over the outside (assuming that this is"down"), and fill it from within. The epoxy mix should be quite thick without being overly dry.
Once this repair is cured, simply drill the proper size hole through the center. This is effectively the same repair as what Figment suggested, and you can try it his way too--it'll use a bit less epoxy. I'd rather just fill it and redrill, but the end result is effectively the same.
The new flange will almost certainly cover the perimeter of the old hole, and then some, on both sides. If for some odd reason the new flanges didn't overlap the old hole, it might be wise to lay in a fiberglass patch on the outside, but I can't imagine that being necessary.
Given that the clearance difference will only be 1/8", you could probably get away with just using lots of your chosen sealant, and retaining the old hole. Again, this depends on the size of the flanges on your new fitting. This would work, but I think it's better the other way.
If you feel there's a better location for the new fitting, then you should patch the old hole accordingly. As Mark said, there's no reason to be bound by the old hole, necessarily.
---------------------------------------------------
Forum Founder--No Longer Participating
Forum Founder--No Longer Participating
-
sailman
- Bottom Sanding Grunt
- Posts: 8
- Joined: Tue Dec 19, 2006 4:22 pm
- Location: Portsmouth, RI
- Contact:
Thanks Tim and everyone for your replies. Getting the old thru hull out is obviously the first step and after reading through the suggestions offered it should be fairly straight forward. After it is out I will inspect the condition of the hole and determine which course of action to take from there. I was hoping that I could just wrap the existing unit in wax paper and fill in the annulus with epoxy and coloidial silica.
I will keep you posted. If the weather cooperates this weekend I will pull the old transducer.
Cheers,
Will Museler
I will keep you posted. If the weather cooperates this weekend I will pull the old transducer.
Cheers,
Will Museler
-
Mark.Wilme
- Candidate for Boat-Obsession Medal
- Posts: 340
- Joined: Tue Jun 20, 2006 8:35 pm
- Location: MA and RI

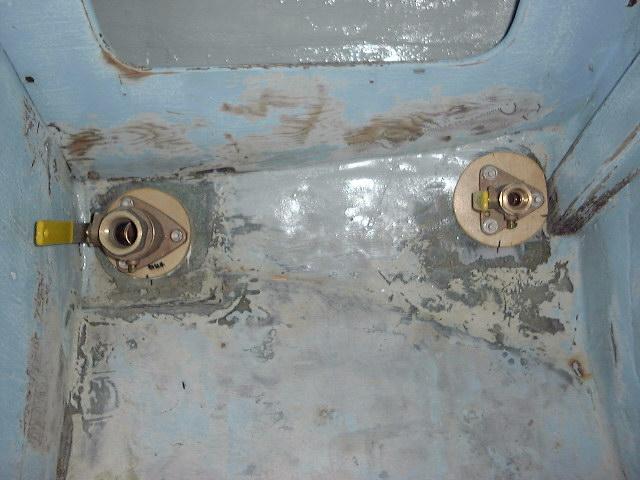
I'm installing new through-hulls and real seacocks, and I think I'm going to do some rearranging in the head. Currently, the intake hole (all that's left :-), is in the inboard/after end of the space (under the toilet platform), and the discharge is forward and outboard. Here you can see where the holes are by looking at the blue tape patches. (The intake shows up as just a small blue spot - you're looking down through a hole in the platform where the hose used to come through:

While this places the intake miles below the waterline (I would be able to flush even in a knockdown ;-), it makes installation of a real seacock awkward, because in order to have good clearance for the lever to operate, it would either need to protrude slightly into the passageway, in front of the board trimming the shelf, or I'd have to cut a big piece out of the toilet platform. Here's a view looking in from the passageway (facing to port) at the old valve and part of the fiddle on the toilet shelf. This is what's directly below the "blue spot" on the left of the above photo. It's not nearly so roomy in there if I hold my new, 3/4" seacock in place.

Not as big a deal, but still annoying, is that the discharge is above and forward of the intake. If I do plumb a head to pump overboard (in future), it would likely be a Lavac, which does take in water as you flush.
Looking at Tim's website for the rebuild of Glissando, I see that the Triton seacocks (at least on one Triton), were both installed behind (outboard) of the toilet. This would make my installation - and future seacock operation - much easier, assuming there isn't a major annoyance caused by having the intake seacock that much closer to the waterline.
I don't plan to put in a discharge through hull right now (I'm on the Chesapeake, and currently the boat has plumbing only to a holding tank, which will serve fine for now), but what I'm thinking is that I could move the intake through hull to (or near to) the hole that used to serve as a discharge; and then a potential future discharge could go where the Glissando one is, which is in the same plane, but at the after end of the compartment.
If I were to fill and re-drill the old discharge hole, I could probably move the intake an inch, or maybe two, lower in the hull, but really the current location is pretty good. So, my question (yes, I'm getting to it - drumroll!) is about whether the above-mentioned "fill it with a colloidial silica/epoxy mix and then redrill in the center at the new size" technique would work to convert a 1-1/4" hole to a 3/4" one. Is 1/4" gap all-around too much for this? I suppose I could go with a 1" through-hull just as easily (now THAT sounds lazy), but chose 3/4" because that looked like the common size for toilet intakes.
Any comments about my new placement(s) idea are welcome, too. By the way, I don't plan to use this particular toilet, so the specific locations of the hose inlets, flush handle, etc. on this unit won't be considered in my decisions.
Thanks,
Rachel
While this places the intake miles below the waterline (I would be able to flush even in a knockdown ;-), it makes installation of a real seacock awkward, because in order to have good clearance for the lever to operate, it would either need to protrude slightly into the passageway, in front of the board trimming the shelf, or I'd have to cut a big piece out of the toilet platform. Here's a view looking in from the passageway (facing to port) at the old valve and part of the fiddle on the toilet shelf. This is what's directly below the "blue spot" on the left of the above photo. It's not nearly so roomy in there if I hold my new, 3/4" seacock in place.
Not as big a deal, but still annoying, is that the discharge is above and forward of the intake. If I do plumb a head to pump overboard (in future), it would likely be a Lavac, which does take in water as you flush.
Looking at Tim's website for the rebuild of Glissando, I see that the Triton seacocks (at least on one Triton), were both installed behind (outboard) of the toilet. This would make my installation - and future seacock operation - much easier, assuming there isn't a major annoyance caused by having the intake seacock that much closer to the waterline.
I don't plan to put in a discharge through hull right now (I'm on the Chesapeake, and currently the boat has plumbing only to a holding tank, which will serve fine for now), but what I'm thinking is that I could move the intake through hull to (or near to) the hole that used to serve as a discharge; and then a potential future discharge could go where the Glissando one is, which is in the same plane, but at the after end of the compartment.
If I were to fill and re-drill the old discharge hole, I could probably move the intake an inch, or maybe two, lower in the hull, but really the current location is pretty good. So, my question (yes, I'm getting to it - drumroll!) is about whether the above-mentioned "fill it with a colloidial silica/epoxy mix and then redrill in the center at the new size" technique would work to convert a 1-1/4" hole to a 3/4" one. Is 1/4" gap all-around too much for this? I suppose I could go with a 1" through-hull just as easily (now THAT sounds lazy), but chose 3/4" because that looked like the common size for toilet intakes.
Any comments about my new placement(s) idea are welcome, too. By the way, I don't plan to use this particular toilet, so the specific locations of the hose inlets, flush handle, etc. on this unit won't be considered in my decisions.
Thanks,
Rachel
-
catamount

- Candidate for Boat-Obsession Medal
- Posts: 378
- Joined: Sun Jun 19, 2005 7:30 am
- Boat Name: GREYHAWK
- Boat Type: Peterson 34
- Location: Boothbay Harbor, ME
- Contact:
My inclination is to say, no, just the thickened epoxy is not going to be enough in this instance -- you're going to want some real fiberglass reinforcement there. Either that or a really big flange on your thru-hull, to span the original opening and then some on the outside of the hull, plus a big and well-secured fiberglass/G10 backing plate spanning the original opening on the inside of the hull.Rachel wrote:So, my question (yes, I'm getting to it - drumroll!) is about whether the above-mentioned "fill it with a colloidial silica/epoxy mix and then redrill in the center at the new size" technique would work to convert a 1-1/4" hole to a 3/4" one. Is 1/4" gap all-around too much for this? I suppose I could go with a 1" through-hull just as easily (now THAT sounds lazy), but chose 3/4" because that looked like the common size for toilet intakes.
Tim Allen -- 1980 Peterson 34 GREYHAWK
Harborfields Housekeeping Cottages, West Boothbay Harbor, Maine
Sailors for the Sea, a new voice for ocean conservation
Harborfields Housekeeping Cottages, West Boothbay Harbor, Maine
Sailors for the Sea, a new voice for ocean conservation
-
Hirilondë
- Master of the Arcane
- Posts: 1317
- Joined: Thu Dec 28, 2006 8:50 am
- Boat Name: Hirilondë
- Boat Type: 1967 Pearson Renegade
- Location: Charlestown, RI
Laziness certainly has its place. If the location works and using a 1" through hull means you can avoid a lot of work and/or any grinding it would surely be a consideration of mine. Key questions to ask are.......Rachel wrote:I suppose I could go with a 1" through-hull just as easily (now THAT sounds lazy), but chose 3/4" because that looked like the common size for toilet intakes.
1. Is it safe?
2. Does it work well?
3. Does it configure in with all other systems' hoses?
I am never afraid of the work needed in doing it right, but I don't look for extra work either.
Dave Finnegan
builder of Spindrift 9N #521 'Wingë'
--------------------------------------------------------------------------------------------------------------------------------------------------------------------
Gresham’s Law of information: Bad information drives out good. No matter how long ago a correction for a particular error may have appeared in print or online, it never seems to catch up with the ever-widening distribution of the error.
builder of Spindrift 9N #521 'Wingë'
--------------------------------------------------------------------------------------------------------------------------------------------------------------------
Gresham’s Law of information: Bad information drives out good. No matter how long ago a correction for a particular error may have appeared in print or online, it never seems to catch up with the ever-widening distribution of the error.
-
Tim
- Shipwright Extraordinaire
- Posts: 5708
- Joined: Tue Apr 01, 2003 6:39 pm
- Boat Name: Glissando
- Boat Type: Pearson Triton
- Location: Whitefield, ME
- Contact:
It's so simple to fill and repair the old hole properly that it doesn't even seem like a question to me. Just do it, and then you're free to move your new intake somewhere else if you choose...or to reinstall it in the same place if it seems better. Either way, you'll know you did it right, rather than ever question the installation.
You can accomplish this work in a single day if you apply curing heat to the epoxy to speed things along. The total actual working time (not including cure time) might be one hour.
1. Tape outside of hole
2. Fill (from inside) with silica-thickened epoxy. Let cure. (judicious application of heat if necessary, though the fill will likely heat on its own)
3. Grind appropriately-sized circular dish on exterior of hull to allow sufficient bearing surface for new fiberglass reinforcement. A 4" diameter circle is sufficient, and the depression needs only to be deep enough in the center to contain your desired number of fiberglass layers. I'd suggest three layers of 1708.
4. Cut and install your fiberglass. Let cure, grind, fill as desired. (use heat to speed along, if desired.)
5. If it makes you feel better, you can add fiberglass to the inside of the patch too, but it's not really necessary.
I don't know where those fittings fall relative to the waterline on your A-30, but the ones outboard of the head on a Triton are well below the waterline. If your location is similar, you'd be well served to reconfigure the seacocks in a manner similar to the Triton for better access.
---------------------------------------------------
Forum Founder--No Longer Participating
Forum Founder--No Longer Participating
Thanks for the replies.
I have two other holes to close off, so I'll be in the mode anyway, and I'll probably glass over and re-drill. I suppose if I start the other two and it seems particularly difficult for me, I might up-size the seacock on this one, but I'll try the filling procedure first.
I'm not in a particular rush (meaning, if it takes a few days that's okay), but I do have a question about the grinding-of-the-hole step. I've got the Porter Cable 5" DA sander and the fun discs from McMaster-Carr. My question is, how do you start the thing? What I mean is, do you just put the sander in the center and go to it, keeping it level? Do you start at one side and work your way in? How do you keep track of how deep you're going? I have this fear of suddenly sanding a huge hole into my boat, and then having to add a bow thruster or something to fill it ;-) I could use one of those junker e-Bay boats to practice on.
And yes, if I put the through-hulls outboard and "above" the toilet, they will still be well below the waterline, though I could conceive of the intake sucking air when really heeled. I still like the location better. (As a point of reference, they would be very similar to the locations on Glissando, as in this photo of her.)
Rachel
-
Figment
- Damned Because It's All Connected
- Posts: 2846
- Joined: Tue Apr 08, 2003 9:32 am
- Boat Name: Triton
- Boat Type: Grand Banks 42
- Location: L.I. Sound
If the boat is heeled that far to the opposite side (starboard, I assume), use of the head will be near impossible anyway. Unless you install some sort of seat belt or other restraint. Now THERE's a topic just waiting to be explored!
Just start grinding. The nuance of moving and angling the grinder to create the "dish" is completely intuitive. The layers of cloth in the existing layup will indicate how deep you're digging. Stop when you've cut through the second layer. (just a rule of thumb)
Just start grinding. The nuance of moving and angling the grinder to create the "dish" is completely intuitive. The layers of cloth in the existing layup will indicate how deep you're digging. Stop when you've cut through the second layer. (just a rule of thumb)
-
Tim
- Shipwright Extraordinaire
- Posts: 5708
- Joined: Tue Apr 01, 2003 6:39 pm
- Boat Name: Glissando
- Boat Type: Pearson Triton
- Location: Whitefield, ME
- Contact:
Sometimes, just doing whatever process is the best means of understanding.
The dishing is intuitive and easy to do using a slight angle on the sander pad and plenty of pressure. Start light, and you'll soon get the feel. Fiberglass doesn't sand so easily that you'll create serious problems before you become aware.
The dishing is intuitive and easy to do using a slight angle on the sander pad and plenty of pressure. Start light, and you'll soon get the feel. Fiberglass doesn't sand so easily that you'll create serious problems before you become aware.
---------------------------------------------------
Forum Founder--No Longer Participating
Forum Founder--No Longer Participating
-
fusto
- Master Varnisher
- Posts: 109
- Joined: Sun Aug 13, 2006 9:49 pm
- Boat Name: Erebus
- Boat Type: Apollo 16
- Location: Adams, MA
Heres a pic of the "whoopee bar" that Bruce Schwab has installed on his Open 60 Ocean Planet. Guess it makes it easier for him to use his carbon fiber toilet in rough seas.Figment wrote:Unless you install some sort of seat belt or other restraint. Now THERE's a topic just waiting to be explored!
I wonder if thats a stock Jabsco toilet?
Maybe it comes in solid gold too. I suppose then you'd lose all your weight savings though.
$-)

I apologize for the digression.
We now return you to your regularly scheduled thread already in progress...
Zachary
Adams, MA
Adams, MA
So, I'm in the process of filling in the holes left over from removing three through-hulls (one will be replaced but with a smaller size).
I basically followed the instructions Tim laid out above. I started by grinding the hull on the inside just to remove the paint. Then I cleaned out the holes with sandpaper (there was Dolfinite in them) back to plain glass, and wiped them down good with acetone.
Next, I taped over the outside, and then filled the holes from the inside with a "stiff" epoxy resin/colloidial silica mixture and let that cure. Then I suited up and loaded my new Porter Cable DA sander with one of the 40-grit discs from McMaster Carr.
At first I found the thing really hard to control - it was like a drunken sander. Then I noticed that the variable speed control (I couldn't find it when I was looking for it prior to starting and thought maybe mine was single speed) was on the slowest speed. I cranked it up and it became very controllable.
Now maybe this is just because I'm not particularly brawny, and also was grinding in an "up" direction, but I couldn't make much headway. I will say that what I did sand was perfectly round and neat, and I can see how someone with a bit more oomph would find this very controllable and nice to use, but my shoulders gave out before I got too far. I stopped that first night at this point:

Last night I came back to it with a borrowed Makita 4" grinder (also with a 40-grit disc - I'd bought one of the flap discs, but this was already on it and the person who lent me the tool suggested I try it, so I did). Wow, that cut like butter! Minnesota butter in winter, but butter nonetheless. Definitely not as smooth and precise as the sander - and I'm sure I'll love the sander for other applications - but it did cut material, and didn't tire my arms out.
However, now I've come to a point where I need some advice, and that has to do with how deep to go. I'm at step 3 at this point:
I have photos of where my "dishes" are now, but not web-hosted yet -- I'll post them as soon as I can. For now, I'll try to describe it: I went through the first layer(s), which had short lenths of glass fiber in them (mat?), and got down to what looks to me like woven roving. On two of the holes I stopped there, although on the third I went through what looks like 3 (?) rings of roving. I think my hull is about 3/8" thick. On the inside of the boat, the final layer is definitely roving.
The dishes do have a definite sunken-ness to their centers, yet when I put a straight edge across they don't look all that deep...
R.
I basically followed the instructions Tim laid out above. I started by grinding the hull on the inside just to remove the paint. Then I cleaned out the holes with sandpaper (there was Dolfinite in them) back to plain glass, and wiped them down good with acetone.
Next, I taped over the outside, and then filled the holes from the inside with a "stiff" epoxy resin/colloidial silica mixture and let that cure. Then I suited up and loaded my new Porter Cable DA sander with one of the 40-grit discs from McMaster Carr.
At first I found the thing really hard to control - it was like a drunken sander. Then I noticed that the variable speed control (I couldn't find it when I was looking for it prior to starting and thought maybe mine was single speed) was on the slowest speed. I cranked it up and it became very controllable.
Now maybe this is just because I'm not particularly brawny, and also was grinding in an "up" direction, but I couldn't make much headway. I will say that what I did sand was perfectly round and neat, and I can see how someone with a bit more oomph would find this very controllable and nice to use, but my shoulders gave out before I got too far. I stopped that first night at this point:
Last night I came back to it with a borrowed Makita 4" grinder (also with a 40-grit disc - I'd bought one of the flap discs, but this was already on it and the person who lent me the tool suggested I try it, so I did). Wow, that cut like butter! Minnesota butter in winter, but butter nonetheless. Definitely not as smooth and precise as the sander - and I'm sure I'll love the sander for other applications - but it did cut material, and didn't tire my arms out.
However, now I've come to a point where I need some advice, and that has to do with how deep to go. I'm at step 3 at this point:
I figure there are two factors: How deep I can go without breaking through to the inside of the boat? And, how deep I need to make the dish so that it will hold three layers of biaxmat 1708? Just how thick are those three layers, when they're wet out and placed in the patch area?Tim wrote: 3. Grind appropriately-sized circular dish on exterior of hull to allow sufficient bearing surface for new fiberglass reinforcement. A 4" diameter circle is sufficient, and the depression needs only to be deep enough in the center to contain your desired number of fiberglass layers. I'd suggest three layers of 1708.
I have photos of where my "dishes" are now, but not web-hosted yet -- I'll post them as soon as I can. For now, I'll try to describe it: I went through the first layer(s), which had short lenths of glass fiber in them (mat?), and got down to what looks to me like woven roving. On two of the holes I stopped there, although on the third I went through what looks like 3 (?) rings of roving. I think my hull is about 3/8" thick. On the inside of the boat, the final layer is definitely roving.
The dishes do have a definite sunken-ness to their centers, yet when I put a straight edge across they don't look all that deep...
R.
-
Ceasar Choppy

- Boat Obsession Medal Finalist
- Posts: 622
- Joined: Thu Mar 09, 2006 11:05 am
- Location: Port Starboard, MD
From the looks of it, you have more to go.
Try laying in a piece of the mat/glass into the dimple you made to estimate how much more you want to go. If it is only 3/8" thick, maybe consider reducing the number of layers. Otherwise, you probably need to lay into that grinder some more. If you go through, it is no big deal since the mat/glass will cover just fine.
One thing to remember though. Make sure you start with the large pieces of mat/glass in the dimple first and go progressively smaller to the outside. That way when you fair, you won't tear up the integrity of the bigger pieces of glass.
Usually when I fill holes like these, I grind the bowl on both side and lay the glass on both sides. Tim's method is a lot less dust in the bilge though.
-
Tim
- Shipwright Extraordinaire
- Posts: 5708
- Joined: Tue Apr 01, 2003 6:39 pm
- Boat Name: Glissando
- Boat Type: Pearson Triton
- Location: Whitefield, ME
- Contact:
If you grind through your hull, you've ground too much for the repair you're making in this instance. But you're not about to grind through the hull, even if it's "only" 3/8" thick.
3 layers of 1708 is about 3/16 - 1/4" of material when installed. So the center point of your dish need not be any deeper than 1/4". What you're looking for is a flat-ish area in the center that's at maximum depth (not flat, just flat-ish) and a smooth, consistent, and gradual taper out to nothing. For a 1-1/2" through hull hole, I'd say the outer diameter of your dish will end up being 6" or thereabouts.
Stack up three dry layers of the material to get a rough idea of the finished thickness. This will give you a close enough idea to work from. If you really want to know more specifically, if only for your peace of mind, then wet out and laminate three scrap pieces on a piece of plastic or wax paper and let it cure. If you saw through one side when it's cured, you can measure the thickness. I don't think you have to go this far, but it might be instructive for you nonetheless, and all for the cost of a couple ounces resin and some scrap material.
Ideally, the center of the glassed hole will end up just barely lower than the surrounding boat. This way, you end up removing the least amount of reinforcing material (cloth) when you grind and fair, but don't need excess amounts of fairing compound either.
Also ideally, the three layers of material will allow the thickness to drop off correspondingly as you move away from the center, and correspond nicely with the depth of the ground taper. The largest piece, which you install first in this case, should be just a little smaller in diameter than your ground area; otherwise you'll have to grind off the overlap anyway. So grind a 6" (for example) dish and make your first circle 5"+, so that you have a little space.
If you don't get it perfect on these first attempts, don't worry about it. You are filling basic, structurally sound holes (round drilled holes in a hull don't really affect the structure at all, other than the obvious problem of allowing water in if not filled), and your reinforcement is really only to ensure that the epoxy plug in the center is absolutely secure. All these repairs to your existing through hull holes are doing is keeping the water out; technically you don't need the structure.
It doesn't hurt to glass over the inside too, but in this case it's not necessary from a structural standpoint, nor from a water intrusion standpoint. Again, this refers specifically to your through hull job, and not to all potential boat repairs in general. Often, glassing from both sides is not only prudent but necessary, but here it's not a requirement. Do it if you want. Also, on the inside, clean round dishes are often less critical, since there's not necessarily a need to fair in the surface cleanly. So reinforcement laid directly over the inside of the properly prepared hole and hull will work fine if you don't mind seeing the patch. (Not to suggest that the repair shouldn't be as neat and attractive on the inside as possible too, but it's still different from the otherwise fair outside of the hull.)
Now, with the sander. Your DA will function a lot like a grinder if you tip the pad slightly on edge. Holding the pad flat is critical for a lot of sanding uses, but when you need to remove stock, coarse paper and using the edge of the pad will work wonders. I grind all my hole-patching dishes in this way.
I almost never turn to a grinder, since I find the DA to be so versatile in this way. It's a lot more controllable, even when tipped on edge, than any grinder, too, and while it's possible to overgrind and cause waviness, unfairness, or other damage, it is much harder to really screw up than it is with an aggressive circular grinder. Way too much damage has been done to boats with grinders in inexperienced hands to recommend them as a general rule, though they have an occasional place.
From my "sneak preview" of the latest photos (which you'll be posting here shortly after I get them online), you need to create a more gradual taper from the center of your holes out to the edges. I think you're about deep enough based on the number of roving rings you've gone through, since roughly one roving ring equals one layer of 1708 for this purpose.
There should be more space between each of those "rings" of roving that you've ground through--that is, if the angle of the taper is more gradual, then those rings will move correspondingly outward from the center, and have more distance between them. Use your DA for this; the grinder got you the depth you needed in the center
---------------------------------------------------
Forum Founder--No Longer Participating
Forum Founder--No Longer Participating
My original post was perhaps confusing, photo-wise. That photo was my initial attempt with the DA sander. I probably should have waited to post until I had the "grinder" photos up, but I'm eager to get cracking, so I posted last night.Ceasar Choppy wrote:From the looks of it, you have more to go.
I'll post the current photos here now; I think it will follow along with the thread more logically. Here's how the "dishes" stand now, post-grinding:


I need to get a bit bolder on this one:

A lame attempt to check depth with a straight-edge, using materials lying in the yard near my boat. This makes it look really shallow, but then it sounds like three layers of the biaxmat will wet out to be thinner than I was imagining. It seems so thick when it's dry and on the roll.

Thanks for the tip on it being okay to tilt the DA sander to make it a bit more aggressive. I wasn't sure if that would harm the pad, so although I was tempted, I didn't. I think I'll grind a tad more on that last dish (that does not show the roving in the center), and then finish them up as you suggested with the DA sander.
I know that some of you must be thinking "Okay already, just GRIND the suckers!" But it's a bit intimidating for me at first. It's a skill I'd like to possess though, so I wanted to tackle it myself. This forum makes it doable.
Here's a shot that shows the hull thickness. This is the galley sink drain, where I'm putting in a new through-hull and seacock, so there's hull (white), then thickened epoxy (greyish), and then a fiberglass backing block (red).

Same area on the inside. Next to the backing block is one of the holes I'm filling, which was for a galley saltwater intake.

Slightly tangential, but new cockpit drains in progress. For now, I rigged up the clear hoses to my (now too short) original drain hoses, and they just run out through the holes. I was glad to have photos of the old ones in place next to the engine as I realized that I had to consider that before orienting the handles on the new seacocks - of course with the old gate valves there was no change in size since when they are operated the handle just spins in place, like a household garden-hose spigot.

Rachel
-
Ceasar Choppy
- Boat Obsession Medal Finalist
- Posts: 622
- Joined: Thu Mar 09, 2006 11:05 am
- Location: Port Starboard, MD

-
Ceasar Choppy
- Boat Obsession Medal Finalist
- Posts: 622
- Joined: Thu Mar 09, 2006 11:05 am
- Location: Port Starboard, MD
-
dasein668
- Boateg
- Posts: 1637
- Joined: Thu Apr 03, 2003 9:09 am
- Boat Name: Dasein
- Boat Type: Pearson Triton 668
- Location: Portland, Maine
- Contact:
Geez, Rachel, did you use a router on the roundover for those backing blocks or what? They look perfect!
Nathan
dasein668.com
dasein668.com
I am going to paint the backing blocks when I do the rest of the painting - with Bilgekote. As others have, I'll use some ratio of grey/white mixture for the color, as I don't want white, but find the (new) gray too dark. The red is kind of neat though, isn't it.
The backing blocks are cut from pre-made FRP board (3/4" electrical grade) from McMaster-Carr. They were cut out with a hole-saw and then the edges rounded over on a table router. I had to give most of the "style points" to one of my co-workers who did the routing. Next time I'll try to do that part, as I'd like to add that to my "tools I can use" list.
I did get to add two new tools to my list on this job though, a tap and the grinder. (I tapped the holes for the bronze lag bolts that will fasten the seacock to the backer block.) Knowledge is good!
Rachel
I dredged this thread up to post a link to it for Steve'O, so as long as I did let me add an update:
I did get all three of the through-hull holes patched successfully, then faired and barrier-coated (the rest of the hull was barrier-coated when I got the boat, so I was just replacing it to be consistent).
I did make one rookie mistake, although it was not hard to correct. That is that when I was using a straight-edge to try to see how deep to go to make room for my new layers, I forgot to take the outward curvature of the hull into account (this happened to be at the "chine"). So I was grinding along when all of a sudden there were holes in the "hollows" of the woven roving. That I could see through. "Oh, hello, there's the head but I'm standing outside the boat." Oopsie!
I stopped in time to leave enough material to support my new layers (I added extra), and, since this was the hole I was downsizing and moving over (but only slightly), I was able to see how my patch looked because th new hole went slightly through my patched area. All looked well, with good thickness and saturation, and in addition much of it was behind the new FRP backing block for the new seacock, which has been installed.
(Since I had to fill-and-re-drill anyway, I moved the head intake so that the handle of seacock does not protrude into passageway and also so that it is not downstream of the discharge as it was from the builder.)
By the end of the process the using the grinder felt pretty "normal."
Thanks again for the help.
Rachel
-
Steve'O
- Bottom Paint Application Technician
- Posts: 24
- Joined: Mon Apr 21, 2008 3:59 pm
- Location: NY/NJ
Rachel thanks this is exactly what I was looking for. So in summary I grind down enough fibregalss to allow for three layers of 1708 material. The "dish" diameter should be about 6-inches. The first cloth diameter is about 5 or so inches. What size circles did you make the next two layers? I'm thinking to go down an inch on each layer so 5,4 then 3-inch circles? Followed by fairing and barrier coats.
That's about what I did, size-wise. Mine might have been a bit less than an inch smaller each time. I made a paper pattern since my "circles" didn't end up being completely circular, then traced it onto the cloth with a black magic-marker. Then I just cut some off the pattern, traced another circle, etc. I was cutting for three holes together so I marked them to keep them all identified.
I had read where it can be a good idea to finish off with a layer of "regular" cloth - say 6-10 oz - to smooth things out, but on the one hole I tried this on I ended up getting air behind that last layer, and I had to go back and cut some of that top piece out before I started to fair. I left it off on the other two and then just faired right over the biax which worked fine. I wasn't too worried because they were beneath the waterline, but they came out nice and smooth. I'm not condemning the "final layer of cloth" method though; I'm sure more experienced fiberglassers can make it work. I put mine on all at once (three layers of biax then the one of cloth); not sure if that's how others do it.
The barrier coat was only because the whole boat was already barrier coated when I bought it, and I wanted to keep it consistent.
Also, if you use microballoons to fair, you should probably put a layer of "neat" epoxy on over it to seal it (not sure if you need to do this if you are barrier coating, but it can't hurt). Also, be sure to rinse off any amine blush after the epoxy cures but before you paint, or its waxiness will prevent proper adhesion.
Rachel